Showing posts with label gears. Show all posts

Thursday, October 1, 2020

Steampunk Bon Voyage Card

Hello BPM Fans! I am enjoying this month's Steampunk challenge since this is a new style for me. I really love being able to put my Distress Inks to use. I love inking and blending with different colors. Today I am sharing a very simple Steampunk card that you can complete in less than an hour! Try making this card and you can enter it in our monthly challenge for a prize! 


Supplies:

  • Blank Page Muse Stamps: Steampunk Gear Cluster and World MapHot Air Balloon Steampunk
  • Distress Ink: Vintage Photo, Old Paper, Antique Linen
  • Ink Blending Tool
  • Cream colored Kraft cardstock or regular cardstock, cut to A2 size card (base card)
  • White cardstock
  • Patterned paper with a travel theme, 4” x 5.25” (I used Graphic 45, Cityscapes Collection, Map the Past)
  • Black ink pad
  • Stamp positioner or stamping block
  • Sentiment (I used Bon Voyage, you can use anything you like)
  • Gears and cogs die cuts (Please see my September 26, 2020Blog post to see how to make them)
  • Adhesive foam squares or dots
  • Your favorite glue/adhesive

 Instructions:

Distress ink the edges of the base card with Vintage Photo.


Distress ink the patterned paper using Old Paper in the center and use Vintage Photo on the edges.


Stamp the hot air balloon stamp on white cardstock and fussy cut. Distress ink blend the hot air balloon using Antique Linen in the center and Vintage Photo on the edges.


Stamp the Steampunk Gear Cluster stamp onto the patterned paper.


Stamp or print a sentiment and distress ink the center with Old Paper and use Vintage Photo on the edges. Adhere to the patterned paper. I typed my sentiment in Microsoft Word and printed it on white cardstock.


Adhere the gears and cogs die cuts onto the patterned paper. Adhere the hot air balloon using adhesive foam dots or squares. Your card is done! 


I hope you enjoyed this tutorial. It's an easy card you can make and mass produce.  Have a great week! If you have any questions, please leave them in the comments below. Thank you for stopping by. 
Betty


Looking for more Inspiration? Click the links below!
The Blank Page Muse Shop https://blankpagemuse.com/
FB Fan Page https://www.facebook.com/groups/bla...
Instagram - Shop https://www.instagram.com/blankpage...
Instagram - Blog https://www.instagram.com/blankpage...
Twitter https://twitter.com/BlankPageMuse
Pinterest https://www.pinterest.com/blankpage...


Tuesday, May 21, 2019

Steampunk Hummingbird Card

Hi Friends,
To create more depth for the background I used different color inks with the same stamp. This allowed me to stretch my supplies. Let's create something a bit masculine and get a bit grungy!

BPM Stamps:
Cogs & Gears Steampunk Background Rubber Stamp
Hummingbird Steampunk Cogs Gears Stamp

Chicken Wire Mesh Background Texture Art Rubber Stamp by Pam Bray Designs


Shop now and save! Use code "BPMDtKaren2019" to save %15 off your total order!

Other Supplies:
ink pads (aqua / silver / black), ink blending tool, card stock (black & aqua), mini brads, black marker, gear embellishment, black twine, clear mounting block, card base (5X7")

Directions:
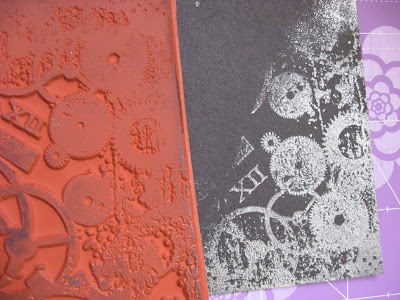
1. Selectively apply silver ink to only the corner of the gear background stamp. To avoid leaving a harsh line, blot the edges of the loaded stamp with a tissue to remove some of the ink so that the intensity of the image gradually fades. Stamp the impression onto the corner of black card stock. Repeat process with other corner and set aside to dry.

2. Load the entire gear stamp with aqua ink and stamp directly to aqua paper. Load the same gear stamp with black ink and first stamp onto scrap paper. The first impression will not be used. Stamp the second generation impression in the corner overlapping the first layer of aqua stamping. The image will be lighter and create a more distressed irregular appearance. Add a honeycomb texture stamp randomly to the background using aqua ink.  Create more depth to the design by using more than one color of ink.  Use an ink blending tool to gently apply black ink to the edges to create a misty haze. Set aside to dry.
 

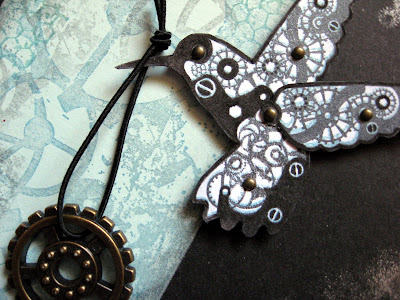
3. Create the embellishment by stamping the steampunk hummingbird onto white card stock using aqua ink. Reload the stamp with black ink and stamp over the first design doing your best to align the images. A perfect line up is not required because you want some of the aqua impression to peek out adding the appearance of more depth to the gears. Repeat the process to create another wing for the hummingbird.

4.  Carefully, cut out the hummingbirds, assemble the second wing, and add mini brads to some of the gears. Use a black marker to outline the hummingbird and darken any important details.

5. Adhere the black card stock vertically to the right side of the card base. Attach the aqua card stock to the left side of the card base leaving a narrow border of black. Add the completed hummingbird to the center of the card with foam tape.

6. Add a loop of twine to a gear embellishment and hook it around the beak of the hummingbird so that it appears as if the hummingbird is carrying the gear.

            Blank Page Muse Shop http://blankpagemuse.com/
            Facebook Fan Page https://www.facebook.com/groups/bla...
            Instagram - Shop https://www.instagram.com/blankpage...
            Instagram - Blog https://www.instagram.com/blankpage...
            Twitter https://twitter.com/BlankPageMuse
            Pinterest https://www.pinterest.com/blankpage...
To see more of Karen's projects, visit her blog Art & Soul.

Sunday, May 19, 2019

Happy Father’s Day card

Hello there all our fellow BPM fans! Jess here with you sharing a card using some of those famous red rubber stamps!! This time it's a different masculine take on Father's Day. I just love this stamp set by Kate Leitch! Come along, let's craft a unique Father's Day card together!

Products used:
Spectrum Noir: Watercolor paper
7 Dots Studio: Hazy Days
Prima Marketing Inc. Junkyard Findings: Lightbulb
Ranger Ink: Archival Black ink
Hobby Lobby: Wooden gears
American Crafts: Sticky Thumb - foam dots
Black and White gesso
(Shop now and save! Use code BPMDtJessica2019 to save %15 off your total order!)

I am in LOVE with this stamp sheet! The possibilities are endless!!
1. Cut your desired card size
Do you like using up scraps in your stash? Well, here's your chance
Pull out some of your paper scraps
2. Begin by cutting them at different lengths and sizes
3. Stamp and cut out your images using black ink

4. Take some large pieces of scrap paper and mount the two larger stamped images onto them
5. Cut them out leaving a thin boarder around the images
6. Start mounting your paper layers using tape

7. Use some foam dots or cardboard pieces to mount your top layer of stamped images


8. Adorn the card with some wooden gears adhering them with tacky glue
9. Finally, splatter the front of the card with watered down white and black gesso

You have finished your card! 
Here are some close-ups for you to enjoy!


Thank you for stopping by today!
We look forward to seeing you next time!

Visit and follow us for more inspiration:

Thursday, May 9, 2019

Steampunk Gentleman Collage

Hello, so glad you stopped by! For the Steampunk theme this month, I wanted to use some recycled items.  The Steampunk theme stretched my creativity because I am not really into it but wanted to play around and see what I could do with images and gears. Here is a teaser close up of the embellishments used on the collage.


Supplies
Word stencil
Gears and other embellishments
Spackling
Drywall tape
Cardboard box
Acrylic paint – teal and brown
Gesso
Gel medium
Brushes and water
Washi tape

Take a cardboard box and tear off one of the flaps then tear down to approximately 6”x6” for the base of your collage. Tear off some of the “covering”; you want the ribs of the cardboard to show. Water down some gesso and lightly run it over the cardboard panel, let dry. Using the Background Grunge and Hearty Doodles stamps, add some texture to areas that are not torn off the front of the panel. 


Then cover cardboard with gel medium to seal it over. Using the word stencil and spackling, add some words along the edges of the cardboard panel and other interesting shapes, let dry completely. When spackling is dry, gently brush teal paint over the spackling.


Glue down some drywall tape on one side and using teal and brown paint light brush over the front of the panel. This will tone down the teal and create some areas that look rusty.

Now, you are ready to place the embellishments and focal point. Stamp the Vintage Steampunk Gentleman three times onto watercolor paper and using watered down teal paint, paint over the image and let dry. Seal with gel medium, let dry.

Using gears, buttons, keys and other assorted pieces, place them on the collage using tacky glue and foam tape for dimension. Add some washi tape near the bottom of the collage and glue down the Steampunk Gentlemen. 


The Blank Page Muse- https://blankpagemuse.com/


Friday, September 21, 2018

Mechanical Bird Card

Welcome to my bright and colorful semi-steampunk card. I love the look of gears and the mechanical bird image but I'm not always a fan of the dark and dreary colors that are typical of steampunk....so I opted for a non-traditional mix of colors.  I used three distress inks: lime, cranberry, and purple.
Mechanical Bird Card

Blank Page Muse Stamps:
Birds & Clocks Rubber Stamp Set
Cogs & Gears Steampunk Background Rubber Stamp
Metal Screw profile view Art Rubber Stamp

Supplies:

  • Black ink pad
  • Distress Ink Pads (lime, cranberry, purple)
  • Spray bottle
  • Clear mounting block
  • Silver ink
  • Black marker
  • Brads
Directions:
1. Gently swipe a distress ink pad across a non-stick craft mat and then lightly spray with water until small beads form. Place a piece of white cardstock onto the wet ink and wipe it through the ink until all the puddles have absorbed.  Continue to add different colors of ink + mist to create the background.  Repeat the process until you have covered the whole bit of cardstock.

2.  Apply black ink the gear stamp and press it over the background of blended inks.

3.  Use a sponge applicator to add more ink as needed.  (I darkened the purple and added more lime.)

4.Stamp a bird image with black ink and color in using lime distress ink.  Stamp a screw with black ink and carefully cut out both shapes.

5.  Adhere the stamped background to a cranberry card base.  Apply the bird and screw to the lower right corner.

6. Use silver ink to stamp multiple clusters of small hexagon shapes.  Finally, add brads to the center of some of the gears.


Closer Look:
www.blankpagemuse.com
Follow us on Facebook and Pinterest.
Join the Blank Page Muse Fan Group...HERE
Instagram - Shop
Instagram - Blog
Twitter


To learn more about our designer Karen, please visit her blog, Art & Soul.
Thanks for visiting us today!

Saturday, February 1, 2014

Fabric Cuff with Sin City Stamps


I am so happy to be here as a Guest Designer for Sin City Stamps!

You can make the perfect fabric panel for your sewing projects by stamping on fabric! For this Steampunk Chic Fabric Cuff, I used the largest image from Sin City Stamps' Time set.


I stamped the image with ColorBox Chalk Ink in Warm Violet onto tea dyed muslin.  Tightly woven fabric gives the clearest image. I like Chalk Ink, but India ink works well, too.  I heat set the ink with a hot iron.  For more tips on stamping on fabric, read this post.


You can see that the image didn't come out clearly all the way around.  Sometimes you can get a clearer image by putting a piece of craft foam under the fabric, but this result was perfect for this project because I wanted a soft look.

I gathered a few tea dyed doilies to consider as possibilities for the base of my cuff.  I wanted to make an extravagant cuff, so I chose large, lacey one.


I folded the doily in half, then pulled the top layer back a little bit to reveal both layers.
I planned the length of my focal section to make sure I could stitch it to the fuller portion of the doily.  If you stitch your panel to a weak part of the doily, the whole piece will be weak.

I wanted the panel to have finished edges, so I added a seam allowance when I cut it out.  I cut out a piece of plain muslin the same size.  I decided to add a little ruffle with a piece of silk sari ribbon.  I pinned the ribbon to the right side of the printed panel.  I didn't measure the pleats for the ruffle.  I just marked the halfway point and then folded the ribbon over to make the pleats.


Then I pinned the plain piece of muslin to the top of that and stitched all the way around it with my sewing machine.  You can leave an opening for turning, but I like this method when it’s okay for the back to have a slit.  After stitching all around, make a small slit in the piece that will be the back, and turn the piece through that.  You can stitch it closed, or leave it as is if the back won’t show.
I added the gears to the panel.


These were raw brass gears that I treated to add a little patina.  I learned this method from Brenda Sue Lansdowne of B'Sue Boutiques.  I adapted it a little to use the items I had on hand.  I washed the pieces with warm water and soap to remove residual machine oil from the manufacturing process.  Then I soaked the pieces in a combination of water, white vinegar and table salt for an hour.  Then I removed them from the mixture and put them in the oven at 450 degrees for an hour.  When they were cool, I rinsed them off.  You can add colorants at this point, and seal the pieces, but I left these the way they were.

Each gear has a hole in the center, so I sewed them to the panel the same way you would sew on a sequin.  Bring your thread up from the bottom, go through the hole of the gear, go through an anchor bead (mine are brass), sew down through the hole of the gear.  I did that twice for each one and then knotted the thread on the back.

Next, I pinned the panel to the doily and stitched them together.


There are many different closures you can use for a fabric cuff.  For this one, I chose a large snap because it was simple and I did not want to overlap the ends of the cuff.  I put one side of the snap on each side of the doily, and when you snap it together, the edges of the doily drape down.


I hope you will make your own fabric cuff.  Please let me know if you have any questions.


Copyright Text

Blank Page Muse 2018 Sin City Stamps 2013