Showing posts with label Distress Inks. Show all posts

Sunday, October 15, 2023

Third in my Series of Jane Inspired Projects

Greetings Creatives! Lyneen here, today I have another one of my series of Jane inspired projects creating with Blank Page Muse!  Blank Page Muse stamp plates "Words by Jane" are on my list of favorite stamps. The plates are inspired by the works of Jane Austen. If you are a Janenite these are for you!


To create the tag, I used the following stamps and stencils from Blank Page Muse:


Visit my Blog HERE for a detailed tutorial!

Wednesday, April 5, 2023

Mini Stamps Big Impact

Hi Chris here today sharing this cute Easter tag using the mini stamp from the Anime Fairies 2 Stamp set.  


Supplies needed to create this tag:
Manilla Tag
Sin City Stencil Template #20
Tim Holtz Distress Inks -Old Paper, Walnut Ink
Tim Holtz Distress Markers- Spiced Marmalade, Wild Honey, Pickled Raspberry, Shaded Lilac, Stormy Sky
Embossing Folder-Darice
Sizzix Die- bunny
Vellum
Staz-on Ink
Copic Markers - B24, Y15, YR04, R04, V06
Scenic Route Stickers
Ribbon
Liquid Pearls


I started by inking over the Stencil #20 template using the Old Paper Distress ink.


I then embossed the tag with my embossing folder. A little hint, I partially cut along the fold of the embossing folder just enough to allow the tag to slip through the embossing folder.

 Here is the result.

I then stamped some mini flowers on the embossed image using the mini flower stamp from the Anime Fairies 2 collection.  I used the Distress markers to color directly on the stamps .  I stamped the flowers in multiple colors.  I added Liquid Pearls to the center of each flower. 


I then stamped the mini butterfly from this set onto vellum with Staz-on and then colored the back sid of the image with Copic markers. After fussy cutting the butterflies I attached them to the tag. 


I trimmed off the bottom of the tag that was not embossed.  I die cut out the bunny and inked edges of the bunny with Walnut Distress Ink and added the bunny to the bottom of the tag.


I added some ribbon and Baker's twine and matted the tag on card stock to finish off the tag.

 I had so much fun creating this tag I decided to use the same techniques and stamps to create this card.
I sprayed Glimmer Mist all over the tag.  After embossing the tag I "painted" the vines and flowers with distress ink and my water brush.  The butterflies were stamped on cardstock and then punched out with the Martha Stewart butterfly punch.  I  layered the flowers from Petaloo with Fabri-Tac from Beacon Adhesives and added microbeads to the centers of the flowers using Gem Tac from Beacon Adhesives. I hope you are inspired to create some project using mini stamps.

Looking for more Inspiration? Click the links below!
The Blank Page Muse Shop https://blankpagemuse.com/

Wednesday, January 26, 2022

A Dream is a Wish Your Heart Makes

Greetings!  
Chris here, and today I am extra excited to share this Cheery card I created!
This Card features 
Blank Page Muses' Nature Girl Art Rubber Stamp Set designed by Donna Gray and Hearts Stencil designed by Magda Polakow


Other supplies needed to recreate this card include card stock, distress inks, archival ink, and coordinating patterned paper. 


Ink your card stock with distress ink. 
 Secure Hearts Stencil designed by Magda Polakow and ink with distress inks.


 Stamp Nature Girl in center of background.
 Add sentiment from Dandelion Wishes with Butterflies Art Rubber Stamp Sheet by Terri Sproul.

Mat your stamped background over patterned paper to finish. I hope you are inspired to get creative with your Blank Page Muse Stamps.  Don't forget to use our discount code . 

Be sure to follow us at 
The Blank Page Muse- https://blankpagemuse.com/


Sunday, October 10, 2021

Nevermore said Poe!

 Hi Stamping Fans!

Well it's October - such a fun month to be creating with spooky images!


Today I am sharing some bright "Poe" inspired tags - I wanted to use bright colours so I grabbed my Purple and Green Distress Inks and started stamping! 

You can see details over at my blog CLICK HERE!

Stamps used are available from the BPM Shop links below and if you use the code BPMSharon you can get 15% off your stamp order!

Poe designed by Rick St Dennis
Dribonez set designed by Rick St Dennis
Nevermore Word Art


And visit our social media sites for more stamping fun!


Sunday, June 27, 2021

Beachy Stamped Summer Card

 Hello friends! It's Teri from Teris Mailbox. I am here posting a summer beach scene card!


This card started with distress ink blending. So much fun! I used Tumbled Glass on the top and Tea Dye on the bottom for sand! I angled it down from the left to appear like a sand dune.


The bush from the Pam Bray Fall Rubber Stamp Sheet set was perfect for the scene I imagined! I stamped it in Walnut Stain Distress ink and added Clear embossing powder. Prior to heat setting, I rubbed the powder off the birdie as I knew I wanted to color him blue for contrast. 


I thought the stamp with the sentiment A Little Birdie Told Me...was perfect for the bottom of the card.

Last step was to trim the piece to allow some of the Kraft Cardstock to show. The twine just adds more texture and interest!

I hope you enjoyed my post. Thanks so much for stopping by today! I'd love to have you follow/subscribe on my social media sites Instagram, Facebook, Blogger and You Tube.  Be well. Be creative!

Looking for more Inspiration? Click the links below!

The Blank Page Muse Shop https://blankpagemuse.com/


Monday, May 24, 2021

Beachy Vibes

 Hello crafty friends, on the blog today with Blank Page Muse dreaming of summer beaches! What about you are you ready for the beach?


I have to say, I love this card and how it turned out! here are the supplies used - 
Cosmic Shimmer Aqua Lagoon
Distress Ink Kitsch Flamingo
Distress Ink Marmalade
White Cardstock
Washi Tape
Black embossing powder

To create the background on this card, squirt some of the dry Cosmic Shimmer on your work surface and spritz with a little bit of water. Dab your cardstock in the Cosmic Shimmer, dry with a heat tool, and keep dabbing and drying until you like the background. 


Next, stamp the flamingo and sentiment on white cardstock and heat emboss in black. Using Distress Ink Kitsch Flamingo and Marmalade to watercolor the flamingo.


Cut close to the sentiment and place down a piece of washi tape for the flamingo to stand on. Glue down the flamingo and sentiment. Your card is finished!

Thanks for stopping by and I hope I have inspired you to create your own flamingo!


Thursday, October 1, 2020

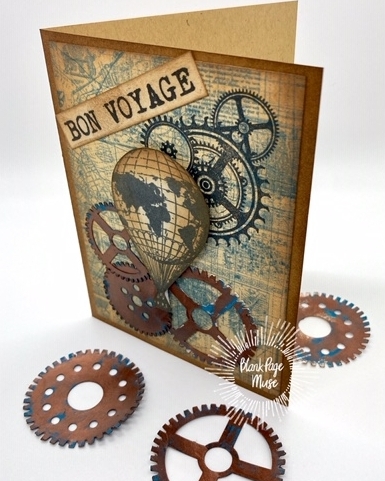
Steampunk Bon Voyage Card

Hello BPM Fans! I am enjoying this month's Steampunk challenge since this is a new style for me. I really love being able to put my Distress Inks to use. I love inking and blending with different colors. Today I am sharing a very simple Steampunk card that you can complete in less than an hour! Try making this card and you can enter it in our monthly challenge for a prize! 


Supplies:

  • Blank Page Muse Stamps: Steampunk Gear Cluster and World MapHot Air Balloon Steampunk
  • Distress Ink: Vintage Photo, Old Paper, Antique Linen
  • Ink Blending Tool
  • Cream colored Kraft cardstock or regular cardstock, cut to A2 size card (base card)
  • White cardstock
  • Patterned paper with a travel theme, 4” x 5.25” (I used Graphic 45, Cityscapes Collection, Map the Past)
  • Black ink pad
  • Stamp positioner or stamping block
  • Sentiment (I used Bon Voyage, you can use anything you like)
  • Gears and cogs die cuts (Please see my September 26, 2020Blog post to see how to make them)
  • Adhesive foam squares or dots
  • Your favorite glue/adhesive

 Instructions:

Distress ink the edges of the base card with Vintage Photo.


Distress ink the patterned paper using Old Paper in the center and use Vintage Photo on the edges.


Stamp the hot air balloon stamp on white cardstock and fussy cut. Distress ink blend the hot air balloon using Antique Linen in the center and Vintage Photo on the edges.


Stamp the Steampunk Gear Cluster stamp onto the patterned paper.


Stamp or print a sentiment and distress ink the center with Old Paper and use Vintage Photo on the edges. Adhere to the patterned paper. I typed my sentiment in Microsoft Word and printed it on white cardstock.


Adhere the gears and cogs die cuts onto the patterned paper. Adhere the hot air balloon using adhesive foam dots or squares. Your card is done! 


I hope you enjoyed this tutorial. It's an easy card you can make and mass produce.  Have a great week! If you have any questions, please leave them in the comments below. Thank you for stopping by. 
Betty


Looking for more Inspiration? Click the links below!
The Blank Page Muse Shop https://blankpagemuse.com/
FB Fan Page https://www.facebook.com/groups/bla...
Instagram - Shop https://www.instagram.com/blankpage...
Instagram - Blog https://www.instagram.com/blankpage...
Twitter https://twitter.com/BlankPageMuse
Pinterest https://www.pinterest.com/blankpage...


Tuesday, February 18, 2020

Guest Designer, Samantha! CAS Card in blues with Curls & Flourishes!

Hello, hello! Samantha Ziegenfuss here.

I'm thrilled to be back on the blog as a guest designer today!
I've been drifting over to the more clean and simple side of crafting lately and that is what inspired this card.

To begin you will mask off an inch and a half along both the top and bottom of an A2 sized card panel. Go in with your inks and do a simple blend using the lightest color in the center and darker colors as you move toward the edges.


Use the Fancy Curls and Flowers Flourish Art Rubber Stamp by Terri Sproul and black ink to stamp across the ink blended panel. Rotate and shift the stamp each time you stamp it to ensure you get a varied appearance.


Press a clear embossing ink pad over your stamped and ink blended area and heat set it with clear embossing powder. This adds a cool look of shine and dimension.

After you cut the strip out layer it onto a piece of wood grain patterned paper and adhere it to the front of a white A2 sized card base.


Next use the Everything is Going to Be Alright Word Phrase Rubber Stamp and, with black pigment ink, stamp it below the colorful strip and to the left. Heat set it with clear embossing powder.


To tie everything together add a few flat backed pearls.


Thanks so much for taking the time to stop by the blog and check out my card. Make sure you're subscribed so you won't miss any of the amazing Blank Page Muse posts.

Until next time,
Samantha Ziegenfuss

Stamps used:


Thanks so much Samantha! We really love this clean and gorgeous card!
Thank you dear crafter for stopping by and reading about this beautiful card by Samantha. We do hope you are inspired and will come back to play in our creative challenge!

Thursday, May 30, 2019

Steampunk lady

Hello to you all. Cathy N here with a steampunk lady card. I really love making steampunk art. I like how you can add gears and a octopus and a bit of rust and you got steampunk. At least for this card it does.

Stamps Used:
1887
Birds on wires by Terri Sproul
Octopus Lady
Steampunk word

Other supplies used:
Distress ink
Distress Oxide spray
Washi tape
Copper paint

 Start out with a 4x6 piece of cardstock. Add some rusty colors of ink to the base of the cardstock. Then layer some Distress Oxide sprays to give it a rusty look.

Trim to fit on a A2 card base. Or leave it that size to make a postcard.

 Next stamp Octopus Lady on the bottom of the card.

After you have Octopus Lady stamped start to layer your other stamped images on the card around it.

Stamp Steampunk word on the side and layer with some washi tape. Lastly before added it to a black card base take some copper paint and thin it down with water and splatter it over the front.

Don't forget you can save 15% off your stamp order with my code BPMDtCathy2019

Follow us 

The Blank Page Muse- https://blankpagemuse.com/


Copyright Text

Blank Page Muse 2018 Sin City Stamps 2013