Showing posts with label Hot Air Balloon. Show all posts

Tuesday, January 5, 2021

Let Your Dreams Take Flight

Happy New Year BPM Fans! Betty here to share a vintage/classic card. You have probably heard of the saying, "Let Your Dreams Take Flight." What does this really mean? What I think it means is that you can still achieve your dreams and goals even if you have come across many challenges. As we enter 2021 with renewed hope and inspiration, it's time to achieve some of these dreams and goals. I made this card to inspire a special person in my life who has had some recent challenges in his life. 

I used two Blank Page Muse stamps. One is called World Map Hot Air Balloon Steampunk and the sentiment, Let Your Dreams Take Flight, is from the Vintage Transportation Steampunk set. These are the perfect stamps to use for entering a project in the Blank Page Muse January challenge, “Vintage/Classic.” 


Supplies:
  • Blank Page Muse Art Rubber Stamps:  World Map Hot Air Balloon Steampunk and Let Your Dreams Take Flight sentiment from the Vintage Transportation Steampunk set.
  • White cardstock (base card) - 12"H x 6"W folded in half 
  • White cardstock (card front) - 4-1/4"H x 5-1/2"W
  • White cardstock (to stamp balloons) - 4-1/4"H x 5-1/2"W
  • Gray cardstock (card mat) - 5-7/8"H x 5-7/8" W
  • Newsprint Patterned paper - 5-3/4"H x 5-3/4"W. I used paper from Pink Paislee called Indigo Blue. Substitute with any matching paper.
  • Postage meter patterned paper (cut 2)- 1-7/8"H x 5-3/4"W. I used Kaisercraft, Miss Empire Collection, Steampunk. Substitute with any matching paper. I also used this paper to cut out 2 tags.
  • White cardstock (sentiment) - sentiment trimmed to 3/4"H x 2-5/8"W
  • Vintage postage stamps - I used real ones, but you can also use clip-art.
  • 3-1/2"H x 4-1/2"W rectangular die (I used an edge that looked like a stamp, but you can use any style)
  • Waterproof Black ink pad - I used StazOn
  • Distress ink: Black Soot
  • Distress ink: Stormy Sky
  • Distress ink applicator
  • Distress Collage Medium - vintage
  • Paint brush to apply collage medium
  • Glue stick
  • Favorite adhesive
  • Scissors
  • Paper trimmer
Optional items for the tags:
  • 2 brads
  • 2 eyelets
  • Crop-a-dile or hole punch and eyelet fastener
  • 2 pieces of brown twine - 5" each
Instructions:
  • Cut all the cardstock as indicated in the supplies list
  • Using a 3-1/2"H x 4-1/2"W die, use a pencil and trace the inside of the die to mark a guide for placement of stamps onto the card front (white cardstock). If you don't have a die, use a ruler and mark the dimensions as stated.

  • Using a glue stick, put a layer of glue onto the white cardstock. Add some glue outside of the lines as well.
  • Arrange the stamps on the cardstock, making sure each piece has glue. Make sure the stamps go over the edges of the guide lines.
  • Apply a thin later of Distress Collage Medium (vintage color) over the top of the stamps. Let this completely dry.
  • Use the die and cut out the stamps. If you don't have a die, use a paper trimmer to trim where the guide lines are.
  • Using a waterproof black ink pad, such as StazOn, stamp 2 balloon images and the sentiment on white cardstock (the picture only shows one balloon. I decided to add two balloons at the end of the project)
  • Using Distress Ink Stormy Sky, ink your balloons and sentiment. Fussy cut the balloons and use a paper trimmer to trim the sentiment. 
  • Using Distress Ink Black Soot, ink the edges of the balloons, sentiment, card front, mat, and base card.
  • Using the Kaisercraft, Miss Empire Collection, Steampunk paper or paper of choice, cut off the strip that has the postage meter stamp and adjoining border. One piece will be for the outside of the card and the other will be for the inside. Distress the edges with Black Soot.


  • Cut two small tags using the Kaisercraft, Miss Empire Collection, Steampunk paper. If you don't have a die, use a paper trimmer. Distress the edges with Black Soot. Punch a hole and add an eyelet and twine to each tag.

  • Add brads and foam tape to the back to the sentiment. 
  • Time to assemble your card:
    • Adhere the gray cardstock onto the base card
    • Adhere the newsprint patterned paper on top the gray cardstock
    • Adhere the postage meter patterned paper to the bottom of the card, but leave the top edge unglued so the stamps and tags can be added. Adhere the extra strip to the inside of the card.
    • Adhere the card front with the stamps to the card. Slip the bottom corner behind the bottom strip.
    • Using double-sided adhesive foam tape, adhere the balloons and sentiment
    • The tags are NOT adhered, instead, they are to be slipped underneath the strip. This way, the recipient can remove them to see the vintage stamps.


Thank you for stopping by today. I hope you give this card a try. If you have any questions or comments, please leave them below. ~Betty~

 Looking for more Inspiration? Click the links below!

Thursday, October 1, 2020

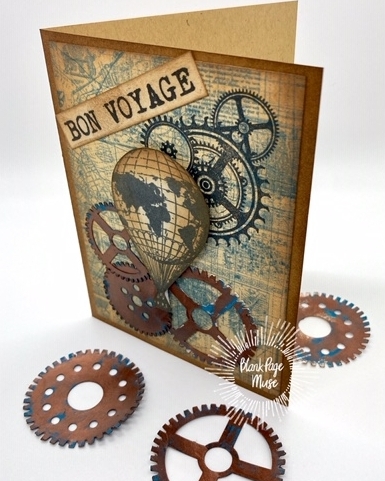
Steampunk Bon Voyage Card

Hello BPM Fans! I am enjoying this month's Steampunk challenge since this is a new style for me. I really love being able to put my Distress Inks to use. I love inking and blending with different colors. Today I am sharing a very simple Steampunk card that you can complete in less than an hour! Try making this card and you can enter it in our monthly challenge for a prize! 


Supplies:

  • Blank Page Muse Stamps: Steampunk Gear Cluster and World MapHot Air Balloon Steampunk
  • Distress Ink: Vintage Photo, Old Paper, Antique Linen
  • Ink Blending Tool
  • Cream colored Kraft cardstock or regular cardstock, cut to A2 size card (base card)
  • White cardstock
  • Patterned paper with a travel theme, 4” x 5.25” (I used Graphic 45, Cityscapes Collection, Map the Past)
  • Black ink pad
  • Stamp positioner or stamping block
  • Sentiment (I used Bon Voyage, you can use anything you like)
  • Gears and cogs die cuts (Please see my September 26, 2020Blog post to see how to make them)
  • Adhesive foam squares or dots
  • Your favorite glue/adhesive

 Instructions:

Distress ink the edges of the base card with Vintage Photo.


Distress ink the patterned paper using Old Paper in the center and use Vintage Photo on the edges.


Stamp the hot air balloon stamp on white cardstock and fussy cut. Distress ink blend the hot air balloon using Antique Linen in the center and Vintage Photo on the edges.


Stamp the Steampunk Gear Cluster stamp onto the patterned paper.


Stamp or print a sentiment and distress ink the center with Old Paper and use Vintage Photo on the edges. Adhere to the patterned paper. I typed my sentiment in Microsoft Word and printed it on white cardstock.


Adhere the gears and cogs die cuts onto the patterned paper. Adhere the hot air balloon using adhesive foam dots or squares. Your card is done! 


I hope you enjoyed this tutorial. It's an easy card you can make and mass produce.  Have a great week! If you have any questions, please leave them in the comments below. Thank you for stopping by. 
Betty


Looking for more Inspiration? Click the links below!
The Blank Page Muse Shop https://blankpagemuse.com/
FB Fan Page https://www.facebook.com/groups/bla...
Instagram - Shop https://www.instagram.com/blankpage...
Instagram - Blog https://www.instagram.com/blankpage...
Twitter https://twitter.com/BlankPageMuse
Pinterest https://www.pinterest.com/blankpage...


Thursday, March 19, 2020

Project Life with Wings Above the Rest


Hello! 
Today we are sharing with you a project from our archives 
That was created by a Guest Designer: Pam Bray.
Here she created a a project life page. 
Enjoy!


Supplies needed:
  1. A Wing Above the Rest - Rubber Stamp Set
  2. Dylusion spray inks
  3. 5"x 7" of chipboard and white cardstock
  4. Black StazOn ink pad
  5. Modeling paste and a stencil
  6. Blending markers

Start by spraying 3 different colors of the Dylusion Spray onto white card stock, once dry, place it on top 
of the chipboard.


Stamp the background  with the StazOn Ink.


Apply the modeling paste with the stencil to the top of the project. 
Allow to completely dry before moving on.


Stamp the hot air balloon and color in with the blending markers.


Cut out and add the hot air balloon to your page with pop dots and finish with red twine and a embellshment.


See more creative inspiration here:

The Blank Page Muse- https://blankpagemuse.com/


Tuesday, June 4, 2019

Vintage Kinetic Hot Air Balloon Card

I always find it a pleasant surprise to find a kinetic element on a card. My hot air balloon is free hanging and; therefore, can swing when the card is handled. Challenge yourself to add something a bit unexpected to your project like a hinged element, wiggly eyes, or a shaker filled with sequins. All this month, you will find more inspiration from the BPM Design Team about clever ways to add different types of  movement to your projects.


BPM Stamps:
Hot Air Balloon with Wooden Barrel Basket Rubber Stamp
Life is Not About Waiting For the Storm to Pass Sentiment
Steampunk Devil Collage Stamp

Directions
1.  Stamp the hot air balloon onto white card stock using black ink.


2. Next, stamp a balloon onto transparency using permanent ink and set aside to thoroughly dry.


3. Color the paper image using a sponge applicator.
(Time Saver TIP: The coloring does not need to stay within the lines since the image will be cut out.)


4.  Next, fussy cut to separate the balloon, people, and basket.

5. Reassemble the pieces of the hot air balloon over the transparent image and adhere with foam tape.  Use a white gel pen to add fine details to the hot air balloon.

6.  Take a craft card base and stamp along the edges with the clocks & newsprint design using blue ink. Lightly ink the edge of the card base with brown ink to give it an aged appearance.

7.  Stamp the sentiment with black ink onto the lower right corner of the cream cardstock. Then antique the edge of the paper by gently inking the edges of the sentiment with brown ink.  To give the card a kinetic element, attach twine to the top of the hot air balloon. Adhere the other end to the back of the stamped sentiment so the hot air balloon embellishment hangs freely.  Matte with maroon card stock. Attach the matted hot air balloon element to the middle of the card base.


Save 15% off your BPM rubber stamp order when you use discount code
"BPMDtKaren2019"

Other Supplies:
black permanent ink pad, transparency, ink pads (red, blue, brown), ink blending tool, clear mounting block, white gel pen, baker's twine, cardstock (cream & maroon), card base (6x6")


            Blank Page Muse Shop http://blankpagemuse.com/
            Facebook Fan Page https://www.facebook.com/groups/bla...
            Instagram - Shop https://www.instagram.com/blankpage...
            Instagram - Blog https://www.instagram.com/blankpage...
            Twitter https://twitter.com/BlankPageMuse
            Pinterest https://www.pinterest.com/blankpage...

To see more of Karen's projects, visit her blog Art & Soul.

Sunday, May 19, 2019

Octopus AWAY!


 Are you looking for a fun, masculine card to create for a special someone?  This easy Steampunk themed greeting card is great for Father's Day or any day you want to surprise someone, or warn them of the impending octopus apocalypse (just kidding!).


Supplies:
Crackle Background Stamp
Small Cluster GeoMetric Stamp and Interlocking Circles from this set
Octopus Airship Stamp from this set
Black archival ink
White Pigment Ink
Various Scrap pieces of cardstock in white, purple-blue, blue-green,and yellow decorative patterned paper (in the example it was a Graphic45.
Adhesive
Foam Double-sided Tape
Small Star Embellishments
Scissors

Instructions:

Create the card base from the blue green paper.  This one is a standard 5X7 sized card.  Cut the decorative paper about 1/8" smaller than 5"X7" and cut the purple-blue card stock another 1/8th" smaller than that one.  Using the black archival ink, stamp the crackle background first, then stamp the joined circles and the geometric cluster stamps randomly using the white pigment ink.


Stamp the Octopus Airship on the white card stock with the archival black ink.  Allow to dry and color in with your choice of medium (watercolor pens, oxides, pencils, etc).  Fussy cut out.


Layer the cards, adhering the patterned paper to the base card, then glue the decorative stamped blue card to the patterned paper (all should be centered).  Attach the fussy cut image using foam tape at a slight angle.  Add some star embellishments and you are done.

All ready to float away into an envelope.


More ideas & crafts by Mercy

Want an extra 15% off on your next order? Use this code on your order! Good until June 1, 2019. BPMDtMercy2019


Copyright Text

Blank Page Muse 2018 Sin City Stamps 2013