Friday, January 29, 2021

Vintage Magical Bookmark And Tassel DIY

I just love snuggling up under a fluffy blanket and a good book. I often find myself to comfy and fall asleep while reading.  😊 Which leaves me needing something to save my place.
So today lets make a cute bookmark!


Items used:
  • Imagination
  • Scissors
  • Alcohol markers 
  • ink- Palette, hybrid acid free
  • Sharpie marker
  • Card stock
  • Acrylic paint
  • Cardstock
  • Tissue paper
  • Yarn or thread
  • Glue Stick
  • Rubber Stamps used-


I'm still new to the great world of stamps, so I wanted to push myself and do a more of a layered background. I started with the with the Marigold Flowers in the upper corner. From there I just kept adding. I'm really pleased with this background. 


I just love the look of tassels and stamps together. You can easily make your own using yarn or thread.

  1. Wrap the yarn around cardboard or your fingers. The more you wrap the more fuller your tassel will become. I wrapped mine about 20 times.
  2. I just used a long piece of yarn and tied a double knot on the top, then slipped it off my cardboard. You could also use a jump ring between the loop. This will be used to attach your tassel to your finished piece.
  3. Next cut off a piece of yarn to tie near the top of your tassel. Tie a double knot, then wrap the yarn around a few times. Giving the tassel a more finished look tie another double knot.
  4. Cut the bottom loops. I used crappy scissors, so I needed to trim the ends a bit to make my tassel pretty.


Hope you enjoyed this Vintage Magical bookmark and Tassel DIY. If you have any questions feel free to message Lasheet and if you choose to make your bookmark tag her and Blank Page Muse. Thank you, happy crafting!! ♥


Looking for more Inspiration? Click the links below!
The Blank Page Muse Shop https://blankpagemuse.com/


Wednesday, January 27, 2021

Love Greeting Card

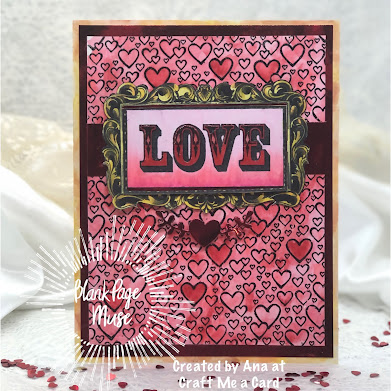
Thank you so much for stopping by. My name is Ana and creating cards is a passion of mine. It is with great joy that I present to you this cute Valentine’s Day card. This card uses the "Love" stamp from the Love Faith & Family Vintage Art Rubber Stamp Full Sheet SC88I made it for Valentine's Day but it really can be given to someone special on any given day.  Who doesn't like to hear they are loved right?


Supply list:


Instructions:

Begin by adding the red foil cardstock to the card base. The shininess of the foil will add a nice elegant look to this Valentine's Day card.
 
Next, stamp the image of the word love on to a watercolor paper. This cute and vintage looking “Love” stamp makes the perfect center piece for a card. 

This next step is optional.
Cut out the inside frame of the stamp. This step is suggested so that a piece of red foil cardstock can be placed under the stamp creating a shiny frame around the word love.

Creating a 'frame' or  'border' like this helps to balance the card once all the elements are put together.  

Blending markers such as Copics, are useful in creating a ombre effect in your card making as I did with the Love stamp.


Using some watercolor markers, choose  colors that will coordinate with your card theme. 
After you have finished coloring in the card, run it  through a die cutting machine with the hearts embossing folder.
This will create dimension. 
Cut this piece to a size of 1/4" smaller than the first layer (the red foil layer).


Adhere the Love onto 1" strip of red foil. 

Finish the card by touching up the letters  with some flossy accents so that they would shine just like the red foil cardstock that surrounds the card. 


Simple and quick Valentine's Day Card created with this wonderful Love Stamp. 


I hope this inspires you, I hope you create and be happy. Thank you so much for stopping by.                                                                             ~ Ana


Monday, January 25, 2021

Good Intentions Collage

 Hello crafty friends! On the blog today with Blank Page Muse and a collage using stamped and colored images and Gelli printed backgrounds!


Supplies

Gelli plate
Brayer
Bubble wrap
Acrylic paint
White cardstock

First of all, I like to print lots of gelli prints all at once so that I have a stash of them to play with, so I now have a slim iris box full of backgrounds. I like to print on all kinds of papers such as cardstock, colored cardstock, deli paper, old book pages, music sheets, and lots more!


Start with stamping the Vintage Scents on watercolor paper using Versafine Clair Nocturne ink, then watercolor.

When the images are dry, (you can hurry this along by using a heat tool), fussy cut them out. Find a coordinating background for them to sit on. As you can see in the picture above, I reprinted over the blue with a bit of brown to form a "table" for the perfume bottles to sit on. 

Decide on how you want to arrange the bottles on the table and then the first layer of bottles is glued directly to the pape, the second layer of bottles has one layer of foam tape and the final bottle has 2-3 layers of foam tape. 


Find some words from an old book page and attach them to the collage. I used Good intentions from an old book titled "Good Intentions".


 Looking for more Inspiration? Check out the links below! 
The Blank Page Muse Shop 
https://blankpagemuse.com/ 
FB Fan Page 
https://www.facebook.com/groups/bla... 
Instagram - Shop 
https://www.instagram.com/blankpage... 
Instagram - Blog 
https://www.instagram.com/blankpage... 
Twitter 
https://twitter.com/BlankPageMuse 
Pinterest 
https://www.pinterest.com/blankpage...

Sunday, January 24, 2021

Create a Vintage Layered Card

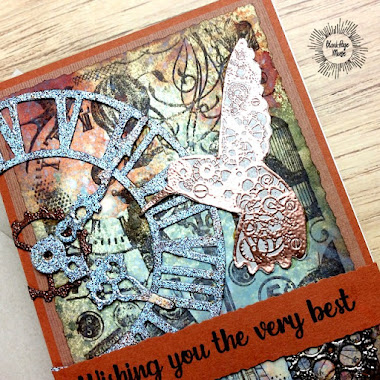
 I love steampunk, vintage and layered cards. These all came together for me with this great layered card I am posting for Blank Page Muse.


Check out all the dimension created by using multiple layers!


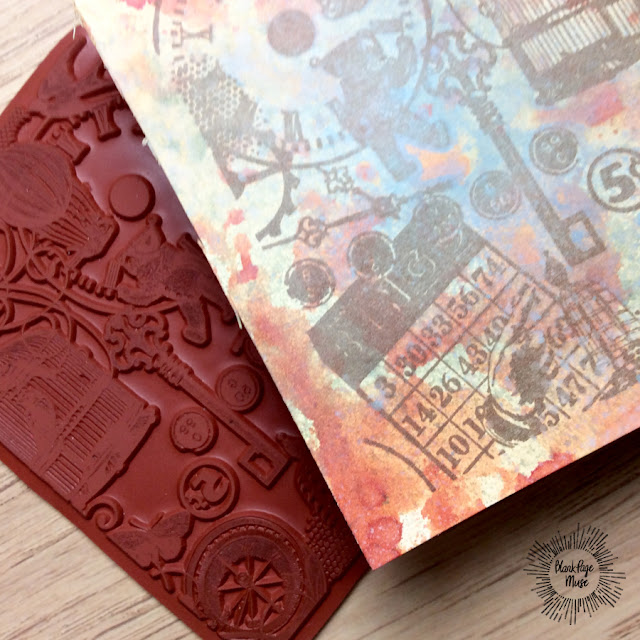
It all started with the Bingo Collage background stamp stamped on natural color Cougar cardstock and smooshed with Distress Inks.


 Check out these great layers! I love the Hummingbird Steampunk Cog Gears Stamp, cut from a cereal box and embossed with copper powder.

Check out the video here: 


The Wishing You the Very Best sentiment was stamped on Kraft.  The base was cut using a deckle edge trimmer. I inked the edges with Vintage Photo Distress Ink.  This was layered on Ginger and Dark Orange Cardstock.


Thanks so much for stopping by today! I'd love to have you follow/subscribe on my social media sites Instagram, Facebook, Blogger and You Tube.  Be well. Be creative!

Looking for more Inspiration? Click the links below!
The Blank Page Muse Shop
https://blankpagemuse.com/
FB Fan Page
https://www.facebook.com/groups/bla...
Instagram - Shop
https://www.instagram.com/blankpage...
Instagram - Blog
https://www.instagram.com/blankpage...
Twitter
https://twitter.com/BlankPageMuse
Pintrest
https://www.pinterest.com/blankpage...


Saturday, January 23, 2021

With Thanks Sewing Card

Hi everyone, Steph Ackerman here today with a sweet thank you card for someone who is an avid sewer.   From buttons to pins to sewing machines and stitches, there is something for everyone.


Supplies:

Blank Page Muse Stamp:  Vintage Sewing Art Rubber Stamps
White, Black and Tan Cardstock
Die: Spellbinders
Thread: Whiskers Graphics


Cut cardstock to fit card front.
Repeatedly stamp the buttons and pins stamps across the panel using blank ink.


I kept the images together, but you could easily cut them apart and use them separately.
Ink with several colors of distress inks using yellow and orange inks to create a vintage effect.


Ink the edges of the panel with brown ink.


Punch holes and thread several buttons with twine and tie off.
Mat the panel with black cardstock.
Add a wood "thanks" to a die cut oval and adhere to the card.


Finish by adding the panel to a tan card.


With so many sewing themed stamps available at Blank Page Muse, it's fun to see what you can create from vintage to fun to sassy.

Thanks for stopping by.


Looking for more Inspiration? Click the links below!
The Blank Page Muse Shop https://blankpagemuse.com/

Friday, January 22, 2021

Believe: A Sparkly Layout

 Good Morning! Today I have a layout out to share with you using stenciling, embossing, and lots of stamping! Christmas has come and gone, but, if you're like me, you have many photos ready to be scrapbooked! So, are you ready!? Let's get inky! 

Start with a solid color cardstock and your accent paper. Here you see some of the fabulous paper from Pam Bray's Watercolor Line. Using an edge distresser, distress the edges of the pattern paper. Now put aside and get those inks out! 

Using the Star Slimline Stencil and Distress Ink, stencil the stars on the on your card stock. Then outline them using a fine black marker, ZIG is my go to. 

Now for a little splatter fun! Choosing spray inks in blues, greens, yellows, and red, splatter droplets onto your layout. To do this, screw off the spray nozzle and gently tap over your layout. This technique allows you a little more control over where your spray inks go. 


Using the tree from the stamp set Starbright Gnome Wintery Tree and a little embossing powder, create the tree accent at the bottom of your layout. Embossing never gets old, it is like magic every time! You can use whatever embossing color you have on hand, or if you have little empty containers, you can mix up your own color, like you see below. 


Next, grab the stamp set Classic Christmas Art and black embossing powder. Using the Poinsettia, stamp in Versamark on the scrap pattern paper and emboss with the black embossing powder. Using embossing powder made for fine detail works the best. 


Using the Pine Leave Branch from the Classic Christmas Art , stamp a grouping of Pine Leaves in the top corner of your layout. You can and some sparkle accent with a variety of glitter pens. Fussy cut your embossed Poinsettia, and using a pop dot, adhere to the layout. 


Stamp another Poinsettia on white cardstock and color. You can see here, where I colored Poinsettias with Copics recently. Using kraft cardstock, create the mat for your photos. Then start piecing your layout together. Add the pattern paper from the first step. Using pop dots, added your mat with your photos, and then using another pop dot, add the gorgeous Poinsettia you colored! 

Using kraft cardstock, write out your title, "Believe" and fussy cut. Draw a heart, and finish your title. Fussy cut it out and, once again, use pop dots to add to your layout. For the journaling above the photos, grab a piece of coordinating paper from your scrap bin, cut down to size, add a little ink to the edges and your journaling and you now have a beautiful layout! 


I hope your New Year has started off with blessings and joy and when times get tough, remember, always have hope and believe beyond what you can see. ...and always know that you can find your peace when you sit down and take a moment, or a day, and spend it creating. Below are several places you can go to look for inspiration. Also, make sure you are a member of the Blank Page Muse Fan Page on Facebook so you can connect with crafter's all over, be inspired, and make new friends. 

Until next time.... Happy Creating! 

Christine


Thursday, January 21, 2021

Mini Vintage Gift Cards!

 Hi Blank Page Muse Stamps Fans!

Hope you are all enjoying our "Vintage" theme this month and that you have been able to join our current challenge - there is still time to play along!

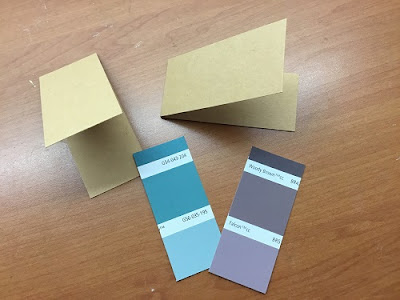
Today I am sharing some mini gift cards - you may remember a few months ago I created some cards with paint chip sample backgrounds and collage elements - well I really hate throwing out even the tiniest of scraps so I decided to use the excess paint chip pieces and make some similar cards but on a very small scale! Great for using up scraps of plain coloured card too!

I love that you can also use this idea for mini cards for any occasion!

Supplies:
Blank Page Muse Stamps: Background Grunge Set
Scrap Card any Colour cut to size and folded in half
Paint Chip Sample Off Cuts cut to just smaller than mini card front
Embossing Pad & Embossing Powder
Collage Images - "Art Tea Life" collage Sheet used for these cards
Small Embellishments & String, Ribbon or Fibre
General: scissors, glue, ruler, heat gun, hole punch

Instructions:
Use your scrap base card to make mini cards that are slightly smaller than your scrap paint chip samples.


Start by stamping and embossing your paint chip samples.


Adhere the stamped and embossed paint chip to your mini card front and punch a hole n the top corner.


Add a small collage image and small stamped sentiment and any tiny embellishments.


Punch a hole in the top corner of the mini card and add some string, ribbon or fibre to use to attach to your gift or xmas tree!

Thanks for joining me today and I hope 2021 brings you lots of time for crafting!

Have fun creating!

Sharon


Don't forget to check us out at all of our social media sites
The Blank Page Muse- https://blankpagemuse.com/

Tuesday, January 19, 2021

Vintage Perfume Greeting Card


Vintage Greetings!  Today I am excited to share this card I created  to play along with this month's Any Thing Goes and Vintage Challenge here at Blank Page Muse! This car was so fun to create and feature 4 different stamp sets! 


Vintage Greetings!  Today I am excited to share this card I created  to play along with this month's Any Thing Goes and Vintage Challenge here at Blank Page Muse! This car was so fun to create and feature 4 different stamp sets! 

The four stamps sets featured include


Other supplies needed to recreate this card include:
card stock- white and pink , kraft card base, paper doily, patterned paper, distress inks, kraft tag, paper bag, stamp punch, water color markers and water brush, adhesive (regular and dimensional) , ribbon, flower 

Cut the pink card stock slightly smaller than your card base. Stamp the Blank Page Muse Sequin Waste Light Art Rubber Stamp by Terri Sproul onto the pink card stock with distress inks. 


Stamp the script text from Blank Page Muse Correspondence Pens, Ink & Postage Art Rubber Stamp Sheet by Katy Leitch, repeatedly onto your tag with distress inks. 


Layer patterned paper onto your stamped card stock. Add paper doily then adhere tag to card. 


Stamp Blank Page Muse Vintage Scents Perfume Ephemera Art Rubber Stamps onto white card stock and cut out image.  Color image as desired with water color markers. 


Add paper bag to card.  Add stamped bottle to card using dimensional adhesives. 


Punch out stamp from white card stock.  Stamp feather from Blank Page Muse Flower & Bird Sketches Art Rubber Stamp Sheet Set in multiple colors.  Tuck stamp under bottle. 


Finish card with ribbons and a bow. I hope you enjoyed this project and are inspired to get creative with your Blank Page Muse Supplies. 

Be sure to follow us at 


Copyright Text

Blank Page Muse 2018 Sin City Stamps 2013