Saturday, September 30, 2017

Grungy Background ATCs

Hi all

I have a few quick ATCs to share using the new Background Grunge stamp set by Pam Bray.


http://sincitystamps.com/background-grunge-art-rubber-stamp-sheet-designed-by-pam-bray-scpbr-001/


To create the backgrounds, Add paint and then stamp textures over the top.


Stamp out the circles onto card stock and color them in before adhering them to the ATCs.


Create different style of ATC by changing colors and combining different texture stamps.

Thank you for visiting.

Friday, September 29, 2017

6 Halloween Cards


Another quick idea to make Halloween cards (or any other themed card by changing color scheme and images).
Supply List:
Orange and black  card stock, pre cut card frames, washi tape, gelli plate left overs, black stamp ink


Cut the left over gelli prints in squares and mat them on black card stock
Stamp the images on the squares and glue them to the die cut card frames
Adhere the die cut card frames to the card base

Decorate with washi tape

Stamp a sentiment or skeleton key on the die cut card base or/and on the card
That's it folks,  super quick and easy, enjoy making them yourselves and please do show us the results on the facebook fan page.  There are lots more Halloween stamps in the shop here, and  of course you can use this idea for other Holiday cards too.

Wednesday, September 27, 2017

Skull Gift Card Holder


Friends, it will soon be time to start thinking about Halloween treats and gifts for those special goblins in your life.  I have designed a gift card holder using Sin City Stamps.

Supplies:  
  Sin City Stamps: DriBonez Skulls and Bones
                            Background Grunge
  Splat stamp
  Embossing Powders: iron and green
  Brown Ink
  Die cut of gift card holder
  Foam tape
  Craft card stock

Step 1:  Die cut gift card holder out of craft card stock.  Emboss skull and bones image using iron colored embossing powder at bottom.


Step 2:  Using the Grunge Background stamp set emboss boarder with green embossing powder.


Step 3:  Emboss the skull with iron embossing powder.


Step 4:  Cut out Skull.


Step 5:  Using splatter stamps, distress entire holder. 


Step 6:  Assemble gift card holder.


Step 7:  Using foam tape, pop up the skull to holder front.


We hope you enjoy making this quick and easy Halloween project.  Please share your creations with us on Sin City Stamps fan group Facebook page.

X

Monday, September 25, 2017

Hello Black Kitty Card

Hey Ladies,
If you need an idea for a cute Halloween card, then take note how I used some non-holiday stamps to design a friendly Halloween card.  I used a quirky "hello" stamp and a cute kitty to create my Halloween card.  Check out your stamp collection, think outside the box, and see which designs you already have that can be used for multiple occasions by simply changing the colors. 

Supplies:
1. Sending Smiles Whimsical Mail Art Rubber Stamp Sheet by Rick St Dennis
2. black ink pad
3. fine tip markers
4. colored pencils
5. 3" circle punch & 3.5" scallop circle punch
6. black cardstock

Directions:
1. To create the background, use black ink to stamp the word "hello" onto white cardstock. Vary the angle of each impression and make sure to overlap the edges when stamping.
 
2. Color the background design with fine tip markers.


3. Stamp the cat using black ink and shade the image with colored pencils. Carefully fussy cut.


4. Use a circle punch to cut a 3" circle of white cardstock and punch a slightly larger scalloped matting using black cardstock.


5. Mount the cat to the circle with foam tape, matte, and attach to the stamped background.

6. Finally, attach the stamped image to a 5.5" square black cardbase leaving a narrow border.

A Closer Look:

Sin City Stamps:

http://sincitystamps.com/sending-smiles-whimsical-mail-art-rubber-stamp-sheet-by-rick-st-dennis-mfa-scrsd-01/

To purchase these cute stamps, visit www.sincitystamps.com
Be sure to follow us on Facebook and join the Sin City Fan Group. HERE
To see more of Karen's projects, visit her blog Art & Soul.

Thanks for visiting!

Saturday, September 23, 2017

EEEEEK!

Hi Sin City Fans!!!
Getting ready for Halloween???
I love to create Halloween themed things even though it's not really a huge event here in Australia!
It's just fun to make spooky things!!
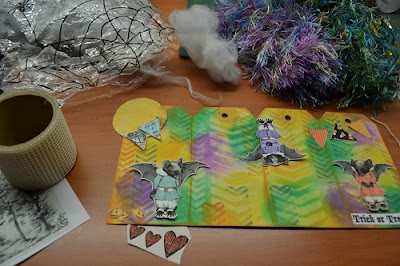
I've been doing a lot of tag art lately and I have some more to share with you today!
Hope you like what I have done!
Supplies:
Sin City Stamp Set: Background Grunge Set
Strip of 4 Packaging Tags
Distress Inks & Sponges
Stencil
Baby Wipe
Halloween Collage Elements - Sheet by Art Tea Life used for this creation
Embellishments: cobweb, fibres, sticky mesh, thread
General Supplies: scissors & glue
Instructions:
Let's get started with this fun & quirky tag set!

Use some nice bright colours for this creation - we are not creating spooky - we are creating fun and semi cute LOL!!! Cover the tag set with colour using your sponges.


Next grab a stencil and a fresh baby wipe and "remove" some of the ink through the stencil. Be careful you don't rub too hard and start to remove the layer of card - just aim for a subtle look. I chose this stencil as it matched the stamp from the Background Grunge Set perfectly!!


Next use a stamp of your choice from the Sin City Background Grunge Set and use a couple of different coloured ink to stamp randomly over all of the background.


Using one of the colours on your background edge the tag with a sponge including the "join" between each tag. I think edging with colour always gives a "finished" look.


Gather your collage elements and fussy cut - can be a little bit fiddly but worth the effort in the end!


Start arranging them on the background so you can work out where to adhere some "cobwebs" and sticky mesh for effect.


Tie some fibres through the hole of each tag to complete.

I hope you have enjoyed this little Halloween creation!

Make sure you keep checking back here at the blog for more DT inspiration - especially with Halloween coming up!!
Remember to share your creations at the Sin City Stamps Fan Group at Facebook - we love to be inspired by you as well!!!
Thanks for joining me!
Sharon


Thursday, September 21, 2017

Romantic Halloween Card "Skellie Love"

Hello all, MOnique here showing you how to make this Halloween card using the masking technique
Supply list:
Sin City Stamp sheets:

White Cardstock
Black cardbase
Metallic lustres in Copper and Gold
Black waterproof stampink
Ink pads in several colors
Masking paper
Scissors


Step 1: Make impressions on the white cardstock using the octopus lady and the skeleton.
 Stamp them again on the masking paper and cut them out.
Step 2: Cover the impressions of the lady and the skeleton with the masks, then stamp the tombstone and the tree.
Step 3: Stamp the border of the Dribonez set next to the tomb.
Step 4: Make an impression of the owl.
Step 5: Add a flower in the corner.
Step 6: Color the stamps.
Step 7: Use colored inks to create a background.
Step 8: Use black ink to distress the edges.
Step 9: Add metallic lustre on the embossed borders of the card
Step 9: Add foam tape on the back of the stamped cardstock
Step10: Adhere the stamped scene to the card base.


I hope that you have enjoyed this project and are inspired to get stamping!!
Please follow us on our Facebook Fan Page Here and share your work with us!
To purchase your stamps head over to Sin City Stamps online store!
Until next time! Thanks!

Copyright Text

Blank Page Muse 2018 Sin City Stamps 2013