Thursday, February 28, 2019

Dream Big Dreams Art Journal

Hello Crafty Friends,


Today, I made an Art Journal Page with some beautiful stamps BPM, a lovely stencil and butterflies.
Always a vintage style for this creation.


BPM Rubber Stamps Used :


Other Supplies

Art Journal
Distress Inks
Stencil
Vintage images or Clip Art


Start to colour your background with Distress Inks.


Use a baby wipe with your stencil.


Here the result.


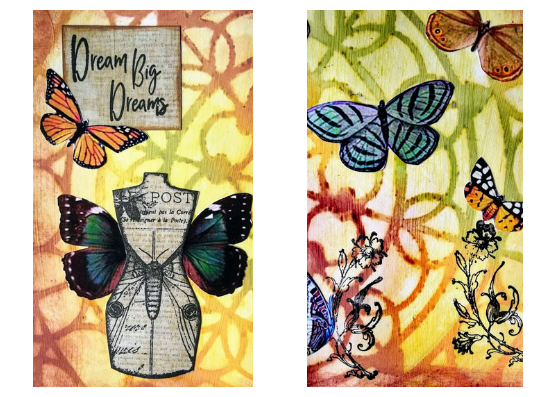
Stamp the mannequin and the title onto a printed paper and the flowers on the Art Journal background.
Adhere two wings and some beautiful butterflies images to finish!


Hope you have enjoyed my tutorial!

Thanks for stopping by today.

Marie-Christine
Inspiration Team Member

Please visit the following for more inspiration!


Wednesday, February 27, 2019

Miss you card

Hello! We are back at Blank Page Muse with a new card - Miss you. I loved the black on kraft look and it was really quick and fast to create for those times when you need a card quick!

This card can be made with any number of colors, but the key is to work with only one color and black and white cardstock. This is called a monochrome color scheme. So let's get started and please share your cards on IG with the hashtag #BPMmonochrome

Supplies -
Blank Page Muse Stamps used -
Dear Beach
Bird Open Wings

Other supplies used -
coordinating colors of washi tape or pattern paper
black ink
kraft card and envelope
black embossing powder
Versamark ink
glue stick
stamp platform

1. Taking the coordinating colors of washi tape, position it about 1/3 from the folded edge of the card. Using the book page and pattern paper, tear the edges so that you have a worn look. On the text page, use the black ink to color the edge. The pattern paper will be a bit wider depending on where you place the washi tape.


2. When the washi tape, book page, and pattern paper are glued down, use another coordinated washi tape to layer over the pattern paper.


3. Using the Dear Beach stamp, I cut it into pieces and I can then use the words in multiple ways. It was a bit scary to cut it apart but when I was finished I have more words to use in other ways! I used the Miss you part of the stamp and the Bird Open Wings stamp, then using the Versamark ink they were stamped on kraft paper and embossed in black.


4. Fussy cut the bird out and then cut out the words and ink around the edges with black ink. Using foam tape, adhere to the back of the words and bird and affix to the card front.


Quick and easy card ready for any occasion! Check out all of the awesome stamps at Blank Page Muse!
The Blank Page Muse- https://blankpagemuse.com/

Tuesday, February 26, 2019

A Fairy Garden Journal Page

Welcome to another tutorial. Lately I have been working in my journal and decided to share a page with you. It's a fairies garden!


This page has lots of texture and uses a beautiful fairy stamp from The Fairytale Fantasy Figures Art Rubber Stamp Sheet Set designed by Terri Sproul


Other supplies used are:
  • gel medium
  • matte medium
  • jute cord
  • tissue paper
  • collage papers
  • gesso
  • green, black and yellow acrylic paints
  • Golden Pearl Acrylic Paint
  • gold mica powder
  • oil pastel/waters soluble crayon
  • waterproof ink pad
  • texture paste 
  • stencil

Let's get started on the background. Spread gel medium around the page and stick on the jute string in swirls. 


Cover with tissue paper, securing with matte medium. Add any other papers at this point.


When dry, add a coat of gesso. Wipe off in areas that you want to show through.


Start adding color to your background, leaving a light spot in the middle for the fairy.


Add a coat of pearl paint where you will place the fairy. This will give the fairy a nice sparkle.


Stamp the fairy stamp on white tissue paper and allow to dry thoroughly. Be sure to use a waterproof ink.


Stick the fairy on with matte medium.


While that is drying, stamp another fairy on a piece of paper, and cut out. This will be used as a mask.


Cover the fairy with the mask and splatter some diluted white paint with a toothbrush.


Now mix some texture paste with some black paint and grab your stencil. Add some words by carefully apply the texture paste through the stencil.


Use a red oil pastel or soluble crayon to add some shading to the page.


To finish off your page, add gold mica powder to the wings and hair to add a sparkle.


Look at that scrumptious texture!


Thank you so much for stopping by. I do hope you enjoyed this tutorial. Remember to subscribe so you don't miss a post and look us up on social media (links below).

Happy crafting!
Suzette

Instagram Shop-  https://www.instagram.com/blankpagemuse/
Instagram Blog-  https://www.instagram.com/blankpagemuseblog/
Twitter-  https://twitter.com/BlankPageMuse
Pintrest- https://www.pinterest.com/blankpagemuse/boards/

Monday, February 25, 2019

Dare To Be Different Art Journal


Hello all
I have a mixed media art journal page to share today and there is a tutorial for you to follow. 


Blank page Muse Stamps:

Ranger Archival Inks
Acrylic Paint


Apply acrylic paints to the page and leave a little white space.


Stamp a few texture stamps around the edge.
Add the chain link texture along the edges but apply ink to a larger area so it over laps a little.
Add the water droplets texture at random along with a few swirls.


Stamp out the vines and skulls onto card stock using different coloured inks and cut them out.
Stamp them again onto the sections of the page you would like to glue them, this is so you don't have to cut out the small intricate parts. Go over the fine details with matching marker pens to highlight the detailed parts.
Cut out the skull and glue them onto the stems, You can add any small image to these so you could use flowers if you don't like the skulls.
Finish with a quote 


The Blank Page Muse Shop http://blankpagemuse.com/
That's Crafty  UK And Worldwide here http://www.thatscrafty.co.uk/blank-page-muse.html

Sunday, February 24, 2019

Tiny Spring Pots

Hi!  Mercy here and spring is (somewhat) in the air.  With trying to keep ahead of the seasons, and in this case, spring ahead of spring with making some decorative flower pots to brighten your home (both indoors and out).  Mini pots from the Dollar Tree were used in this example that came in a set of three, but any earthenware, standard flower pot can be used.  As an added bonus, the decorative pots do not have to have dirt and living plants in them to use, but can be used as storage for other items or just decorative element in a room or in a garden.


Supplies:
Heart & Geometric Stamps
Flower Flourish
Flower Filled with Butterflies
Leaf
Mini Blank Flower Pots
Black Archival Ink
Markers in varying shades of red (pink to red), orange, yellow, purple and green
Stickles (glitter glue)

Instructions:

1. Wipe clean the outside surface of your clay pot with a wet wipe or clean damped with water cloth.  Make sure all dust, dirt an clay particles are clear from the stamping surface.

2. Attach small heart stamp from Hearty Doodles set to a block and using black archival ink, stamp the heart across the belly in intersecting positions.  Once that is complete, clean off small stamp and use Distress Festive Berries and stamp a mall heart border across the lip section.  Allow the hearts to overlap.  Then, take the larger heart from the same Hearty Doodle sheet and impress across the black stamped hearts with Festive Berries.  Once you are happy with the overall stamped surface, start coloring in the hearts using your markers.  


2. Allow to dry.  Move on to the next pot using the same concepts as the first, but with different stamps.  In this example, the Flourish Flower was used on the belly of the pot, overlapping slightly, with black archival ink and the leaf stamp was used on the top lip area as a border.  Everything was hand colored with markers. 


 3. Since this was a pack of three, another set of BPM stamps were used (this time the butterfly, flower silhouette, distorted circle filter and geometric shapes) to enhance the outside of the pot.  Archival black ink again was used.  The smaller stamps work great on the stamping blocks, but the larger stamps were not mounted to the block as I wrapped the stamp around the curved surface carefully. The porous surface took on the ink beautifully.


4. The last steps on these pots were mostly just adding more color from my markers.  On the heart pot, a dark purple Tombo pen was used to fill in most of the background.  On the flower/butterfly one, I just darkened the background of the lip in a dark red and stamped over it with black archival ink.  To add a bit of sparkle bling and dimension, Stickles were used as dots or coloring some of the hearts.


Note that I used a lot of watercolor and non-permanent colors because they were in my stash of tools.  If you wanted a more permanent color, use your permanent markers and inks more.  You can also spray sealant across the finished pot if you want to make the decorations last longer.

Hopefully these fun pots bring a little spring into your life and hearts!  Happy Stamping!


Looking for more Inspiration? Click the links below!

More ideas & crafts by Mercy

Copyright Text

Blank Page Muse 2018 Sin City Stamps 2013