Thursday, January 31, 2019

Love Story

Love is in the air as we approach Valentines Day.
 Do you have a secret admirer? 
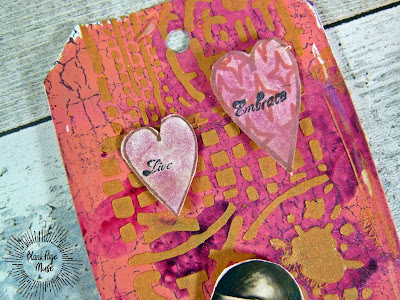
I have a quick tag to share today.


Stencil
Colored inks
Gold Mica Powder
Modeling paste
Vintage love clip art
card


Use colored inks to color the background of your tag, With black ink, use the crackle stamp next. Place stencil over the tag. Mix some gold mica powder in with a bit of modeling paste and spread onto the stencil, covering all of the tag. Lift up stencil and let the modeling paste set before adding your stamped hearts. 


For more idea's, please visit the following:
Blank Page Muse Shop http://blankpagemuse.com/
            Facebook Fan Page https://www.facebook.com/groups/bla...
            Instagram - Shop https://www.instagram.com/blankpage...
            Instagram - Blog https://www.instagram.com/blankpage...
            Twitter https://twitter.com/BlankPageMuse
            Pinterest https://www.pinterest.com/blankpage...

Wednesday, January 30, 2019

Galaxy Love Tag

Hello all Cathy here with a Galaxy Love Tag.
 This was such a fun tag to make. It really does look like a galaxy!


Stamps used:
Other Supplies:
Tag
Assorted colored inks
White acrylic paint
Pink and white pad
Pink cardstock
Heart die or punch
Holographic twine
               
                     
Start out by die cutting some hearts from pink cardstock or if you have a large punch it would work.  I used 2 different size heart dies for this.

 Stamp the hearts with  Faded page text by Terri Sproul and with pink ink. Edge them with the same pink ink. Set aside.
 Now we are going to start to make our galaxy tag. I used a pink, purple, 2 blues and a yellow to make the colors for the galaxy.
 This is what it looks like when you are done adding color.  After you are happy of how the colors look, then you can start  blending some black around the colors to create the galaxy.
Next add splatters of white paint and begin stamping the star with white paint, randomly around the tag.
 Adhere the couple to the side of the tag along with the hearts we made earlier. Use the holographic twine to make them look like they are suspended.


I hope you enjoyed this galaxy love tag.
Come check out these great sites for Blank Page Muse:
The Blank Page Muse- https://blankpagemuse.com/

FB Fan Page-  https://www.facebook.com/groups/blankpagemuse/

Instagram Shop-  https://www.instagram.com/blankpagemuse/

Instagram Blog-  https://www.instagram.com/blankpagemuseblog/

Twitter-  https://twitter.com/BlankPageMuse

Pintrest- https://www.pinterest.com/blankpagemuse/boards/


Tuesday, January 29, 2019

A Valentine's Wish...


Hi Blank Page Muse Stamps Fans! 
Have you been enjoying this month's "Valentine's" themed creations and inspiration?
I'm sharing a mixed media semi vintage style card today - perfect for you to make for that someone special!

Supplies:

Blank Page Muse Stamp: "Make a Wish" from the Dandelion Wishes with Butterflies Set
Blank Page Muse Stamp: Vintage Style Man & Woman from the Romance Classic Couples Set
Black Base Card
Card 1cm smaller than the front of your base card
Old Book Pages
White Watercolour Paper/Card & Small piece white card
Heart Stencil & Texture Paste
Ink Sprays and/or Brea Reese Glitter Ink or like Product
Black & Pink Archival Ink
Gold "Smooch"
Watercolour Pencils and Water Brush

Embellishments: ink stained muslin cloth, corner charms, diamante
General supplies: glue stick, glue, spatula, heat tool to speed up drying process, scissors, double sided tape, mounting tape


Instructions:
Start by cutting your base card from black card or using a pre-made card base. Use your glue stick to adhere torn pieces of old book pages over your card front piece which is cut to 1cm smaller than your card front. Cover the entire front with the pages and then trim excess from sides of card.


Use a "love" themed stencil to apply texture paste to the card front. Note: I didn't cover the entire front - it looks more effective to "miss" bits!! The stencil used here was cut from a piece of acetate on a Cameo Silhouette. We all have our favourite stencils- this I one of mine! Allow to dry.


Once the texture paste is dry spray some pink ink spray and Brea Reese glitter ink and spread over the page by spritzing with a bit of water and "moving" the ink around on the card. Gold and Pink colours used on this card. Allow to dry.


To add a finishing touch to the card front "edge" the piece with gold Smooch or like product. Allow to dry. Remember you can speed up any of the drying processes carefully with a heat tool.


Stamp the Romantic couple onto watercolour paper with Black Archival ink. Stamp the "Make a Wish" wording onto plain white card. Cut around the wording and edge with Pink Archival ink.


Colour the Romantic Couple with watercolour pencils and a water brush and when dry fussy cut the image ready to use on the card front.


Use double sided tape or glue to adhere the card front to the card base. Gather all your stamped images and embellishments ready to arrange and adhere to the card.


Adhere all the elements to the card - use mounting tape to adhere the main Vintage Couple.


Happy Stamping!
Sharon
 Don't forget to visit us at all of these Social Media Sites for more inspiration:

The Blank Page Muse- https://blankpagemuse.com/

Monday, January 28, 2019

Time Will Explain - Art Journal

Hello Crafty Friends,

Marie-Christine with you today with an Art Journal Page.
I would like to show you how to make a beautifully raised background using Blank Page Muse Stamps!


BPM Stamps used:

Other Supplies:
Magazine pages
Stencil
White Gesso
White Texture Paste
Spray Inks
Patterned Papers
Vintage image of a couple


Use the gel medium to adhere some magazine pages to a art journal page.


Then paint over all with white gesso.


When dry, apply some white texture paste with a floral stencil. 
Let the texture paste design set before spritzing with different colors of inks. 


Once dry, randomly stamp all over the page with the script and grunge stamp.


Stamp the other stamps onto patterned paper, and cut them out.


Adhere all your elements to your journal page.


I hope to have inspired you with this vintage project!

Marie-Christine
Design Team


Don't forget to visit us

The Blank Page Muse- https://blankpagemuse.com/

Sunday, January 27, 2019

Valentine Paper Doll

Remember when you were little and played with paper dolls?
Well this project allows you to create your own dolls or other images with lots of possibilities!
You can use magazine cut-outs, colored pencils, markers, stamps and much more to create these easy to make standing toys.


Blank Page Muse stamps –

Other supplies used –
Water-based markers
Brown grocery sack or cardstock
Sewing machine
Beeswax pellets
Potpourri crock pot
Old brush or foam brush
Iron
Scrap paper
Small plastic cup

Step 1 – If using a brown grocery sack, tear down the seam and cut out the bottom so that you have a sheet of paper, fold this in half and cut out the approximate size to fit your stamps. If using cardstock, fold in half.


Step 2 – Lay your stamps onto the paper and trace around with a pencil leaving at least a ¼” edge.


Step 3 – Use your  sewing machine to stitch around the pencil mark, leaving the bottom open. Cut out around the sewn edge leaving about ¼”.


Step 4 –Stamp your images on both sides.


Step 5 – Color your images with your choice of medium – colored pencils or markers. Glue any additional bits on also.


Step 6 – Melt the beeswax pellets and brush over the images on both sides, allowing each side to dry.. Before your doll is completely dry, carefully open the bottom with a thin paintbrush handle and slide over the small plastic cup so the melted beeswax can set.


Step 7 – When the waxed image is completely cool and dry, iron between several layers of paper to remove excess wax.


Your  doll is now ready for play or to display! 
This process can be used to create all kinds of items such as an angel for the tree, a village, and lots more.

The Blank Page Muse- https://blankpagemuse.com/


Saturday, January 26, 2019

Adding Dimension to a Journal Page

Hi there! Do you ever want to add more dimension to a journal page but you are not sure how? Well today I will show you how to add texture using Blank Page Muse Rubber Stamps and some texture paste.


For this project I used the following Blank Page Muse Rubber Stamps:


Other supplies:
  • Blank journal page
  • Texture Paste - Opaque Matte
  • Yellow acrylic paint
  • Colored ink sparays
  • Versafine Ink Pad - Onyx Black
  • Colored markers
  • Glitter gel pen
  • Water brush 
  • Blending tool, palette knife, paintbrush, paper towel, glue and scissors

Cover your page with texture paste.


Using your rubber stamp, press into texture paste in several areas. Wash your stamp off immediately.


Allow to dry thoroughly.


Paint with acrylic paint and allow to dry.


Spray with a contrasting color spray ink.


Look at that texture!


Use a paper towel to gently remove excess ink.


Set aside to dry.


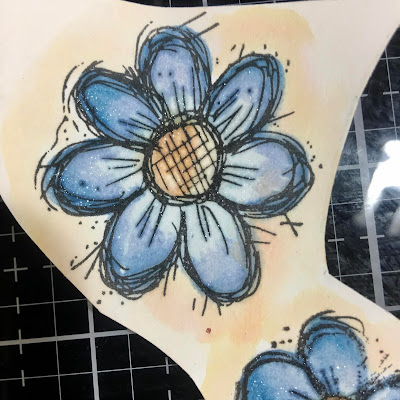
Meanwhile, stamp the flowers on cardstock.


Color you flowers using water soluble markers.


Add color to the outer parts of the petal and then use a water brush to blend with the rest of the flower.


When your flowers are dry, use a glitter pen to add some sparkle.


Cut out the flowers and stick them in place.


Add your sentiment, quote etc. You can go around the edges with a little black ink to help them stand off the page.


Add shadows to the edges of your page using a blending tool and black ink pad.


Your journal page is complete!


Here are a few more photos.


Thank you so much for stopping by. I do hope you enjoyed this tutorial. Remember to subscribe so you don't miss a post and look us up on social media (links below).

Happy crafting!
Suzette

FB Fan Page-  https://www.facebook.com/groups/blankpagemuse/
Instagram Shop-  https://www.instagram.com/blankpagemuse/
Instagram Blog-  https://www.instagram.com/blankpagemuseblog/
Twitter-  https://twitter.com/BlankPageMuse


Copyright Text

Blank Page Muse 2018 Sin City Stamps 2013