Wednesday, October 28, 2015

Thanks for Fall!

Hello All Lanette Here!

Today I'm going to share a fun fall card featuring a couple of Pam's fabulous stamps!


First lets take a look at my card and then I will take you through my process.


Stamps Used:  Pam Bray's Fall Collection

Other Products Used: Ranger water-brush, Distress Ink, India Ink, Vera Ink, Embossing powder, Golden Gloss Gel, Watercolor Pencils, Ribbon and Pattern Cardstock.

Now lets look at my process......

I started by making a quick mask with a post it note.


 Next I used my little post it mask to stamp the image over and over with out over lapping the ink.


Next I colored my image using a water brush and my water color pencils. 


After I colored my image I sealed my colored images with a bit of gloss gel.


Next it was time to add a bit of background color, again using my water colors.


Next I stamped & heat embossed my verse, this is another fun stamp from Pam's Collection.


Next I started to build my card by matting and framing my image on a bit of pattern cardstock.


The last thing I added was a pretty little bow..


And that's it easy peasy a fun Fall Card to share with a dear friend :)


Thank you so much for stopping by today!

I hope that I have inspired you to have some inky fun of your own!

After all time flies! You gotta get inky when you can!

Remember to like us on Facebook and stop by the store for all your stamping needs!!

As always feel free to stop by my blog Stacks of Scraps anytime!


Monday, October 19, 2015

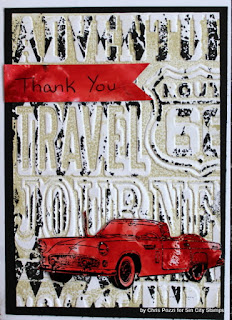
Creating Masculine Thank You cards


Hi Chris here today sharing this masculine thank you card I created for my uncle for helping out with my daughter's car.

To re-create this card you will need:

Sin City Stamps - Classic Spark Set
Photo Paper
Tim Holtz Embossing Folder
Black Sharpie
Tim Holtz Distress Inks- Worn Lipstick, Fired Brick, Black Soot, and Antique Linen
Cardstock - black, white
Ranger- Archival Ink - Jet Black


 To create this card I first stamped my Worn Lipstick and Fired Brick ink pads onto my Craft Sheet.

I then spritzed my craft sheet with water. 


I then laid my photo paper shiny side down into the ink, and then carefully lifted it off the ink and heat set my ink.


 I then stamped the classic car using the Archival Ink and fussy cut out the car.

 I then inked the "raised side of my embossing folder with the Antique Linen ink and embossed my paper.  By inking the raised portions the ink is transferred to the inlay portions of the embossed image.

I then Stamped over the embossed panel using the background stamp from the Classic Spark set.  I thought it really grunged up the embossed page.

I then matted the embossed piece onto black cardstock and added the car and a hand written banner (which I hand cut from the photo paper) to finish  off the card!


Monday, October 5, 2015

A Jump Start on Christmas Cards

Hi Chris here and today I am sharing this fun Christmas Card.
Supplies Needed:
Sin City Stamps - Natural Beauty
Photo Paper
Tim Holtz Distress Inks - Stormy Sky, Weathered Wood, Forest Moss, Peeled Paint
Ribbon
Tag: Recollections
Card Stock

To create my back ground I started by stamping my Stormy Sky and Weathered Wood ink pads onto my Craft sheet and spritzing it with water.

I then laid my photo paper glossy side down into the ink.  Here is the result

I used my heat gun to dry the ink. I then inked my branch stamp with Forest Moss and Peeled Paint. I stamped multiple times to create my "tree". I stamped the image two or three times before reinking to created branches in the background. I then heat set my stamping.
I matted my stamped page onto card stock and added a ribbon.
I then tied on my tag with my hand written greeting and matted the whole thing onto my card. HOpe you enjoyed this project!


Friday, October 2, 2015

29 Again.. Birthday Card... with Tamiko

Hey good people!  It's Friday and I have a birthday card to show you ::smiles:: I combined images from the Madame Stampset and the Bingo Stampset .. They both give me a vintage feel and seem to go together.. What do you think?


I took out my water soluble crayons called Neocolor IIs, after stamping the images with an archival inkpad on 140lb watercolor paper. I used my waterbrush pens to apply color.


I also used my Wink of Stella glitter markers to add a little sparkle.  :::if you haven't noticed I LOVE sparkle:: You won't see it much in my main picture because of the lighting in the room.


Created wording of my own in my own handwriting using a waterproof pen. Then I matted the main images and a card was created.  Cute and simple..


Hope you enjoyed my card today.  Oh by the way, tomorrow October 3rd, 2015. is WORLD CARD MAKING DAY!!  Best way to celebrate is by going over to the Sin City Stamp Site/Store and fill a basket with all your cardmaking desires and make a purchase!!  Thanks for coming by!!!


Copyright Text

Blank Page Muse 2018 Sin City Stamps 2013