Showing posts with label #dribonez. Show all posts

Saturday, November 17, 2018

Family Memories

Hello Everyone!!
Who can believe it's halfway through November already? Xmas will be her before we know it!


I hope you have been enjoying our November themed month of Family, Fall & Thanksgiving!
Today I am sharing some Sugar Skull tags with my thought process being "The Day of the Dead" and a day of remembrance and celebration of past family members lives.
I hope you like how they have turned out and feel inspired to try something like this yourselves!
Supplies:
Baggage Tags: size used here 6cm x 12cm
Cork Sheet
Black Archival Ink
Cobalt Achival Ink
Matt Chalk Acrylic Paints
Tools: spatula or paintbrush, scissors, glue
Extras: string/twine, ink sprayed muslin cloth scraps
Instructions:

Start by using a spatula or paintbrush and adding a thin layer of various colored chalk style acrylic paints to the tag background.


Once the paint is dry - which won't take long as the thin application is quick to dry - stamp one of the little "floral" stamps from the Sugar Skull set over the tag background using the Cobalt Archival Ink.


Next is to stamp the feature stamps onto the cork sheet. Stamp any (or all) of the Sugar Skulls onto the cork using the Black Archival Ink. Fussy cut the skull.


Follow the same process with the "Memories" stamp but instead of cutting the word out just tear the cork. I love this about the cork sheet - it being pliable enough to tear out images and have the messy jagged look!

Use a fine black pen to draw a border around the edge of the tag for a finished look.

Gather all of your stamped images and extra bits and pieces so you can assemble the tag!

Arrange everything on the tag and then adhere with glue - place the Sugar Skull half off the side of the tag and trim. Tie the string at the top. TIP: you can use the "other half" of the skull for another creation!!!!


Whilst I was making this I stamped and painted enough other bits & pieces so I could make some extras!


Happy Stamping!

Sharon :)

Don't forget to check us out at all of the following Social Media Sites:
The Blank Page Muse- https://blankpagemuse.com/

Monday, October 15, 2018

Spooky Haunted House Shadow Box

Its my favorite time of the year when things get spooky. 
Check out this configuration  box I created using stamps by The Blank Page Muse!


Supplies used:
Wooden shadow box house
Acrylic paint
Gesso
Colored ink pads
Halloween embelleshments


Start off by painting the box with gesso. 
Once dry,  paint the frame purple and the inside green and orange. 


Stamp out the halloween images and colour them with inks. Use different ink pads to create variety.


Stamp the Grunge Background stamp over the frame in black ink.


Begin to add the stamped images to the sections. Fill out the sections with faux cobwebs, faux moss and beads.


Use alphabet beads to spellout spooky words.


Keep adding layers of stamped images and charms to the box. Fill little glass bottles with micro beads and glitter to create potions.


Add gems to eyes to create  a spooky glow.


Thank you for  visiting  and please follow us on social media 


The Blank Page Muse Shop http://blankpagemuse.com/
That's Crafty  UK And Worldwide here http://www.thatscrafty.co.uk/blank-page-muse.html
FB Fan Page https://www.facebook.com/groups/bla...

Saturday, September 8, 2018

Dandelion Wishes Card

Karen here today to share my "Quick Idea" creating a simple blended background with a meadow silhouette.  The metal brad dragonfly embellishment added that little something special to a basic flat card. I hope you will try your own silhouette sunset cards and share them with us on the Facebook Fan Page.  Have a creative day!

Blank Page Muse Stamps:   Dandelion Wishes & Butterflies


Other Supplies:
  • black ink pad
  • distress inks
  • ink blending tool
  • glitter gel pen
  • dragonfly embellishment
  • mounting block
A Closer Look:

Blank Page Muse Shop http://blankpagemuse.com/
Facebook Fan Page https://www.facebook.com/groups/bla...
Instagram - Shop https://www.instagram.com/blankpage...
Instagram - Blog https://www.instagram.com/blankpage...
Twitter https://twitter.com/BlankPageMuse
Pinterest https://www.pinterest.com/blankpage...

To learn more about our designer Karen, please visit her blog, Art & Soul.

Thanks for visiting!

Tuesday, September 4, 2018

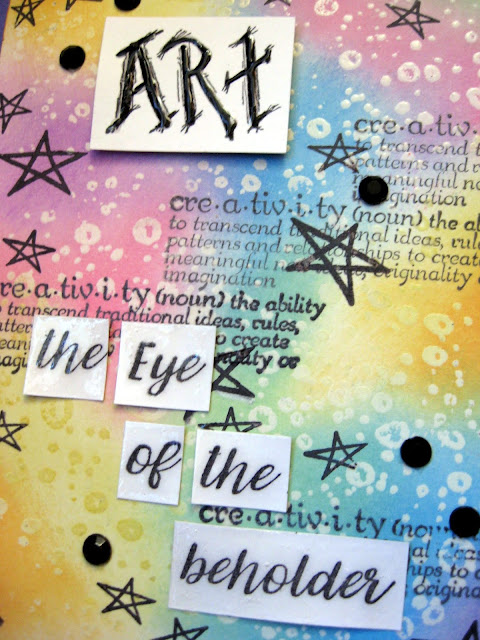
Eye of the Beholder Card

This month's challenge theme is "Color Layering"  My layers include stamping the definition in permanent black ink.  Then I used embossing ink with clear embossing powder to create the splattered pattern in the background. I gently blended oxide inks to add color and make the embossing pop. I hope you enjoy my tutorial!


Stamp Supplies:
Creativity Definition Word Phrase Rubber Stamp by Terri Sproul
Art Journaling Mixed Media Stamps Set 1 Pam Bray Designs
Waterdrops Background Rubber Stamp
Art sentiment stamp - Soulful Dolls Art Rubber Stamps Sheet by Cathy Frailey

Other Supplies:
  • black ink pad
  • embossing ink
  • clear embossing powder
  • heat gun
  • Oxide Inks (pink, tangerine, yellow, pistachio, lt blue, lavender)
  • ink blending tool
  • star stamp
  • clear dimensional paint
  • black gems
  • liquid adhesive
  • clear mounting block
Directions:
1. Stamp a text or definition back ground stamp randomly with black ink onto white cardstock. Use embossing ink to stamp waterdrop background. Apply clear embossing powder and heat set.


2. Apply a variety of colored inks using an ink blending tool to carefully shade and blend the colors over the stamped designs.


3. Use black ink to stamp a scattered an arrangement of various sized star images.  Apply the background to a cardbase.

4. Stamp the sentiment onto white cardstock and cut around each word. Assemble with
foam tape and apply clear dimensional paint over each individual word.  Finally, use liquid adhesive to embellish the design with a random scattering of black gems.

www.blankpagemuse.com
Follow us on Facebook and Pinterest.
Join the Blank Page Muse Fan Group...HERE
Instagram - Shop
Instagram - Blog
Twitter


To learn more about our designer Karen, please visit her blog, Art & Soul.
Thanks for visiting us today!

Monday, July 31, 2017

More Skull tags by Monique- Quick Idea's

I had a play with the 3 new stamp sets and my own :-)   I just mixed them and this came out
Sin City stamp sets used: Background Grunge set  , Wildflower Yikes and DriBonez 
 All backgrounds are Distress ink in various colors.
Next I used a waterproof black stamp ink and mixed and matched the sets.

 On this one I added some red glitter paint around the edges of the tag and in the flourish behind the skull (the flourish is also on the Grunge background set)
 Around the edges are the bones border stamps and on the bottom a nice pair of skulls and bones.
 On the pic below you can see the flourish stamp in the background and the glitter.......


The last tag, is just the Dribonez set and a splatter stamp from my stash.


It was fun to have a play with the sets and see what you can do combining them.

To purchase the stamps for this project, please visit www.sincitystamps.com 
For more inspiring paper-craft projects from the Design Team, be sure to visit us at the Sin City Blogand follow us on Facebook.  Also, share your creations with us and join the Sin City Stamps Fan Page HERE.

Thanks for visiting!

Tuesday, July 18, 2017

New Release Rick ST Dennis~ See No Evil ATCS ~Quick Ideas!

Hi all!

I have an ATC set using the new DriBonez set by Rick St Dennis.


 Use inks on the background and blend the colours. 
Then use the Background Grunge Art Stamps around the edges and 
use the DriBonez boarders around the corners. 


Add texture to the backgrounds using modeling paste and stencils.


Stamp out the large skulls onto white card and color. 
Cut out and adhere to ATC base and finish by adding a few words to the ATC.


Copyright Text

Blank Page Muse 2018 Sin City Stamps 2013