Showing posts with label Quick Ideas. Show all posts

Wednesday, June 10, 2020

Quick Idea with Sharon~ June Mood Board and May Winner!

Today DT Member Sharon has a quick make idea for you using left over patterned paper and BPM Sentiment Stamps!

These cards are perfect for when you need to make a card at the last minute and we know that can happen!
Grab some scrap patterned paper and cut slightly smaller than your card base, cut in half diagonally to make two cards at once and adhere to card base or leave as one piece!
This is also great for ATC,s and tags/bookmarks!
"Edge" the patterned paper with an ink pad if you like to create a "border".
Stamp your BPM Sentiment Stamp and you have a card ready to go!


Why not create something using the Colour Palette for our challenge this month and link up!


Don't forget to check us out at all of our social media sites
The Blank Page Muse- https://blankpagemuse.com/

Here is our June Inspiration Mood Board:


And last but not least, thank you everyone for reading and playing along in our creative stamping challenge!
The Winner for our May Challenge is...

#1 from Rocky's Crafting Blog
a tag card nature journal! 
A beautiful project packed with stamping and stencils! Congratulations!
Please contact us at blankpagemuse (at) gmail dot com for your badge and information!

Have a fantastic day!


Link Up for June here (or above)


Thursday, February 20, 2020

Using more than one stamp in a project

Today our DT Member Sharon is showing an idea for making backgrounds using multiple stamps, paints, inks and clear packing tape!
Sharon loves to create lots of tape strips at a time - she leaves them hanging from her craft cupboards until she needs to make a quick creation and adds the decorated tape to blank card or old book pages and she has the perfect background for all sorts of things like tags, ATC's and adding interest to her journal pages!
We think it's a great idea to have these on hand to lay with!
There are lots of Youtube videos on how to use your Gelli Plate to "pull" designs on the tape so get googling, grab your fav background stamps from the BPM Store and have fun creating!

Stamps by Pam Bray Designs used on these strips!


Perfect backgrounds for bookmarks, tags, atc's, cards - anything!

Stamps by Magda Polakow!


Don't forget to check us out at all of our social media sites
The Blank Page Muse- https://blankpagemuse.com/

Tuesday, December 31, 2019

First Christmas Together Ornament

Hello!  Susie on the blog today with a Quick Idea for a "First Christmas Together" ornament.

All the ornaments on my Christmas tree remind me of events and people in my life.  Decorating my tree every year is like a walk down Memory Lane. I love to reminisce with my husband and children as we "deck the halls".  I also like to give ornaments that commemorate special events: a graduation, a new home, a new baby or...a First Christmas Together!

Time to play...


Supplies:
Lady & Man Clock with Writing Art Rubber Stamp
Clearsnap ColorBox Blends Inks
Archival Ink, black
Embossing ink
Embossing powder, black & clear holographic
Decorative circle die
Metallic gold cardstock
Metallic gold marker
Want2Scrap Baby Bling, black & clear rhinestones

Directions:
  • Stamp and heat emboss the image with black ink and embossing powder.


  • Color image as desired and protect with a layer of clear embossing powder. 
  • Cut out the image and adhere to decorative background. (I used a Spellbinder's die cut, but you could actually use a store bought doily - they come in lots of different colors and finishes.)


  • Add sparkle and texture around the edge with self adhesive rhinestone bling!


  • Optional:  write on the back with names, dates and personal note.


Happy New Year and thank you for stopping by!  I hope you find some time to play today!
Susie

Looking for more inspiration?
Click the links below!

Sunday, December 29, 2019

Mermaid Chunky Dunk


Greetings to all of you in mermaid land!  Kai Lana & Friends Mermaid Jellyfish Starfish Art Rubber Stamps designed by Stephanie Eaton are a perfect reminder that after the holiday we can all embrace our inner mermaid *wink*.

Supplies needed
 Kai Lana & Friends Mermaid Jellyfish Starfish Art Rubber Stamps designed by Stephanie Eaton
Ink -blue, green, black
Ocean-y patterned paper
white card stock
markers or other preferred coloring device


Starting off with a ocean-y patterned paper, stamp the sea weeds and plant from the   Kai Lana & Friends Mermaid Jellyfish Starfish Art Rubber Stamps designed by Stephanie Eaton.


Stamp mermaid and greetings onto white cardstock and fussy cut. Color mermaid as desired. Add to card to finish. 

Be sure to follow us

The Blank Page Muse- https://blankpagemuse.com/


Saturday, November 16, 2019

Fall Leaves Layout with Acetate

Hello!  Susie on the blog today and I am going back to my scrapbooking roots to share a fall layout.

One of the reasons I love living in northern Virginia is because we get all of the seasons here.  I have always loved fall because of the seasonal craft shows and holidays, but now I really enjoy the beautiful fall leaves when "every leaf is a flower".  Today I am sharing a quick idea so you can add those colorful leaves to your layouts, planners and cards!

Time to play...


Supplies:
Leaves Rubber Stamp Set Sheet by Terri Sproul
Stazon Inks- Mustard, Timber Brown, Pumpkin, Blazing Red
Elizabeth Crafts Dies - Planner Essentials 4 & 5
Stamping platform
Acetate sheet


Directions:

  • Position your stamp(s) on a stamping platform.
  • Place acetate in stamp platform on top of a sheet of white paper and secure with magnets and/or washi tape.
  • Select several fall colors of StazOn ink.
  • Apply the lightest color ink to all of the stamp surfaces and stamp the image(s) on the acetate.


  • Apply layers of StazOn ink, one color at a time, until you have the desired colors.  Note: create a variegated effect by adding different color inks to only parts of the leaf surfaces before stamping. 


At this point you have options!  You can die cut the acetate to create planner inserts and card embellishments.


You can use the acetate sheets just like patterned papers on your layouts.  I love the large scale leaves in the background!


Add a favorite photo and you are done!


Stamping on acetate is so easy if you use a stamping platform and the right ink. To make sure you don't smear the images don't over ink your stamps and wait until the ink is dry before you handle it!

Thanks for stopping by and I hope you find some time to play today!
Susie

Looking for more inspiration?
Click the links below!

Sunday, October 13, 2019

Bible Verse Pocket Card

Greetings!   I was recently asked to create decorations for a Ladies Day event at church.  The invitation had poppies on them and the organizer really wanted to bring in the poppy theme!   and I thought I can do that!  So I am sharing this  quick idea for using your Blank Page Muse stamps to create Bible Verse Pocket cards.  I was able to create about 110 of these in a few hours!  While the bible verse are from another set, they could be easily printed from your printer.

Supplies
Archival Ink
Watercolor Paper
Kraft Card stock
Distress Inks

To create these in bulk, I started by pre-cutting my watercolor paper (3 3/4 x 2 3/4 inches) and Kraft Card stock mats (3 x 4).

Stamp the poppy from  on both edges of card.


Using 2 colors of distress ink Paint flowers with water color brush.  IT IS OK TO GO OUTSIDE THE LINES.  Paint quickly and roughly.


 Stamp or print verse over stamped images and mat to finish.


Sunday, October 6, 2019

Celebrate Mad Hatter Day with Blank Page Muse

Hello!  Susie on the blog today and we are celebrating Mad Hatter Day!

In the realm of Weird & Wonderful (our theme for the month!) there are none weirder or more wonderful than the characters found in the pages of Lewis Carroll's classic, Alice in WonderlandMad Hatter Day is celebrated on October 6th because the original illustration shows the character with a paper marked 10/6 in his hat (actually referring to the cost of the hat - 10 shillings and 6 pence).  The stamp from Blank Page Muse does not actually include this detail but I decided to add it when I created a shrink plastic charm for my bracelet.

Time to play...
Supplies:
Alice in Wonderland Characters Rubber Stamp Sheet Set 2
Archival ink, black
Stamping platform
Shrink plastic - I used Shrinky Dink for this project
Crop A Dile hole punch
Walnut Hollow Oil Color Pencils
Oven
Micron Pens
Traditions - Instant Gratification Bracelet and "We're All Mad Here" Focal Pendant
Split Rings

Directions:
  • Stamp image on shrink plastic with black Archival ink and allow to dry.
  • Color image on reverse side with oil colored pencils.
  • Trim out image with scissors.
  • Punch hole for hanging charm.
  • Optional:  Use Micron Pen on front of shrink plastic to add in 10/6 on hat.
  • Bake/shrink according to manufacturer's directions.


  • Add charm to bracelet with split rings.


FYI:  Here's a size comparison of the stamp and the finished charm.


Blank Page Muse actually has 2 sets of stamps with lots of the characters we know and love. Check them out and use this quick and easy idea to add a weird & wonderful character to your jewelry collection!

Thanks for stopping by and I hope you find some time to play today!
Susie

Looking for more inspiration?
Click the links below!


Tuesday, September 3, 2019

DIY Halloween Wine Glass Charms

Hello!  Susie on the blog today and I am pulling out the shrink plastic again!

Time to create some DIY Wine Glass Charms!  This is a fast and easy project and if you are like me you will probably spend more time choosing which stamps and beads to use than actually crafting!

Time to play...


Supplies:
Halloween Takes Flight Rubber Stamp Set
Halloween Bingo Rubber Stamp Set
Shrink Plastic (I used Shrinky Dink brand)
Walnut Hollow Colored Pencils
Archival Ink - Black
Colored pencils
Hoop earrings
Split rings
Beads
Heat Gun
Scissors
Crop A Dile
Pliers
Stamping platform
Craft mat

Directions 
Select desired Halloween themed stamps and position them in a stamping platform.
Stamp the images onto shrink plastic with Archival black ink.
When the ink is dry trim out the shapes and punch holes as desired.


Color images on the reverse side of the shrink plastic with colored pencils (or whatever is recommended by your shrink plastic).
Shrink using  a heat gun on a craft mat.


Thread split ring onto each charm and add to hoop earrings with beads.


Option:  Create charms without adding any color.


The holiday party season is just getting started and these would make really cute hostess gifts.  I am already planning some for Thanksgiving and Christmas!

Thanks for stopping by and I hope you find some time to play today!
Susie


Looking for more inspiration?
Click the links below!


Tuesday, August 27, 2019

Bees and Sunshine

Today our DT Sharon has a really quick and simple tag to share with you that can be adapted to any creation you are making ie. greeting card, artist trading card or coin, journal page.


She started with a blank tag and used decorating chalks through a stencil.
After spray sealing the chalks she added a fun "Bee" stamp by Pam Bray along with a "Sunshine" word stamp from the Sunshine Cherub set!
To finish the tag was edged with a black Posca pen and string tied at the top.
An alternate idea is to stamp onto kraft card and fussy cut the images and adhere to the tag!
A great idea for any BPM stamps you have!


Check out the links below for all of your red rubber stamp needs at Blank Page Muse and follow us for lots of very cool projects!

The Blank Page Muse Stamps - https://blankpagemuse.com/


Tuesday, August 6, 2019

Shrink Plastic Embellishments

Hello!  Susie here with a quick idea to add a little dimension to your crafting - literally!

Not all card makers or scrapbookers like to add dimension to their projects, but I do.  I also like to get the most out of my craft supplies so when I find a way to do both using my rubber stamps you can bet I am going to go for it!

Time to play...


Supplies:
Blank Page Muse: Anime Fairies and Baby Dragons Fantasy Art Rubber Stamp Sheet Set
Archival Black Ink
Stamping platform
Shrink plastic
Scissors
Hole Punch
Markers
Misc beads and findings

Directions:
Begin by stamping fairies and dragons onto shrink plastic using Archival black ink. When the ink is dry, trim out the shapes and punch holes as desired.


Color images on the reverse side of the shrink plastic with markers or colored pencils - follow directions provided with your shrink plastic.


Bake according to directions.


If desired, string together with beads to create fun dangles for craft projects or to wear as jewelry.


I find it so relaxing to make these charms. It is perfect to do while sitting in front of the TV.  I stamp out lots of images and then take my time coloring and trimming them out.  I bake them up when I have a big batch.  I love having them at my fingertips when I am looking for a little accent piece!

Thanks for stopping by and I hope you find some time to play today!
Susie


Looking for more inspiration?
Click the links below!


Friday, May 17, 2019

Smile When You Remember........

Hi Blank Page Muse Fans!

I hope you have been enjoying the DT creations so far this month! Always so much creativity and inspiration being shared here at the blog!

Today I am sharing some vintage style tags made with rubber stamps and collage elements!
I love combining rubber stamping with collage - a great way to compliment each other!
Supplies:
Blank Page Muse Stamp: Background Roses by Pam Bray
Blank Page Muse Stamp Set: Art Journaling #2 by Terri Sproul - "Remember When" & "Smile"
Blank Page Muse Stamp: Background Grunge Art Sheet by Pam Bray - "Single Rose"
Blank Tags
Collage Characters - used here Art Tea Life Collage Sheet
Ink Sprayed "Mop Up" Paper Towel
Embossing Ink & Gold Embossing Powder
Black Archival Ink & Distress Inks
Gesso
Kraft Paper Scraps
Scraps Muslin Cloth
Cloth Ribbon & Fancy Pin
Tools: heat gun, scissors, glue, sponge, spatula
Instructions:
The first step is to decorate your tag background.

Use a glue stick to cover the front of your tag and adhere the paper towel to the tag. Cut out around the tag leaving a border to fold over and adhere to the back of the tag to give a neat finish to the tag front. Then use a spatula and the Gesso and apply a very thin layer to the tag front. As you can see in the picture above the Gesso helps to tone the colour ready for the next step.
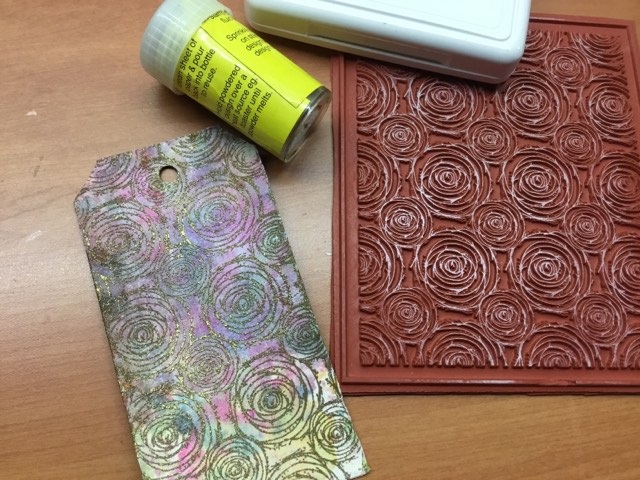
Ink the Rose Background Stamp with embossing ink and stamp onto the tag. Use gold embossing powder and a heat gun to set. the effect of this stamp over the background in gold is beautiful!
Decorate the plain cloth ribbon to add to the top of your tag. Use a sponge and some Distress inks to colour the ribbon and then stamp the Single Rose with Black Archival Ink randomly over the ribbon.
Stamp your wording stamps onto Kraft paper and tear out.
Fussy cut your collage elements and arrange on the tag along with the scrap of muslin cloth and wording stamp and adhere with glue. Attach the printed ribbon to the top with a fancy safety pin.
Hope you have enjoyed my post today!
Always so many ways to use your Blank Page Muse Stamps!
Enjoy!
Sharon

Don't forget to check us out at all of our social media "haunts"!!!
The Blank Page Muse- https://blankpagemuse.com/

Copyright Text

Blank Page Muse 2018 Sin City Stamps 2013