Showing posts with label Halloween Bingo. Show all posts

Saturday, October 2, 2021

Halloween Bingo Artist Trading Coins

Hi all, Katie here!
I have a spooky fun set of artist trading coins to share using some of the Halloween stamps available from The Blank Page Muse Stamps.


Use a 2.5 inch circle die to make the base from card and then spray with mist sprays to create the background. 


Use the large Halloween Bingo stamp on the base and then start stamping out the pieces onto card. Use different coloured inks to get different looks for the stamped images.


If you spray the card with the mist spray first, you will get stronger lines and it will stop the ink lines being washed off.


The Blank Page Muse Shop http://blankpagemuse.com/

That's Crafty  UK And Worldwide here http://www.thatscrafty.co.uk/blank-page-muse.html


Wednesday, October 23, 2019

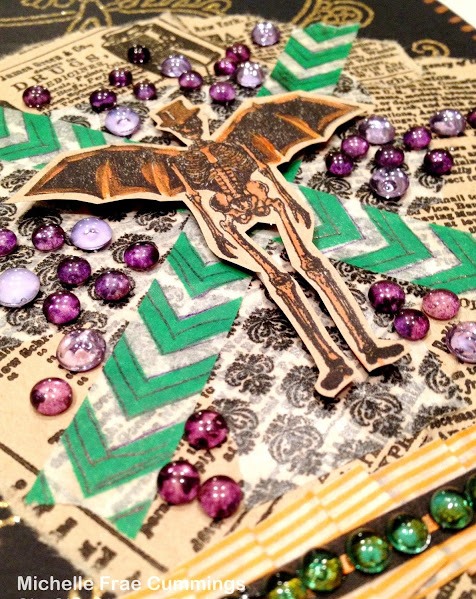
Winged Skeleton Card

Hi Everyone, Michelle here with a card to portray my favorite Holiday...Halloween!
I know it's late, but I could not resist. I hope you'll enjoy and be inspired to create your own!


 Supplies:
  • Winged Skeleton and "Dead men Tell No Tales" from Halloween Bingo Stamp Set
  • Dew and Diamond drops
  • Vintage news print
  • Scrapbook Paper
  • Assorted washi tapes
  • Pumpkin Smooch
  • precision scissors
  • Black stamping ink
  • Adhesive, foam tape, and a pen.

Start by trimming your scrapbook paper to be a card size of 4"x6".
Next attached several torn pieces of the vintage news print. 
Place some decorative washi tape in the center of the card and some pleat a bit near the bottom.
A few more strips of washi tape were placed on the card before I added decorative detail with the liquid smooch.
Stamp the winged skeleton and the saying onto the back side of the vintage newsprint paper. 
Cut out and color lightly with the smooch.
 I added a criss-cross of washi tape to the center of the card before adding the skeleton with foam tape.


Decoratively add the dew drops and saying.

Happy Halloween! 
-Michelle
Don't forget to check us out at all of our social media sites
The Blank Page Muse- https://blankpagemuse.com/


Sunday, September 22, 2019

Halloween Mini Album

Hello!  Susie on the blog today with a Halloween themed mini album.

We love to celebrate Halloween at our house and have had lots of fun over the years with all of the associated activities:  pumpkin carving, apple bobbing, costumes, candies and parties! I  created a little mini album to hold some of my favorite pictures and I found the perfect stamps from Blank Page Muse to add a little creepy touch!

Time to play...


Supplies:
Halloween Bingo Stamp Set
Halloween Takes Flight Stamp Set
Sizzix Notebook Scoreboard Die
Mat Board
Therm O Web Easy Cut Adhesive
Patterned paper
Archival ink - black
The Crafters Workshop Stencil
Inks and blending tool
Elastic
Shrink plastic
Heat Gun
Crop A Dile
Dymo Label Maker

Directions
Cover one side of mat board with patterned paper and cut with Sizzix Notebook die.


Stamp image on front cover with Archival ink.


Use stencil and inks to create stripes on the inside of the Notebook cover.


Stamp images on inside cover.


Use Crop A Dile to punch holes in the spine and thread with elastic.
Insert pages - decorate with stamps and stencils.
Add photos as desired.


Create closure for Notebook with shrink plastic and elastic.


I can't wait to fill the pages with more creepy stamped images, photos and memories!

Thanks for stopping by and I hope you find some time to play today!
Susie


Looking for more inspiration?
Click the links below!


Tuesday, September 3, 2019

DIY Halloween Wine Glass Charms

Hello!  Susie on the blog today and I am pulling out the shrink plastic again!

Time to create some DIY Wine Glass Charms!  This is a fast and easy project and if you are like me you will probably spend more time choosing which stamps and beads to use than actually crafting!

Time to play...


Supplies:
Halloween Takes Flight Rubber Stamp Set
Halloween Bingo Rubber Stamp Set
Shrink Plastic (I used Shrinky Dink brand)
Walnut Hollow Colored Pencils
Archival Ink - Black
Colored pencils
Hoop earrings
Split rings
Beads
Heat Gun
Scissors
Crop A Dile
Pliers
Stamping platform
Craft mat

Directions 
Select desired Halloween themed stamps and position them in a stamping platform.
Stamp the images onto shrink plastic with Archival black ink.
When the ink is dry trim out the shapes and punch holes as desired.


Color images on the reverse side of the shrink plastic with colored pencils (or whatever is recommended by your shrink plastic).
Shrink using  a heat gun on a craft mat.


Thread split ring onto each charm and add to hoop earrings with beads.


Option:  Create charms without adding any color.


The holiday party season is just getting started and these would make really cute hostess gifts.  I am already planning some for Thanksgiving and Christmas!

Thanks for stopping by and I hope you find some time to play today!
Susie


Looking for more inspiration?
Click the links below!


Friday, October 26, 2018

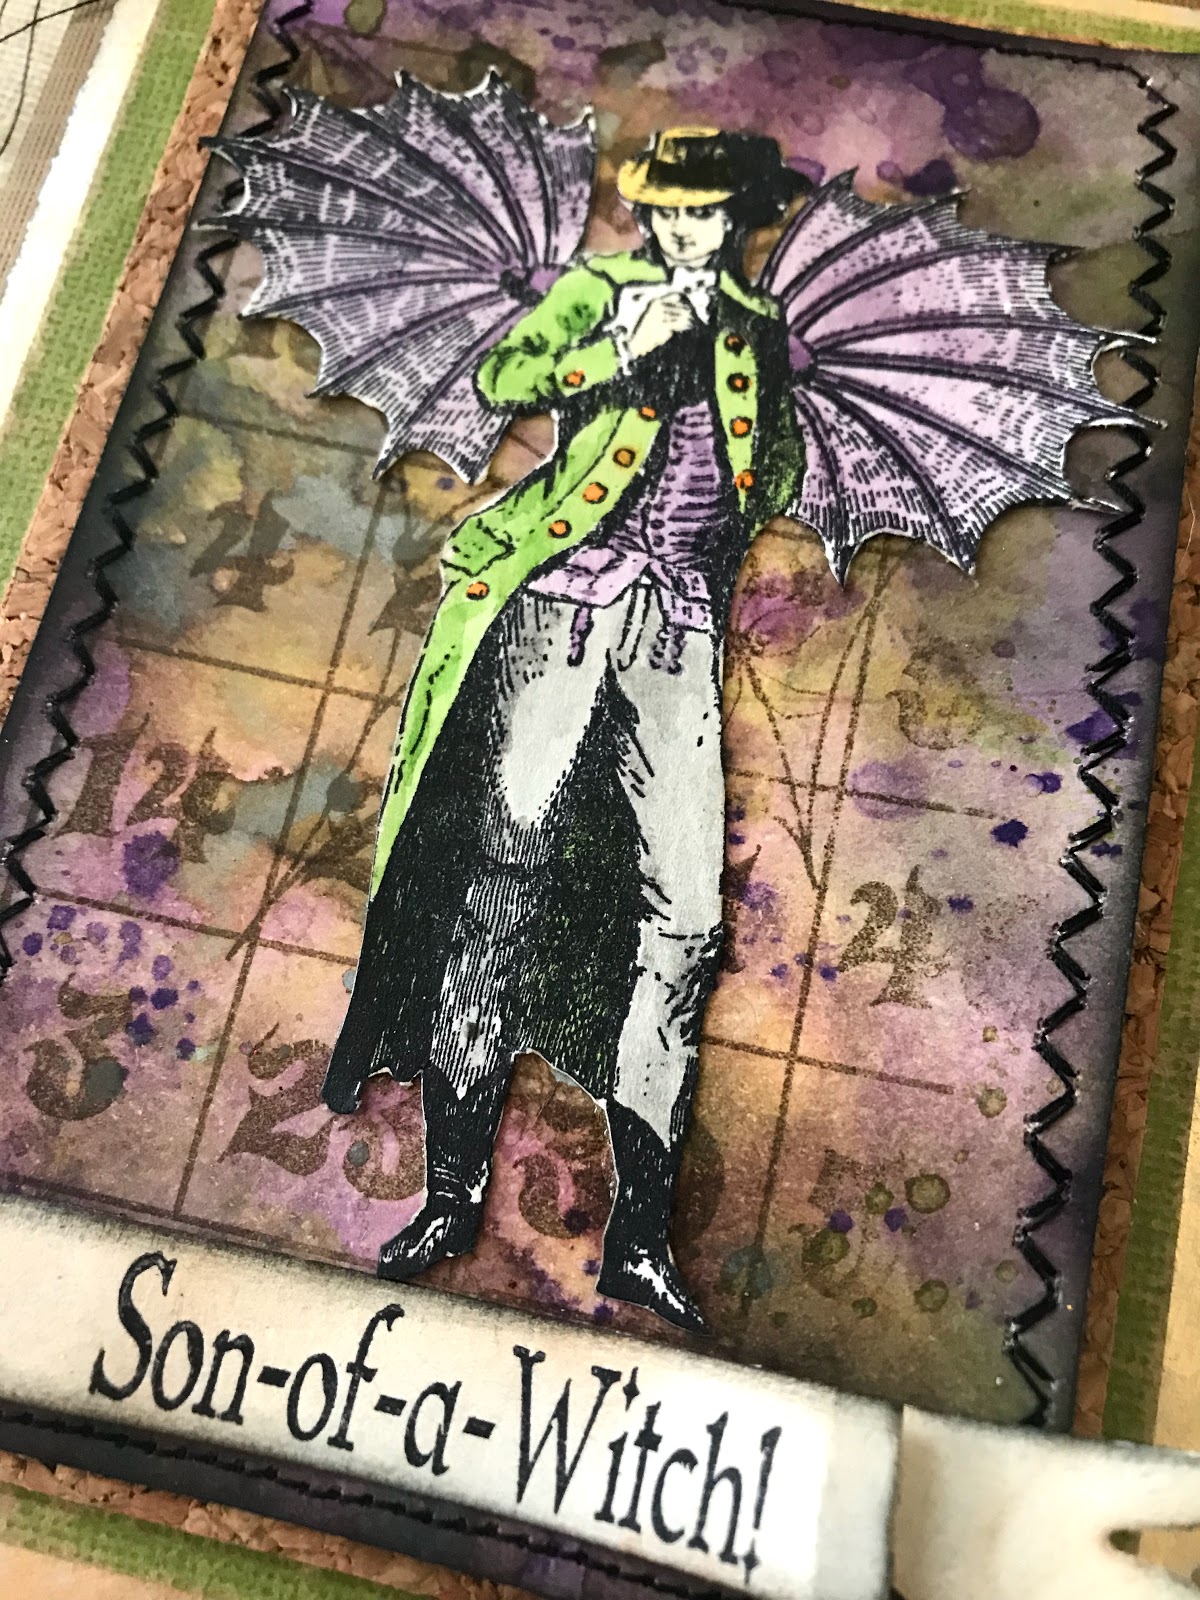
Son of a Witch!

'Tis the season for witches, but let's not forget the Warlocks! This dapper dude just screams Halloween to me.


Blank Page Muse Products Used:
Steampunk Gentleman
Halloween Bingo Board
Oh, Son-of- a-Witch

Other Products Used:
Distress Inks in Seedless Preserves, Wilted Violet, Shaded Lilac, Twisted Citron, Mowed Lawn Crushed Olive, and Black Soot
Distress Oxide Ink in Hickory Smoke
Distress Markers in Mowed Lawn, Dried Marigold, Hickory Smoke, Antique Linen, Dusty Concord, and Mustard Seed
Archival Ink in Jet Black and Coffee
Sizzix Die Tattered Banners
Cardstock
Adhesive
Waterbrush
Sewing Machine

On your craft mat smoosh on the purple shades of ink and run your paper through so the entire surface is covered. Wipe your ink up( wipe ink up between each layer)  Dry the base layer and smoosh more purple on the craft mat to get splats and dots. Dry this layer.

 Smoosh greens on the craft mat and tap the paper into the ink.  Don't rub or you'll get mud.  Dry the greens.

Smoosh on Hickory Smoke Oxide ink and tap the paper into the ink.  Let this layer air dry.  It's important to let the Oxide air dry to get the oxide effect.  Stamp the Halloween Bingo Board on the background using archival ink.  Edge the paper with black soot ink.  Stitch all around the edge of the cardstock.
Cut out the banner and stamp on the Oh, Son-of- a-Witch stamp.  You can alter your stamps by either not inking the word or snipping the saying apart.  For this card the "oh" wasn't used.  Stamp the saying onto the banner.  Adhere the banner to the bottom of the background. 


Stamp the Steampunk Gentleman on heavy watercolor cardstock.  Color in the gentleman using a waterbrush and Distress Markers.  Cut out the gentleman and then ink all the edges with black soot ink.  Glue the Steampunk Gentleman to the background.


The rest of the card is just layered up with various cardstocks.


Thanks for coming by!
Please visit the following for more inspiration!


Monday, October 15, 2018

Spooky Haunted House Shadow Box

Its my favorite time of the year when things get spooky. 
Check out this configuration  box I created using stamps by The Blank Page Muse!


Supplies used:
Wooden shadow box house
Acrylic paint
Gesso
Colored ink pads
Halloween embelleshments


Start off by painting the box with gesso. 
Once dry,  paint the frame purple and the inside green and orange. 


Stamp out the halloween images and colour them with inks. Use different ink pads to create variety.


Stamp the Grunge Background stamp over the frame in black ink.


Begin to add the stamped images to the sections. Fill out the sections with faux cobwebs, faux moss and beads.


Use alphabet beads to spellout spooky words.


Keep adding layers of stamped images and charms to the box. Fill little glass bottles with micro beads and glitter to create potions.


Add gems to eyes to create  a spooky glow.


Thank you for  visiting  and please follow us on social media 


The Blank Page Muse Shop http://blankpagemuse.com/
That's Crafty  UK And Worldwide here http://www.thatscrafty.co.uk/blank-page-muse.html
FB Fan Page https://www.facebook.com/groups/bla...

Wednesday, October 10, 2018

Spooky bookmarks

Hi Everyone,
Jess here today with a little something to keep your page when your book gets too scary to read at night!


Blank Page Muse Stamps Used:
Ashes of Ex-Lovers Bottle
Mummy Ribs Bottle
Powdered Cobwebs Pot
Halloween Bingo Set
31

Other Products used:
Staz On ink  Gothic Purple
Archival ink in Jet Black, Potting Soil, and Plum
Distress ink in Wilted Violet, Shaded Lilac, Dusty Concord, Carved Pumpkin, Black Soot, and Pumice Stone
Distress Spray ink in Walnut Stain
Dylusions Spray in Fresh Lime
Sizzix Halloween Sideorder and Halloween Script
Sari Ribbon
Ken Oliver Water-media Bookmarks
Card Stock
Adhesive


Stamp your bookmark with your Ashes of Ex-Lovers BottleMummy Ribs Bottle, and Powdered Cobwebs Pot.  Using your permanent ink, stamp each bottle in a different color and at various angles to create interest.

Once the inks are dry use Distress ink to cover the entire bookmark.

 Layer your bookmark onto various colors of cardstock.
Punch a hole in the top of the bookmark.  Add your die cut skeleton images, words, and your sari ribbon.


For the second bookmark the paper layering will be the same.  Using the permanent ink stamp your Oct. 31 and Spider from the Halloween Bingo Set.  Add in the tiny 31 to fill in the gaps.

  Once your ink is dry create your background.  Cover the entire bookmark using Shaded Lilac Distress Ink.  On your craft mat smoosh on the other two purple shades and spritz with water.  After your have sprayed your water tap your bookmark in the color.  Be sure you only tap it in a couple times.  If you just rub it around you won't get speckles and splats.  Look at your bookmark and see if you like the patterns that are appearing.  If you do, stop and dry your layer.  Once the layer is dry then you can go back and tap into the ink again.  Drying between layers makes a huge difference.

Add on your die cut image. 

Spray your sari ribbon and dry it.  Add the ribbon to the top of the bookmark.
I hope you're inspired to create some on your own.  They are easy and fun to make!
Happy Crafting,
Jess


Thanks for coming by!
Please visit the following for more inspiration!


Copyright Text

Blank Page Muse 2018 Sin City Stamps 2013