Showing posts with label Valentine's Day Card. Show all posts

Friday, February 13, 2026

Happy Valentine's Day

 Hi everyone, Steph Ackerman here today using some amazing stamps from Blank Page Muse.


Blank Page Muse Stamps: Valentine's Day, Special Day Clear Sentiment

If you need a quick and easy Valentine's Day card, this one will take no time at all.


Create a card from red cardstock.  
Add a panel of black onto which you add a torn panel of cardstock.
Stamp and mat the phrase, adding to the card with foam adhesives.


Stamp a phrase and several flowers inside the card.

Finish with a tiny bow and a heart shaped button on the front.

Thanks for stopping by.

Steph

Looking for more Inspiration? Click the links below!
The Blank Page Muse Shop https://blankpagemuse.com/

Friday, February 10, 2023

Valentine's Day Card

Hi everyone, Steph Ackerman here sharing some amazing stamps from Blank Page Muse and I Brake for Stamps.


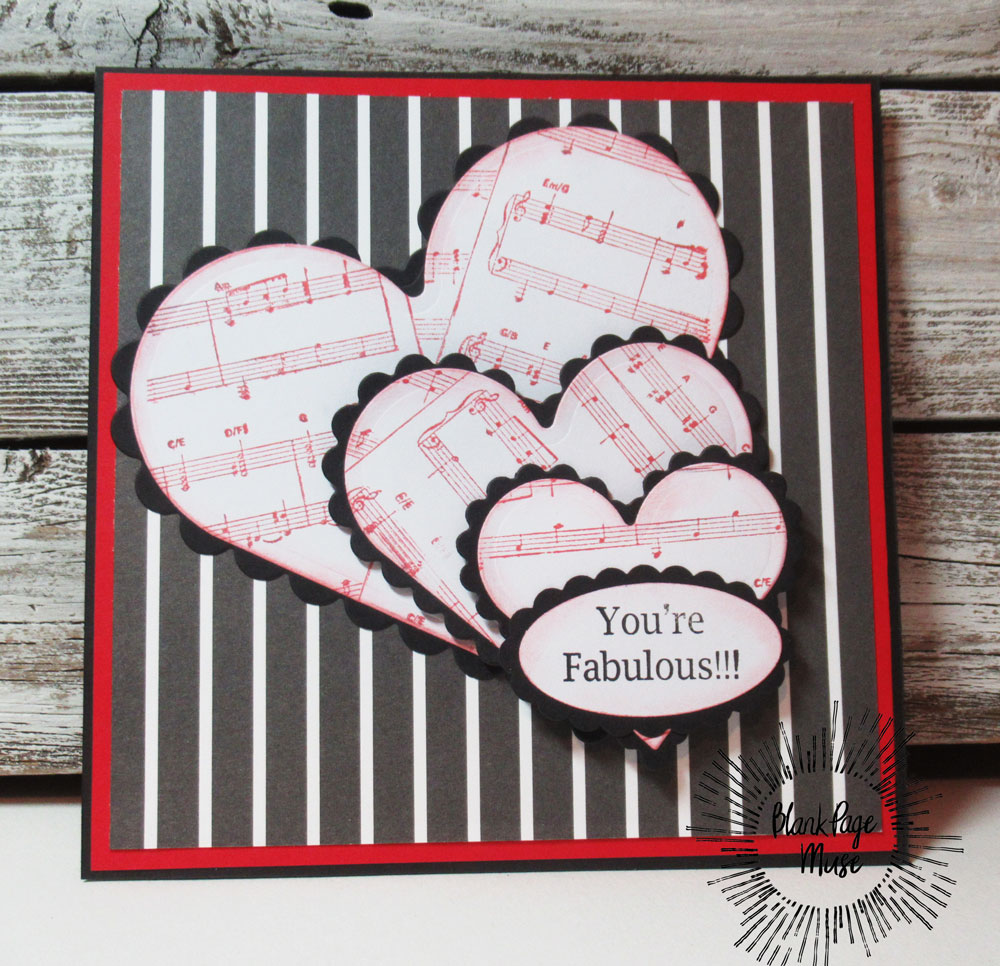
I stamped the Music Background and used several heart shaped dies to die cut graduating sized hearts.
Matting each heart with black scalloped cardstock hearts, I arranged them on the card with foam adhesives for dimension.

 The sentiment was stamped, punched out and added to the smallest heart.

The full tutorial can be found on my blog.

Thanks for stopping by.

Looking for more Inspiration? Click the links below!
The Blank Page Muse Shop https://blankpagemuse.com/

Save 15% of your Blank Page Muse orders with discount code:  BPMSteph

Tuesday, February 23, 2021

Go Splash Yourself!

I was in the grocery store earlier and the selves are stocked with Valentine's day stuff. I love the day after Valentine's day when all that candy is 50% off. I'm an Anti-Valentine's day kind of girl and sadly they just don't made cards for that. So I made my own. 


Rubber stamps used:

Additional items needed:
  • Imagination
  • Scissors
  • Alcohol markers 
  • ink- Palette, hybrid acid free
  • Sharpie marker
  • Card stock
  • Glue Stick

1. Begin by stamping your mermaids tail. While the ink is drying you can cut your card stock into 2.5" x 3.5"
2. Color in your mermaid tail and write "Go Splash Yourself" on a scrap piece of paper. 
3. Cut out your stamps and letters. At this time I also ripped my blue paper and glued it to my prettier red card stock paper. I then glued the words and tail down.
4. Added a boarder around the card using a sharpie and a white gel pen.
5. The heart is a store embellishment, I found in the clearance aisle. But you could cut a heart out by head or us a die cut. Use your imagiantion.


Hope you enjoyed this Anti-Valentine's day card. If you have any questions feel free to message Lasheet and if you choose to make your card tag her and Blank Page Muse. Thank you, happy crafting!! ♥


Looking for more Inspiration? Click the links below!
The Blank Page Muse Shop https://blankpagemuse.com/


Tuesday, February 2, 2021

You Melt My Heart

Hello BPM Fans! Betty here with a cute Valentine's Day card. January seemed to have just whizzed by and Valentine's Day is just two weeks away! Here is an adorable, fun, and quick card you can make for Valentine's Day or for any occasion. I used this cute stamp from Blank Page Muse Art Rubber Stamps called Running Stitch, You Melt My Heart designed by Stephanie Eaton, to make this 6"x6" card.

February 10th will start the new challenge with the theme of "Romance."
Try making this card for your chance to win a prize!


Supplies:
  • Blank Page Muse Art Rubber Stamp: Running Stitch, You Melt My Heart designed by Stephanie Eaton
  • White cardstock to stamp image
  • Black Ink Pad
  • Stamping block or positioner
  • Coloring medium of choice (I used Copic markers)
  • Scissors
  • White card base, 6" x 6"
  • 1 Solid 6" x 6" cardstock (I found some in my stash that already had edges distressed)
  • 1 patterned paper, 5-3/4" x 5-3/4"
  • 1 patterned paper, 5-3/4"W x 2-1/2"H. Save some of this paper to make some flags as embellishments.
  • Chipboard
  • Various sized heart-shaped dies or punches. One heart should be at least 2"x2" so the sentiment will fit. Cut 5 hearts for card front (optional: cut 2 for inside of card)
  • Distress ink: Barn door, Vintage Photo, and Black Soot
  • Distress ink applicator and brush
  • Flag Die, Banner Die, or Scissors & Paper Trimmer to cut flag embellishments
  • Foam squares/dots/tape
  • Your favorite adhesive
  • Twine: Red, Black, Rust -approximately 20" of each
  • Enamel dots
Instructions:
  • Using a stamp block or stamp positioner, stamp your image onto white cardstock.
  • Color your image and fussy cut with scissors. 
  • Using the Vintage Photo and blending brush, ink the edges.

  • Die cut hearts out of chipboard. 


  • Using the Barn Door Distress Ink, swipe the pad over the hearts to achieve a distressed wood look. Using the Vintage Photo Distress Ink, swipe only the edges of the hearts. 

  • Using a stamp block or stamp positioner, stamp the words "You melt my heart" onto the large heart.

  • Using the Vintage Photo and Black Soot Distress Inks, distress the edges of all your patterned paper with a blending tool.

  •  Adhere the mat and patterned papers onto the card base.

  • Add foam squares/dots/tape to the colored image and adhere to the card.

  • Assemble and adhere the hearts. Add the twine and tie a knot, then a bow to secure it. Using a flag, banner die, or paper trimmer & scissors, cut a couple of flags to use as embellishments. Add enamel dots.  

  • Adhere the hearts to the inside of the card on the bottom right corner (this is optional).


Thank you for stopping by and I hope you give this card a try. 
Have a wonderful Valentine's Day! ~Betty~


Wednesday, April 1, 2020

Sparkly LOVE! April Challenge Theme!

Hi BPM Fans!!!

And so another month is upon us!

I really hope everyone is safe & healthy in these trying times!
And I hope that you are all getting some enjoyment from stamping & crafting!

Ready for the April Challenge??? Our challenge for this month is "Sparkle & Shine" - a perfect theme for lifting our spirits and feeling bright & glittery LOL!!!


I hope you like my creation for today!

Please have some fun and play along and link your sparkly creations to our challenge!


Supplies:
Blank Page Muse Rubber Stamp: "LOVE"
Metallic Silver Card Base: 12 x 12cm square used for this card
Scraps Silver Metallic Card
"Shiny" patterned paper x 2 patterns
Embossing Pad, Silver Metallic Embossing Powder & Heat Gun
Glue and/or Double Sided Tape

Instructions:


Tear your patterned paper into strips that will suit the size of your base card - 3 strips of each pattern.


Weave the strips and tear the ends to neaten. Adhere to your base card.


Stamp and emboss your focal stamp onto the scrap silver metallic card and tear away the excess.


Adhere the focal embossed image to the card front on top of your woven paper. Add any other embellishments.


Thanks for joining me today!

Happy stamping!

Stay safe!

Sharon

Don't forget to check us out at all of our social media sites
The Blank Page Muse- https://blankpagemuse.com/
Pintrest- https://www.pinterest.com/blankpagemuse/boards/


Now you have the theme and a lovely project, come on back on April 10 when the new link will be live!


Friday, May 24, 2019

Old Fashioned Love

Hello BPM Fans! Mercy here with a blast from the past of sorts.  As a fan of all things vintage, this project really was something that allowed me to use Victorian inspiration (and my stash!) to create a card for Mother's Day.


Supplies:
4 Small Red Roses
Black Pigment Ink
Black Embossing Powder
Page Corner Rounder punch
Alcohol Ink Pens in green, purple, orange, & red
Tim Holtz Alterations Sizzix 3D Impresslits -Scallop
Yellow Dylusions Spray Ink
Red Glossy card stock
Velum with decorative star bursts
Purple A6 Greeting Card blank
White Cardstock postcard (4.5" X 6.5")

Instructions:
1. Stamp the corner curvy flower stamp, centered on the top of the card (right up against the edge) with pigment ink, corner pointing up.  Rotate the card 180 degrees, add a corresponding corner stamp facing the first stamped one like a mirror, placing that one centered up against the edge of the card.


 2. Stamp the "Love" stamp with the pigment ink in the center.


3. Pour black embossing powder across the card and heat emboss.


4. Spray a few spritzes of the Dylusions Yellow ink across the card. Leave some of the white cardstock showing.


5.  On either scrap paper or on other white cardstock, stamp and emboss in black embossing powers a few more "Love" stamps.  Color those in red and one in purple.  Fussy cut each letter out from the scrap ones.


6. Color the rest of the flowers/vines. Glue roses to be just above and below the "Love" stamp in a square (in my case, I ended up spray dying white roses I had to red). Using foam tape, layer the letters over the base "Love" to add more dimension.


7. Using the Tim Holtz 3d Impresslits border, emboss four strips of the glossy red card stock.  Cut those down to wrap around the postcard base. Glue them to create a border around the stamped image.


8. Mount a 5X7 cut of the velum to the card base.  Once that is mounted, use foam tape to glue down to the velum card, centered.  Use a page rounder to trim the edges.


9. Add a note or greeting to the inside of the card. 

This project is definitely themed to fit for a variety of holidays and reasons to create.  Changing out the messaging on the inside of the card is key towards versatility.


More ideas & crafts by Mercy

Want an extra 15% off on your next order? Use this code on your order! Good until June 1, 2019. BPMDtMercy2019

Tuesday, January 29, 2019

A Valentine's Wish...


Hi Blank Page Muse Stamps Fans! 
Have you been enjoying this month's "Valentine's" themed creations and inspiration?
I'm sharing a mixed media semi vintage style card today - perfect for you to make for that someone special!

Supplies:

Blank Page Muse Stamp: "Make a Wish" from the Dandelion Wishes with Butterflies Set
Blank Page Muse Stamp: Vintage Style Man & Woman from the Romance Classic Couples Set
Black Base Card
Card 1cm smaller than the front of your base card
Old Book Pages
White Watercolour Paper/Card & Small piece white card
Heart Stencil & Texture Paste
Ink Sprays and/or Brea Reese Glitter Ink or like Product
Black & Pink Archival Ink
Gold "Smooch"
Watercolour Pencils and Water Brush

Embellishments: ink stained muslin cloth, corner charms, diamante
General supplies: glue stick, glue, spatula, heat tool to speed up drying process, scissors, double sided tape, mounting tape


Instructions:
Start by cutting your base card from black card or using a pre-made card base. Use your glue stick to adhere torn pieces of old book pages over your card front piece which is cut to 1cm smaller than your card front. Cover the entire front with the pages and then trim excess from sides of card.


Use a "love" themed stencil to apply texture paste to the card front. Note: I didn't cover the entire front - it looks more effective to "miss" bits!! The stencil used here was cut from a piece of acetate on a Cameo Silhouette. We all have our favourite stencils- this I one of mine! Allow to dry.


Once the texture paste is dry spray some pink ink spray and Brea Reese glitter ink and spread over the page by spritzing with a bit of water and "moving" the ink around on the card. Gold and Pink colours used on this card. Allow to dry.


To add a finishing touch to the card front "edge" the piece with gold Smooch or like product. Allow to dry. Remember you can speed up any of the drying processes carefully with a heat tool.


Stamp the Romantic couple onto watercolour paper with Black Archival ink. Stamp the "Make a Wish" wording onto plain white card. Cut around the wording and edge with Pink Archival ink.


Colour the Romantic Couple with watercolour pencils and a water brush and when dry fussy cut the image ready to use on the card front.


Use double sided tape or glue to adhere the card front to the card base. Gather all your stamped images and embellishments ready to arrange and adhere to the card.


Adhere all the elements to the card - use mounting tape to adhere the main Vintage Couple.


Happy Stamping!
Sharon
 Don't forget to visit us at all of these Social Media Sites for more inspiration:

The Blank Page Muse- https://blankpagemuse.com/

Copyright Text

Blank Page Muse 2018 Sin City Stamps 2013