Showing posts with label Background Grunge. Show all posts

Tuesday, December 7, 2021

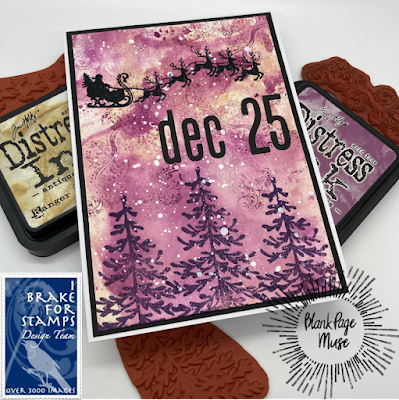
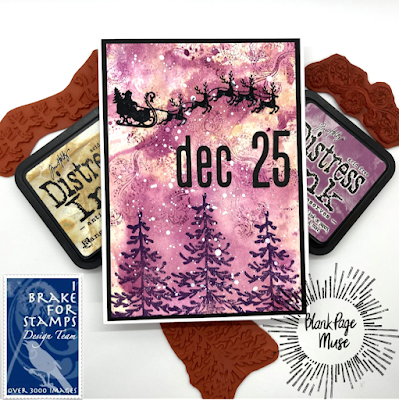
Holiday Ink Smooshed Card

Happy Holidays BPM/IBFS Fans! Betty here today. Here's a fun, fast, and easy card to make with no coloring whatsoever! Just playing with some Distress Inks and stamping with red rubber stamps from Blank Page Muse/I Brake for Stamps. I used three stamps from three different sets to make this card. The first one is a stamp called Santa on Sled with Reindeer Art Silhouette from the Winter Wonderland set (the single stamp is also available); second one is the trees from the Sir Holiday Gnome Tree No Place Like Gnome set; and the third is the fancy swirl stamp from the Background Grunge set by Pam Bray. It's always fun when I get to do some ink smooshing and stamping!

You can save 15% on these stamps and all purchases at Blank Page Muse and at I Brake for Stamps by using my special code BPMBetty. 

Head on over to my blog for the list of supplies and instructions on how to make this card: Betty's Blog


Looking for more Inspiration? Click the links below!
The Blank Page Muse Shop https://blankpagemuse.com/
I Brake for Stamps Shop https://ibrakeforstamps.com/

Tuesday, August 10, 2021

Steampunk Card - Distance is just a test...

Hello BPM Fans! It's Betty here with a steampunk card. I donate many of my cards to the Cards for Soldiers Program. The majority of them are birthday, missing you, holiday, and get well cards. The soldiers that are in long distance relationships may need some long distance love cards so I created this card.

I wanted my card to keep with this month's theme, "Steampunk." This card uses stamps from Blank Page Muse's Vintage Transportation Steampunk Art Rubber Stamp Sheet set. This set comes with many stamps and sentiments.  You can make other occasion cards by just changing it to another sentiment. I also used a couple of background stamps from the  Background Grunge Art Rubber Stamp Sheet designed by Pam Bray

Please visit my blog for a complete tutorial on how to make this card. 

        The Blank Page Muse Shop https://blankpagemuse.com/


Friday, April 16, 2021

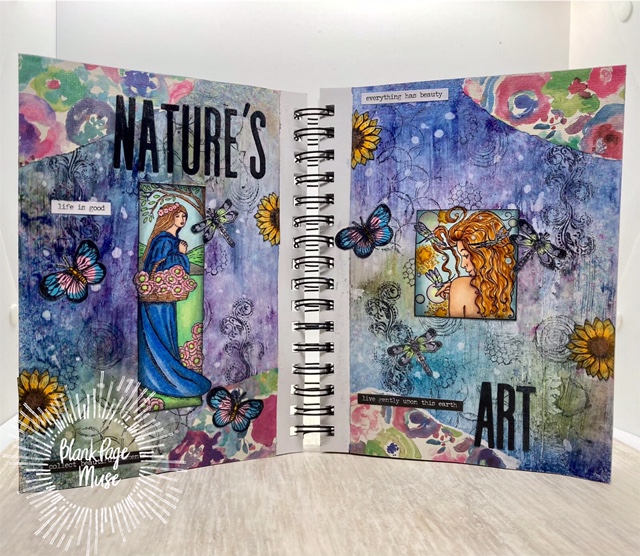
Art Journal - Nature's Art

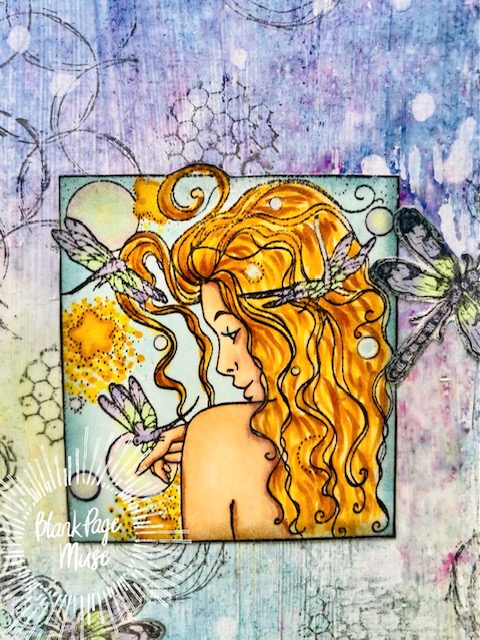
Hello BPM Fans! It's Betty here! My favorite season of the year is Spring. I love how the trees are bare one week then full of leaves the next, the smell of fresh cut grass, and the sound of birds chirping. My husband and I walk every morning and it's been a delight to see all the different flowers blooming everywhere. This inspired me to create my art journal pages called Nature's Art using stamps from Blank Page Muse Art Rubber Stamps (please see supplies list below for list).

This is the perfect project to make for the BPM monthly challenge for a chance to win a prize! The theme for April is "nature." Here is the link to the challenge: CHALLENGE.


Supplies:
  • Blank Page Muse Art Rubber Stamps: 
  • Stamping block
  • Washi tape, wax paper, Press and Seal (to protect coils, margins, and other pages)
  • White gesso
  • Paint brush
  • Distress Spray inks: Bundled Sage, Salty Ocean, Chipped Sapphire, Seedless Preserves, and Picket Fence
  • Water spray bottle
  • Heat gun (optional)
  • Floral patterned paper of choice
  • White cardstock for stamping images
  • Coloring medium of choice. I used both Prismacolor pencils and Copic markers
  • Scissors
  • Black cardstock
  • Alphabet dies
  • Press and Seal or Transfer tape
  • Liquid glue
  • Distress ink pad: Black Soot
  • Distress ink blender brush/pad
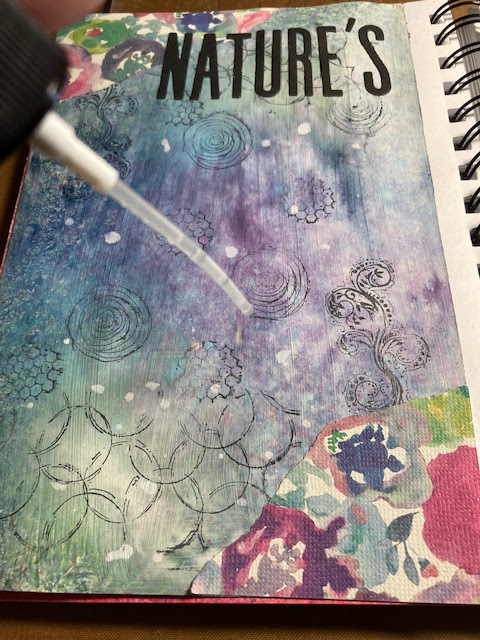
  • Water dropper
  • Collage Medium (I used Tim Holtz Distress Collage Medium)
  • Sentiment stickers (I used Tim Holtz - Small Talk stickers)
Instructions:
  • Prepare the art journal pages by covering the coils with Press and Seal and the margins with washi tape. Add wax paper under the pages. 

  • Paint on a layer of gesso and let it completely dry.

  • Place the journal into a box so the over spray is contained in the box. 
  • Spray the Distress Ink onto the pages, but don't overlap too much. Spray water over the ink so the ink will spread. Gently use a paper towel to mop up puddles.  Use a heat gun to quick dry or air dry.


  • Using the Background Grunge stamps, randomly stamp images using a stamp block or without. The entire image of the stamp does not have to stamp to create the background. Select a variety of stamps from the set to use. 


  • Tear patterned paper corners and adhere using collage medium.
  • Stamp and color the butterfly, sunflower (stamp partial or cut flowers in half since they will be placed on edge of journal page), and dragonfly stamps then fussy cut. Use any colors you like, but here's what I used:
    • Butterfly (Copic markers): Y17, B02, RV02
    • Dragonfly (Copic markers): YG11, BV00, BV01
    • Sunflower (Copic markers): Y17, Y35, Y13, E33
  • Stamp and color the Girl with Basket of Flowers. Use any colors you like. Here are my Prismacolor pencil colors:
    • Skin: 116, 018, 019, 020
    • Cheeks: 082
    • Hair: 117, 114, 010
    • Blue: 042, 043
    • Tree & Basket: 114, 116
    • Green for leaves and flowers: 110, 061
    • Pink flowers: 080, 082
    • Grass: 057, 110, 061
    • Sky: 101
    • Walkway: 065
  • Stamp and color the Dragonfly Lady. Use any colors you like. Here are my Copic colors:
    • Hair: E39, YR27, YR24, Y32
    • Skin: E04, E11, E21, E00, E000
    • Cheeks: R20
    • Lips: R21
    • Dragonflies: YG11, BV00, BV01
    • Stars: Y24, Y11, Y15
    • Blue background: B00, B000
    • Bubbles: Y00, B000, BV000; plus Castle Arts colored pencil #35 lavender light.
  • Using the Distress Ink in Black Soot, ink the edges of each image. Set aside.
  • Using alphabet dies and black cardstock, cut out the words "nature's art."
  • Using a self-healing mat or surface with grid lines, add a line of removable adhesive onto the mat. Line up the die cuts onto the mat and place a piece of transfer tape or Press and Seal on top to pick up all the letters at once. Use a spatula to help lift the die cuts off the mat.


  • Add liquid glue to the die cuts the place them onto your journal pages.

  • Carefully peel off the transfer tape or Press and Seal.
  • Using the end of the water spray pump, add a few big drops of water onto the journal pages for some texture (optional - this was a last minute, spur of the moment idea).

  • Adhere all the images onto the journal pages using collage medium. Add the sentiment stickers.
  • Lastly, apply a light coat of collage medium all over the pages.
The art journal page is complete! This was a really fun project to do. Give it a try!


Thank you for stopping by and have a very creative week! ~Betty~

Be sure to follow us at:

Wednesday, October 16, 2019

Celebrate Dictionary Day with Blank Page Muse

Hello!  Susie on the blog and today we are celebrating Dictionary Day!

I am kind of a word nerd and will admit to flipping through the dictionary to find new and interesting words.  Who knew there was a day to celebrate that?! When I saw the Creativity Definition stamp from Blank Page Muse I had to have it!   Since today is Dictionary Day, I decided to combine my stack of gel prints with the definition stamp to create more ATCs for my CAS card stash.

Time to play...


Supplies:
Creativity Definition Word Phrase Rubber Stamp by Terri Sproul
Just Us Girls Line Figure Art Rubber Stamp Sheet by Terry Sproul
Background Grunge Art Rubber Stamp Sheet by Pam Bray
Gel prints for backgrounds
Archival Ink - Black, Aquamarine
Cardstock

Directions:
Cut gel print paper to 3.5" x 2.5" and stamp with Creativity definition in black ink.


Stamp female figure with black ink.


Stamp Background Grunge elements as desired.


Optional:  Stamp Background Grunge elements with alternate colors before adding definition and figure images.


Repeat to create additional gel print ATCs.


Mat ATCs with white cardstock and mount on black cardstock to create CAS cards.


I have to say, the Background Grunge stamps were great for adding little elements that balanced the designs and the Just Us Girls Line Figures are perfect for a little abstract playtime. I love making these ATCs because it is a fun and practical way to use up my creative experiments!

Thanks for stopping by and I hope you find some time to play today!
Susie


Looking for more inspiration?
Click the links below!


Friday, June 21, 2019

Love on the Wire Card

Hello, BPM Fans,
It's Karen here and I am saddened to say this will be my last project for the Blank Page Muse Design Team.  It has been a great blessing the last year & a half to work with such high quality stamps and fabulous images.  Here is my last card Love on the Wire. 

I created the background with layers of overlapping masking tape which adds a beautiful subtle wrinkly texture. The paints accentuate all the crevices and is a very effective way to create an distressed look. I hope you will try this simple technique to create a textured background because I'm sure you will love it too. 


Blank Page Muse Stamps:
Background Grunge Art Rubber Stamp by Pam Bray
Urban Scene Silhouette Collage Stamp
Distressed Music Background Stamp

Save 15% off your BPM rubber stamp order when you use discount code
"BPMDtKaren2019"

Directions:

1. Cut a piece of heavy card stock 5x7". Tear bits of masking tape into various 2-5" lengths and apply them irregularly to cover the entire sheet. Alternate the angle which you apply the tape and occasionally crunch the tape to purposefully cause it to wrinkle and thus create a subtle texture. Paint the masking tape covered card stock with white gesso and set aside to dry.

2. Protect your work surface to prepare for spraying mist. Apply tones of pink mist to the masking tape background. When thoroughly dry splatter bronze mist across the misted tape background. Set aside to dry.

3.  Stamp the urban scene onto white cardstock using black ink. Use an ink blending tool to lightly apply brown ink to tint the edges of the image to give it an aged appearance.


4.  Blend gold and pink ink to cover a chipboard heart.  Next, apply liquid adhesive randomly to parts of the design and then add glitter over the wet glue. Set aside to thoroughly dry.

5. Stamp three different sizes of swirly rose images with dusty rose ink. Lightly color them using an ink blending tool. Carefully cut out all the roses.

6. Stamp the music notes image randomly over the tape background using black ink to create distressed and imperfect images. Set aside to dry.

7.  Adhere the stamped urban scene to the upper part of the misted tape background using foam tape.

8. Use a black marker to emphasize the bird and attach the chipboard heart to the middle of the stamped urban scene.

9. Next, adhere clusters of roses in the upper left and lower right corner.

10. Carefully cut out some lace flowers and flourishes and add them to the rose clusters. Attach a small bit of lace peeking out from the behind the lower edge of the urban scene image.   Finally, embellish with a random scattering of gems and small hearts.

A Closer Look:


Other Supplies:  

  • clear mounting block
  • card base (5x7")
  • masking tape
  • spray mists (pink & bronze)
  • ink pads (pink / gold / brown / black)
  • ink blending tool
  • heat gun
  • liquid adhesive
  • black marker
  • small heart paper punch
  • chipboard heart (Creative Embellishments)
  • glitter, lace, gems


            Blank Page Muse Shop http://blankpagemuse.com/
            Facebook Fan Page https://www.facebook.com/groups/bla...
            Instagram - Shop https://www.instagram.com/blankpage...
            Instagram - Blog https://www.instagram.com/blankpage...
            Twitter https://twitter.com/BlankPageMuse
            Pinterest https://www.pinterest.com/blankpage...

To see more of Karen's projects, visit her blog Art & Soul.
Copyright Text

Blank Page Muse 2018 Sin City Stamps 2013