Showing posts with label masking. Show all posts

Saturday, October 5, 2024

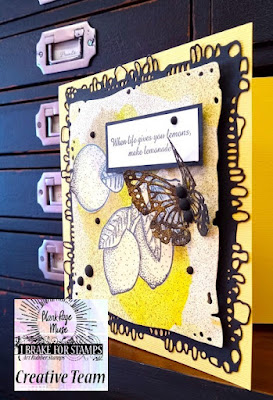
When life give you Lemons!

 I have always loved the phrase, "When live gives you lemons, make lemonade!" I also love the combination of yellow and black. 


Stamps used from I Brake for Stamps:
Other supplies:
Watercolors Yellows and Greens
Watercolor Paper
Water brush
Parchment paper
Stazon Ink
Stamp platform
Tim Holtz Distress Oxide Spray Vintage Photo
Die cut butterfly
AAll & Create Square die #41
Nuvo Midas Touch Aqua Shimmer Pen
Enamel dots
Cardstock: Yellow, black, and white
Dimensional Foam/Glue
Sticky Dots


Paint watercolor paper with blobs of yellow and green. 


Stamp image on copy paper to create a mask.  Lightly sprintz the watercolor paper with Tim Holtz Distress Oxide Spray Vintage Photo


With Stazon Ink stamp lemons on parchment paper and fussy cut.  Using Sticky Dots adhere the stamped parchment to the area of the watercolor paper that was masked.


Stamp sentiment on white cardstock and mount on black cardstock.


Die cut black lacy mat using the AAll & Create Square die #41.  Adhere the black lacy mat to the card base. 

Die cut the watercolor paper with stamped lemons using the matching AAll & Create Square die. With dimensional foam attach the lemons to the black lacey mat.

Adhere sentiment with dimensional foam.


Apply Nuvo Midas Touch Aqua Shimmer Pen to the butterfly die cut from black cardstock. Add three enamel dots to the body of the butterfly. 

Randomly add enamel dots to the card. 

Sunday, June 18, 2023

Clean & Simple Mask-uline Floral Technique

 Hello from design team member, Heidi.  I have always thought that there is no reason why flowers should not be masculine.  Every guy I know likes flowers.  Anyhow, it is corny but I decided to use a flower and masking and make it sort of a masculine card.  


I used this HUGE Dahlia stamp.  It is such a great stamp, I use this one a lot.  

1) I used a grid to mask a straight section of my card front.  I used Mint Tape, and I didn’t even measure how wide it is.  

2) Stamp right over the tape so that the flower shows up on either side.

3) Using both the tape and a ruler, use a black marker or pen to draw a border on the flower.  I didn’t extend beyond the stamped image, but depending on what length of sentiment you will use, you totally could extend it, even to the edge of the card. 

4) Remove the tape and then stamp your sentiment in between the lines.  

I finished the card by coloring just little parts of the flower with a light grey and a green marker. I then matted the card front with grey cardstock and voila, a clean and simple Thank You card, suitable for any recipient.  Even a guy.

This card uses Quarter Sheet Dahlia stamp set and also the sentiment comes from Fall Rubber Stamp set by Pam Bray Designs.

You can also find more inspiration at the links below:

The Blank Page Muse- https://blankpagemuse.com/

FB Fan Page- https://www.facebook.com/groups/blankpagemuse/

Instagram Shop- https://www.instagram.com/blankpagemuse/

Instagram Blog- https://www.instagram.com/blankpagemuseblog/

Twitter- https://twitter.com/BlankPageMuse

Pintrest- https://www.pinterest.com/blankpagemuse/boards/

Saturday, November 7, 2020

Have a Wonderful Christmas Full of Love!

It's time to finish up (or start) making your Christmas cards. I like to make a few cards that are classic and traditional.  The card I'm sharing today is fun and easy to make. It's stamping, coloring, and a little masking. I used several stamps from Blank Page Muse Art Rubber Stamps called Classic Christmas Stamp Set by Pam Bray Designs

This month's challenge is "Easy Holiday Play." If you like to stamp and color, this card's for you! All the supplies and instructions are listed below to make this A2 size card.


Supplies:
  • Blank Page Muse Stamp:  Classic Christmas Stamp Set
  • White cardstock - Cut to A2 size for the base (8-1/2" x 5-1/2"), fold in half
  • Brown cardstock - Cut to 4-1/8" x 5-3/8" for the mat
  • White cardstock - Cut to 4" x 5-1/4" to stamp image
  • White cardstock - Cut to 2" x 1-1/8" to stamp sentiment
  • Brown cardstock - Cut to 2-1/8" x 1-1/4" to mat sentiment
  • Masking tape (I used Eclipse Art Masking Tape)
  • Black ink pad
  • White gel pen
  • Favorite coloring medium (I used Copic markers. Colors listed below)
  • Favorite adhesive
  • Adhesive foam squares or dots
  • Paper trimmer
  • Corner punch
  • Stamp positioner or stamping block (I used a stamp positioner)
  • Optional items: Snowflake embellishment
Copic Markers Used:
  • Deer: E18, E15, E13, E11, E00
  • Wreath and pine needles: G28, G94, G07, YG03
  • Fence and pine cones: E47, E44, E43, E42
  • Snow: BV31, C1, B000, 0
  • Holly berries: R29
  • Sky: B000, B0000
Instructions:
  • Stamp the deer onto the masking tape and fussy cut close to the edge. You don't need to cut above the wreath on the left side. You will need to mask the deer so that when you stamp the fence, it will appear behind the deer.
  • Stamp the deer onto the 4" x 5-1/4" cardstock
  • Place the mask over the stamped deer.
  • Position the fence stamp so that it lines up with the hooves of the deer and stamp the image.
  • Peel off the mask.
  • Stamp the pine cones at the top of the page.
  • The image is ready to color. Start by coloring the deer. 
  • Color the wreath. After coloring the wreath, add holly berries. If you are using alcohol markers or water-based markers, use a white gel pen to make the holly berries. Let it dry, then use a red marker to color over the white gel pen to make the berries. If you are using colored pencils, use a white pencil to make the berries first, then use the red pencil.

  • Color the snow. Don't forget the snow on the fence.
  • Color the fence.
  • Color the sky. Make sure the sky is colored BEFORE you color the pine cones and branches.
  • Color the pine cones then the pine needles.

  • Stamp the sentiment onto the 2" x 1-1/8" white cardstock. 
  • Using the corner punch, punch the corners that are diagonal from each other. Do the same with the 2-1/8" x 1-1/4" brown card stock. Adhere the sentiment onto the brown cardstock.
  • Use foam squares or dots and adhere the sentiment to the card front.
  • Adhere the card front to the 4-1/8" x 5-3/8" brown cardstock.
  • Adhere the card onto the white base card.
  • Optional: Add a snowflake embellishment or any embellishments you wish.

Thank you for stopping by and I hope you are inspired to enter our monthly challenge! If you have any questions or comments, please leave them below.  ~Betty~

 Looking for more Inspiration? Click the links below!

Monday, May 6, 2019

Calendar Inspiration

Greetings BPM Fans!  One of the resolutions worth following up on is "leading a more organized life." The TV series "Tidying Up" on Netflix hammered this concept home, that if your surroundings are organized, one would lead a less stressed life.  In researching of general organizing, bullet journaling came up as a great way to time manage.  After all, organizing one's life is just as important as keeping your living space tidy.

Google Calendar is amazing, but perhaps these daily-weekly-monthly calendars might be a better approach for scheduling my time better. 


The Bullet Journal was created by Ryder Carroll. In his words, the Bullet Journal is meant “to help you track the past, organize the present, and plan for the future.” It's a very analog (non-digital) way to write everything down with an artistic flair.  As someone that is just learning this technique and approach, this post will be focusing on one of many aspects of the Bullet Journal -- the Monthly Calendar.  

Supplies:
Small Notebook, blank no lines  5.57 x 8.25 inches
Distress Oxides [Mustard Seed, Mowed Lawn, Carved Pumpkin, Broken China, and Blueprint]
Blending Brushes
Alphabet Stencil
Post-it Notes
Archival Black Ink
Ruler
Black Ink Pen [Micron]

Instructions:

1. Since this is a three page spread, organizing the pages is the first step. Pick out your header title page, then on the other side of that page, the two page calendar spread should be saved.

2. Add Post-it notes to mask off 1" of the edges of the paper making a border, leaving a open square of paper.

3. Begin stamping inside the open square using the curved flower stamp, stamping them like a frame within the inside square using the black archival ink.

4. Stamp in the center Flower Bunch so that it is surrounded by the curved flower images.  Allow ink to dry.

5. Color in the stamps with the blender brushes and oxides. Once all blended, remove the Post-it notes.

6. Taking a stencil (or if you prefer, write it in yourself), add the month title above the stamped and blended square.


7. Flip to the blank double page and start measuring your actual calendar.  On this version, the standard Sunday through Saturday, 7 days grid was used, with roughly a 1" border left empty.  Using a ruler, measure out your calendar, using a pencil first.  Once you have the calendar measured out, lay ink across the pencil.  Erase the pencil lines once the ink is dry.


8. Measuring 1" from the right side of the double calendar page, fold over two pages on the edge of paper and cut off. This creates a "Dutch Door" so you can write notes and lists outside of the calendar (on the next pages) without cluttering up the calendar margins, because we're going to be stamping all over that and there won't be room.


9. Flipping pages to the first full page after the Dutch Door, add Post-it notes block out the main page leaving the 1" margin uncovered. Begin stamping using the curved flower stamp.


10. Flipping back to the calendar double page, cover the drawn out calendar, leaving a 1" border on the top and bottom margins. Stamp the flower bunch stamp across the top and across the bottom, making sure not to over stamp over the right margin.


11. Start coloring the stamped borders with the blending brushes and Distress Oxides.


12. Once all blended in, remove the masks. Now your calendar is ready to be filled in with activities and any future planning.


Using the Blank Page Muse stamps to decorate calendars really gives the ability to personalize and add something special to your day. 


More ideas & crafts by Mercy

Want an extra 15% off on your next order? Use this code on your order! Good until June 1, 2019. BPMDtMercy2019

Wednesday, March 20, 2019

Sunshine

     Hello again, friends! Samantha here and I'm excited to be back on the blog sharing my card with you. I love these beautiful girl stamps. They're so much fun.
     I was inspired to create this card by the way that this particular stamp looks like she's walking toward something. I thought that maybe she was walking toward the sunshine and as such I felt that the sentiment I used was perfect.

(Shop now and save! Use code BPMDtSamantha2019 to save 15% off your total order!)


For this one layer card you will need:

  • White A2 (5.5" x 4.25") card base
  • Black ink
  • Masking tools of your choice
  • Inks for blending
  • Clear shimmer brush
  • Colored pencils


     Stamp one of the girls from the stamp set onto the card base using black ink.
     Cover the stamped image with a mask of your choice. I prefer to use notebook paper covered with repositionable adhesive.
Over the girl place a second mask. I used a piece of cardstock from which I'd die cut a circle. Tape down.


     Using your inks, do some simple ink blending over the masked image.


     I used Distress Inks in shades of blue, pink, and yellow.


     Remove the circle mask. You should have something like this.


     Take your sentiment stamp and, using black ink, apply to the lower left side of the stamped girl, slightly overlapping your ink blending.


     Remove the mask from the stamped girl image.


     Color the girl with any medium you'd like. I decided to go with colored pencils. I also chose to apply shimmer over the ink blended area with Wink of Stella. Completely optional but it does add a fun touch.


     That's it! Make sure you check these stamps out if you haven't already. Have a terrific day and I'll see you again soon!
~Samantha


Looking for more inspiration?
Click the links below!

The Blank Page Muse Shop
Facebook Fan Page
Instagram- Shop
Instagram- Blog
Twitter
Pinterest

Thursday, February 7, 2019

Creating Dimension with Masking

 Hi everyone! Charlotte here, and today I have a fun, clean and simple card to share with you. I enjoy making one layer cards, and love to use masking when I do. With masking it's possible to create the look of depth and dimension without actually adding any layers to the card.


Blank Page Muse products used:
Small Bird In Flight
Love Birds Word Art

Other materials:
White card base
Scrap paper and repositionable adhesive, or masking paper
Repositionable tape
Scissors
Stamp platform and/or stamping blocks
Black ink
Distress Oxide in Tumbled Glass
Cloud stencil
Alcohol markers or other coloring medium of your choice

Instructions:
Begin by stamping the Small Bird In Flight onto scrap paper, masking paper or post-it notes. Fussy cut them out. If using scrap paper, apply repositionable adhesive to the back and allow to dry to a tacky state.
Stamp the Small Bird In Flight twice onto the white A2 (4 1/2" by 5 1/2") card base using black ink. Ensure that the ink is safe to use with the chosen coloring medium. Apply the previously created masks over the stamped images.
Add the Love Birds sentiment. If using a stamp positioning tool, leave the sentiment stamp in place so that it can be restamped in the exact same position later.
Using tape to mask off the outer edges of the card, approximately 2 inches in from the left and 1 inch in from the right. Make sure that the leftmost bird overlaps the mask on that side, adjusting the placement of the mask if required.
With all the masks in place, begin ink blending. With a cloud stencil and Tumbled Glass Distress Ink, start at the top of the card and work down until the area is filled with clouds.
 Carefully peel off all the masks. Pull slowly and gently to avoid tearing the card base.
If the ink blending has faded the sentiment, place the card base back into the stamp positioning tool and restamp the sentiment. Then the final touch is to color the birds with the preferred coloring medium.

Thank you for reading my post! I hope you liked the card and that you will give this technique a go. Masking is really fun and a great way to create scenes, from simple to more complex designs. I'd love to see what you make if this inspired you!


Looking for more Inspiration?

Click the links below!


Copyright Text

Blank Page Muse 2018 Sin City Stamps 2013