Showing posts with label octopus. Show all posts

Friday, February 5, 2021

You Octopi My Heart

I just love making little candy envelopes!

 I found the template by searching online for printable candy boxes.
 Not only is this perfect for candy but will work for little toys and other small gifts. 


Rubber stamps used:

Additional items needed:
  • Imagination
  • Scissors
  • Alcohol markers 
  • ink- Palette, hybrid acid free
  • Cardstock
  • Craft Foam
  • Beacon's Craft glue 3 in 1
  • Washi tape

So for this project I really just wanted to play with the heart. I'm still new to stamping so I don't have lots of hearts to choose from. I used some washi tape to block around the stamp.
It kind of worked, maybe.... It really didn't matter since I was going to be cutting it out later. ☺


 Pro tip Keep a wet paper towel at your desk when stamping
 to clean the ink off before it dries. 


I glued my stamped paper to craft foam and then trimmed away the excess.


Now is the time to add the washi tape to your candy envelope. Then grab your Beacon's craft glue 3 in 1 (or any glue that works with foam and paper) Glue everything in place and your done!


Hope you enjoyed my little candy envelopes
If you have any questions feel free to message Lasheet and if you choose to make your candy envelopes tag her and Blank Page Muse
Thank you, happy crafting!! ♥


Looking for more Inspiration? Click the links below!
The Blank Page Muse Shop https://blankpagemuse.com/


Monday, September 21, 2020

Vintage Couple on a Steampunk Stroll

Greetings, Chris here and today I am excited to share this art-sy page I created to play with this month's Steampunk challenge at Blank Page Muse. My vision was to imitate  a romantic looking "art" piece except using steampunk images, all while playing with my new watercolor markers. 


This project features


Other supplies need to re-create this project:
Mixed media paper, card stock, alcohol markers, water brush, archival ink

  • Stamp images onto mixed media paper with archival ink.
    I chose mixed media paper (instead of watercolor papers) for this project because the images have fine detail that tends to get muddied when stamping on textured watercolor paper. 
  • When stamping the Blank Page Muse Zebra towing an Airship Steampunk Art Rubber Stamp,    I masked off the zebra because I wasn't sure where my horizon line was going to end up. 


  • Using watercolor markers, draw in your "lane".  I did end up expanding my lane to the horizon. 

  • Draw in hills and add ink to grassy areas. Blend with a water brush. 


  • You can see the blended finished look.  


  • Color in your couple as desired. 

  • Color in and blend you sky and flying vehicles.
    Add dots of red ink and soften by dabbing with a waterbrush to imitate the look of field of flowers. 


I hope you are inspired to get creative with you stamps! 


Saturday, May 25, 2019

Octopus on Your Face Postcard

Check out this colorful and quick hot glue resist postcard from Stephanie!
 It's bright and beautiful! 
Let's see how she made this quick and easy card!


Octopus on Your Face Postcard

Blank Page Muse Stamps Used:

Other Products used:
Pigment Powders
Spray Bottle
Glue Gun
Glue Sticks
Archival Ink Pad
White paint pen


 She added a few drops of glue on her blank post card and let it dry.


She sprinkled a few various colored pigment powders onto the card.


Next, she spritzed with water, tilted and moved the paper around.


Allow the colors to mingle and mix.


Ink and stamp the BPM  Octopus with the Top Hat in the lower right corner.


She finished the piece with a handwritten quote. Don't you just love the highly detailed octopus peeking out from the watery background?


Follow the links below to see more Blank Page Muse goodness!


More projects by Stephanie

Sunday, May 19, 2019

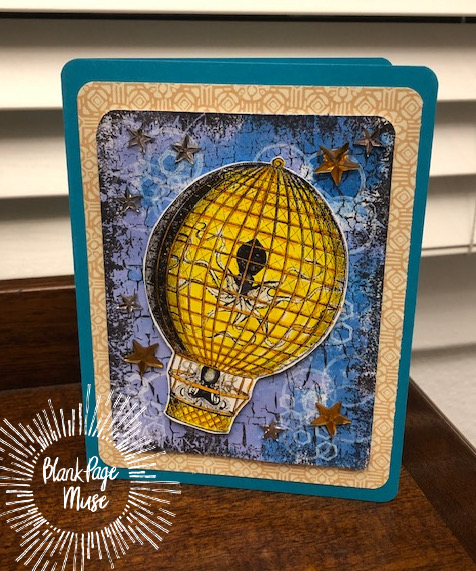
Octopus AWAY!


 Are you looking for a fun, masculine card to create for a special someone?  This easy Steampunk themed greeting card is great for Father's Day or any day you want to surprise someone, or warn them of the impending octopus apocalypse (just kidding!).


Supplies:
Crackle Background Stamp
Small Cluster GeoMetric Stamp and Interlocking Circles from this set
Octopus Airship Stamp from this set
Black archival ink
White Pigment Ink
Various Scrap pieces of cardstock in white, purple-blue, blue-green,and yellow decorative patterned paper (in the example it was a Graphic45.
Adhesive
Foam Double-sided Tape
Small Star Embellishments
Scissors

Instructions:

Create the card base from the blue green paper.  This one is a standard 5X7 sized card.  Cut the decorative paper about 1/8" smaller than 5"X7" and cut the purple-blue card stock another 1/8th" smaller than that one.  Using the black archival ink, stamp the crackle background first, then stamp the joined circles and the geometric cluster stamps randomly using the white pigment ink.


Stamp the Octopus Airship on the white card stock with the archival black ink.  Allow to dry and color in with your choice of medium (watercolor pens, oxides, pencils, etc).  Fussy cut out.


Layer the cards, adhering the patterned paper to the base card, then glue the decorative stamped blue card to the patterned paper (all should be centered).  Attach the fussy cut image using foam tape at a slight angle.  Add some star embellishments and you are done.

All ready to float away into an envelope.


More ideas & crafts by Mercy

Want an extra 15% off on your next order? Use this code on your order! Good until June 1, 2019. BPMDtMercy2019


Wednesday, May 8, 2019

Steampunk Quick Card

Hello! 
 I’m glad you are here today. 
I’d love to share with you a quick tip in using Blank page Muse Steampunk stamps and gelatos 
to provide a easy distressed appearance. 
Come along let’s get to crafting!


Product List:
Spectrum Noir: Watercolor paper
Fiber Castelle: Green gelato
Creative Embellishments: Frame
Creative Expressions: Oval Chipboard Frame
Hampton Art: Rhinestones
Tacky glue
Double-sided tape


1. Distress the edges of your paper using a pair of scissor or tool
2. Take your thin paint brush and run it across the gelato as if you are painting it.


3. Make sure the brush is dense with color.
You want the edges to be the darkest.
4. Begin with running your brush along the edges.
5. Now begin pulling the gelato, using your brush, from the edges of your tag inwards.
This is going to blend the color in the paper. (works just like distress ink)


6.Stamp the fishnet in black ink, tear the edges of the paper when done.
 Use your double-sided tape to adhere the papers together
7. Heat emboss all your chipboard pieces
8. Attach all your altered embellishment to your tag using tacky glue


I do hope you enjoyed the fun quick tip today! Thank you for stopping by today!
We look forward to seeing you next time!

Tuesday, March 26, 2019

I wish I was an Octopus

Hello, for my tutorial today I am working with the theme "Under the Sea". I decided on an octopus-themed mixed media piece using the Octopus Sealife stamp from Blank Page Muse.


Blank Page Muse Stamps used in this project:

Open Weave Fishnet Background Border Texture Red Rubber Stamp by Pam Bray Designs 

(Shop now and save! Use code BPMDtSuzette2019 to save %15 off your total order!)

Other supplies used:

Gesso
Pebeo Acrylic Paint - Leather
jute twine
white tissue paper
washi tape
gel medium
matte medium
white cardstock
sand
washi tape
embossing ink
Baked Texture Artist Embossing Powder by Seth Apter & Emerald Creek -VINTAGE BEESWAX
Versafine Black Ink Pad
Faber Castell Gelatos - Butterscotch, Metallic Icing, Black
Jack Richeson Shiva Oil Paintstik, Iridescent Red

Apply a coat of gesso. When that is dry paint with acrylic paint. Leave an area lighter. This is where you will add the stamp.


Using gel medium, stick down the jute twine.


Place tissue over the jute and coat with matte medium.


Using gelatos, add some more color to the piece. Use the metallic icing to highlight the lighter area.


Stamp the octopus on the lighter area.


Add washi tape where you like.


Apply some gel medium to the base and cover with sand.


Use the net stamp to add more detail to the background and the Shiva Stick or another Gelato to add some highlights.


Darken the edges using a makeup sponge and black ink. Cover the stamped area and add a white paint splatter.


Stamp the quote on white cardstock, cut out and darken the edges before sticking on.


Coat the piece with embossing ink and sprinkle with the beeswax embossing powder.


Heat with an embossing gun to finish.


Wasn't that easy? 


Thank you so much for stopping by. I do hope you enjoyed this tutorial. Remember to subscribe so you don't miss a post and look us up on social media (links below).

Happy crafting!
Suzette

Instagram Blog-  https://www.instagram.com/blankpagemuseblog/
Twitter-  https://twitter.com/BlankPageMuse
Pintrest- https://www.pinterest.com/blankpagemuse/boards/

Tuesday, March 19, 2019

Steampunk Birthday

Hello there my fellow crafty stamper friends! We here at Blank Page Muse are inspired by the nautical theme this month. So to continue the theme today I would love to share with you today to share a masculine steampunk birthday card! 

Product List:
Blank Page Muse: Octopus Time! Steampunk Art
Blank Page Muse: Open Wave Fishnet

(Shop now and save! Use code BPMDtJessica2019 to save %15 off your total order!)

Spectrum Noir: Watercolor paper
Ranger Ink: Texture paste & Archival Black Ink Pad
Tim Holtz: Distress Ink - Brushed Curdory
Canvas Corp Brands: Tattered Angels Shimmer Mist - Sapphire & Penny
The Paper Studio - Gears 3D sticker embellishments
Hampton Art - Brown rhinestones
Tacky Glue

1. Let's begin by creating our card. Get your paper out and get to cutting it to your desired size and folding it in half. 

2. Once this is done, let's add some texture straight to the paper. 

*Tip* I love this paper because, I can do pretty much any kind of mixed media art on its surface without it wilting and falling a part. 

As you see in this photograph, I make sure to lay down a hefty layer of paste as to capture all the fun elements of my chosen background stamp.
3. While the texture is still soft take out any of your texture background stamps and begin stamping the texture. Once you are happy with the results let it dry.

4. While that's drying, take your stamped octopus image and distress it.

5. After your texture is dry spray your surface with your chosen paint sprays and watch the magic happen! 

That image is just a delight to look at! All that golden shimmer! 

6. Use your heat tool to dry the paint quicker so you can begin adding your elements.

7. Finish off your card by adding all your chosen embellishments using tacky glue.

*Hint* I always use tacky glue on the back of my glue dots and rhinestones to ensure that they won't fall off at a later date.
Voila! Here is the finished card and some close-ups. 
I do hope you enjoyed your time here with me today in making this fun masculine steampunk card! 


Thank you so much for popping in today! I will see you right here next time!

Visit and follow us for more inspiration:

Copyright Text

Blank Page Muse 2018 Sin City Stamps 2013