Showing posts with label mixed media art. Show all posts

Saturday, August 30, 2025

Mixed Media Sea Shell

 Hi everyone, Steph Ackerman here today using some amazing stamps from Blank Page Muse.


Paint the seashell in assorted colors of paint.
Stamp the seaweed randomly about the seashell.
Add sand along the bottom.


Stamp and color the umbrella with Copic Markers.
Stamp Footprints on white cardstock and mat with kraft cardstock.
Add a clip to the top edge and adhere to the seashell.
Stamp Hello Sunshine on a piece of chipboard and adhere to the seashell.
Stamp seaweed on a fabric tag as well as on a wood seahorse.


Add glitter around the edges of the seashell.
Create seashells from clay and adhere to the sand along with a tiny bottle.
Finish by adding some tiny flowers on several panels.

Thanks for stopping by.

Steph

Looking for more Inspiration? Click the links below!
The Blank Page Muse Shop https://blankpagemuse.com/

Friday, March 8, 2019

Plenty of fish in the sea - Art Journal

Hello Crafty Friends,

Marie-Christine with you today with an Art Journal Page. The theme this month is "Under water" and the technique is watercolor; so, I used both on this creation.


BPM Rubber Stamps used:

Coral Reef Sponge Small Art Rubber Stamp

(Shop now and save! Use code BPMDtMarieChristine2019 to save %15 off your total order!)

Other Supplies

Small Art Journal
Old Book Page
Distress Inks
Stencil
Watercolor
Vintage image


Adhere an old book page on your Art Journal and color with Distress ink.
Use a waves stencil with green Distress ink at the bottom of the page.


Stamp the shells and fish on a watercolor paper and color them.

To finish, adhere shells, fish, coral, title and vintage image on your page.


Hope you have enjoyed my tutorial!


Thank you for visiting!

Marie-Christine Denis
Inspiration Team Member


Follow us 
The Blank Page Muse- https://blankpagemuse.com/


Saturday, November 18, 2017

Yikes Tentacle Plant Mixed Media Tag

Hi all

Here is an easy mixed media tag made using Monique's  Wildflower Yikes Stamps.

Product list
Large tag die cutter
white card
Black archival ink
Tyveck Material
Metallic paints


Start off with a large blank tag and using a blending tool, Apply light orange ink across the top and bottom of the tag. Next use purple ink and apply it across the middle and blend a little into the orange.


Stamp the boarder stamp around the edges of the tag and then stamp the wildflowers into the corners of the tag. You can layer up the tentacles to  create larger flowers.


Stamp out Yikes into the center of the tag.


Cut out cogs from Tyveck material and paint with metallic paints. 
Tyveck can be bought as sheets or you can buy disposable overalls and cut that up.
Create a flower by placing a metal brand though the center of the cogs and melt with a heat tool.


Wednesday, August 9, 2017

Pens & Ink Journal Page

Hello Sin City Friends and Fans! Today I want to show you how I used the new Sin City Stamps release "Correspondence" by Katy Leitch! I just love these!

For this journal page, I chose the fountain pens (multiple and single), ink bottle, logo, script, quote, and paperclips and used them in a couple of ways.
I started with the background................................................................................................................
Use the script stamp and watermark ink to stamp.
Sprinkle embossing powder on stamped areas and heat activate with a heat tool.
**This step can be done using a colored ink and clear embossing powder as well.
For this, I used an iridescent gold embossing powder.
 Next, I added sprays of browns and blues. In between each color, add water, and move page around to allow drips and rolls of color. Be sure to dry in between every color.
Next, I stamped the multiple fountain pens on the edge using only the tips and a dark brown ink.
This added a pop of brown.
Stamp images of the pens, ink, etc. onto cardstock.
For added strength and shine, these were embossed with clear embossing powder as well.
Cut them out.
Stamp the quote onto cardstock and cut out. Add brown ink with a sponge around the edge to enhance and create depth. Adhere to page with foam dots.

Adhere your cut out stamped images. Add some flowers that coordinate with your color scheme. Splatter white acrylic or gesso and a few of the spray colors used all around the focal area. I then stamped the paper clip in a dark blue ink in various areas to add a bit more blue and to incorporate that stamp!
I hope that you have enjoyed this project and are inspired to get stamping!!
Please follow us on our Facebook Fan Page Here and share your work with us!
To purchase your stamps head over to Sin City Stamps online store!
Until next time! Thanks!
Jenn

Thursday, February 23, 2017

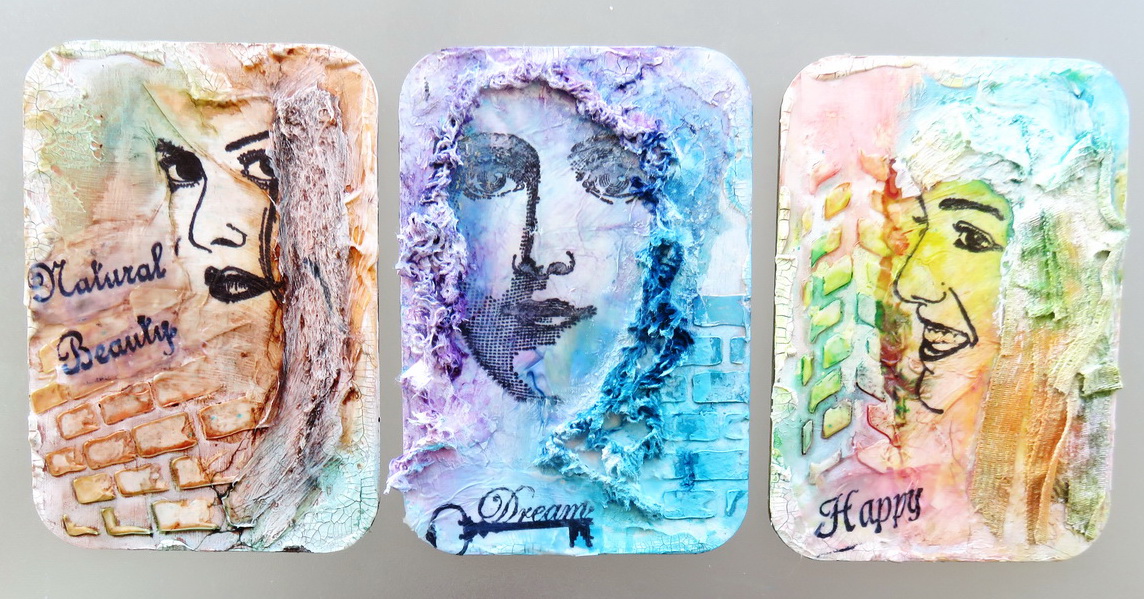
Mixed Media Girls trio


Hello my dear crafty friends and welcome!
Irit is here again and this is my second February tutorial for you.

Today I am going to share small art pieces made with small  boards using 3 similar but totally different Sin City stamps in 3 different color schemes.
The only paint I used here are mists and  I wanted to show you my most favorite way to add stamped images to textured surfaces.

Product list:
Sin City stamps
Face profile line art
Classic face 3/4 view line art
Face 3/4 view strand of hair
Natural Beauty word phrase
Happy Birthday phrase
Old style key Dream word

Other products:
Mixed Media boards- chipboards or sturdy cardboard.
Stencils
Texture paste Clear
Crackle paste
Black permanent ink
Color ink mists
Tissue paper
Ribbon, wool, yarn
Scissors
White gesso
Gel medium

Step by step instructions:
1. Cover three boards with white gesso and let it dry.


2. Add a thick layer of Clear texture paste using three different small stencils. Use a different stencil on each board.


3. Remove the stencils. The paste becomes clear when dry.


4. Cover the edges of each board with white crackle paste. Again, the magic word: Let it dry!
You see the crackles when it's dry, not before.


5. Stamp all three face stamps using permanent black ink onto white tissue paper.


6. Tear each stamped image apart and glue over the boards as shown with Gel medium over and under the stamped piece.


7. Glue the " hair" to each image: the ribbon, yarn and the natural wool . The colors don't  matter as we cover the hair with a thick layer of white gesso.


8. Mist each board with different colors. Pick the colors that fit the stamped image mood. For this pretty, but angry lady, a vintage mix of colors was the best choice.


9. Mist the second board with some shabby, dreamy colors.


 10. Mist the last board with a mix of lovely pastel colors.


11.Stamp the sentiments for each board in the same  black ink and tissue way.
Natural beauty was the best sentiment for the "angry" lady.
Dream key was the choice for the second one.
For the bright board stamp " Happy Birthday" sentiment and tear the word Happy.
Glue all words with Gel Medium.


I really hope that you liked my small art pieces (bigger than ATC, but not the card size).
You can also buy almost all of the stamps in this Natural Beauty sheet of rubber.
 See you again next month!

Wednesday, February 22, 2017

Beautiful Dreamer Mixed Media Wall Art


Hi everyone!
Jenn here with you today to share my latest project using beautiful stamps from Sin City Stamps!

For this wall hanging I used the following supplies:
Sin City Stamps Love of Butterflies
8X12 art board
Heavy black gesso
Crackle paste
Spray inks in shades of teal, purple, and gold
3D Matte gel
Hot Glue
Embossing powders
Micro beads
bits and baubles...(stash)

So here is how it was done...!

1. Start by covering your surface with black gesso and let dry.
Using an old credit card or spatula scrape on the crackle paste in different levels, (thin in some thicker in others)
Let this dry.
Keep in mind that if you are using a heat tool that the crackle paste will bubble if you hold heat in one area for too long so be sure to move it constantly around your surface.


2. Using the stamps and black archival ink randomly stamp onto the white crackle paste and let dry. Now you can spray on some color!

3.While you are waiting for the colors to dry, start to prepare your stamped butterflies.
Use a ink color of your choice and embossing powder in either clear or an iridescent such as I did. Dry with heat tool and cut out. Set these aside.

4. Now for some real fun!! 
Gather up all of the bits, baubles and flowers you have chosen and lay them out how you want them on your piece. Once you do this and get the look you want I recommend you snap a quick photo to refer as you glue it all down.


5. Glue everything in place and then let dry. Once it dries cover all of the bits with black gesso but do not paint the crackle space.


6. Now lightly brush a mixture of white gesso and crackle paste on the bits but do not cover all of the black. Once you have let it dry and then spray your ink colors one at a time drying in between until you achieve the desired look. I also used a brush to apply some gold I added at the end as well as with the teal in some areas. Finish it all off with micro beads for texture. Place the beautiful butterflies where you like to finish!


 I hope you find inspiration in this project and that it guides you to make one of your own! 
Remember to go to Sin City Stamps to purchase these any many other beautiful stamps!

Monday, April 4, 2016

Imagination Mixed Media Canvas


Hi Chris here and today I am sharing my first mixed media canvas I created for Sin City Stamps. I want to say that this is so different from what I normally create but I loved the quote and I just let my imagination go!

Sin City Stamps Supplies
Die Cuts- Ballon, Frame, Flower Outline, Daisy Border Chain, Stars
Silver/Blue 1/2 Round Flat Back Embellishments

Other Supplies -  canvas, Gesso, Molding Paste, Beacon Fabric Adhesive, Glossy Accents, StazOn Ink (Brown), ColourArte Twinkling H2Os (yellow rose, sky blue, persimmon, moss green, blue bayou), miscellaneous small alphabet stamps, brown journaling pen. Graphic 45 Paper,  paper lace doily, sand paper

To create this canvas I started by first applying Gesso to my entire canvas. I then added some texture to my background by applying some molding paste over the Pattern 2 Stencil

I then added some patterned papers and die cuts onto the canvas. 
I continued layering a few more dies cuts and some lace.  You'll notice that the colors don't necessarily match.  That won't matter once I am done. 

In added my gear charms and bits of a paper doily and then applied gesso again over the whole project. 

I then stamped my Globes Stamp using my StazOn Ink. 


I then randomly painted my canvas using my ColourArte Twinkling H2Os. I just kept laying colors until I was satisfied.  I then painted my balloon with Twinkling H2Os


I then used a combination of my alphabet stamps and my journaling pen to add my quote. I topped the balloon with my butterfly button.  I then sanded my edges to smooth the edges and lightly sanded my gears to allow the metal to shine through. Once again here is my finished project. I hope you are inspired to step outside your comfort zone and create something!   Just let your imagination take you away! 


Copyright Text

Blank Page Muse 2018 Sin City Stamps 2013