Showing posts with label Sin City Design Team. Show all posts

Saturday, November 18, 2017

Yikes Tentacle Plant Mixed Media Tag

Hi all

Here is an easy mixed media tag made using Monique's  Wildflower Yikes Stamps.

Product list
Large tag die cutter
white card
Black archival ink
Tyveck Material
Metallic paints


Start off with a large blank tag and using a blending tool, Apply light orange ink across the top and bottom of the tag. Next use purple ink and apply it across the middle and blend a little into the orange.


Stamp the boarder stamp around the edges of the tag and then stamp the wildflowers into the corners of the tag. You can layer up the tentacles to  create larger flowers.


Stamp out Yikes into the center of the tag.


Cut out cogs from Tyveck material and paint with metallic paints. 
Tyveck can be bought as sheets or you can buy disposable overalls and cut that up.
Create a flower by placing a metal brand though the center of the cogs and melt with a heat tool.


Friday, August 25, 2017

Learn How To Create This Entangled Octopus Time Card

Hello

Here I have a steampunk themed card made using the Octopus Time stamp set.
Products
Card blank
Sepia ink
Purple ink
12 x 12 steampunk themed papers

Cover a 6 x 6 blank card with brown paper and the half with patterned paper.

Cut out a large hexagon from faux print style paper and glue to center of card.


Stamp out the octopus lady onto white card using a purple ink pad. Use sepia coloured ink to colour over the white areas and then adhere to the edge of the hexagon. 


Stamp out the cog cluster onto card and color in before cutting out and adding to the corner of the card.


Finish by adding a witty sentiment.

Visit our Facebook group for more inspiration

Wednesday, April 5, 2017

Steampunk ATC Canvas

 Hi All, today I am going to show you how to make this steampunk canvas. The canvas is ATC sized so very small, that makes it a quick and easy but (very) fun project!

Supplies used:

Sin City Skeleton  head on vintage key stamp
A small canvas about 3.5 x 2.5 inch
Metallic paint in Copper, Moss Green and Purple
Black acrylic paint
Stencil
Gear and wings dies
Die cutting machine
Black cardstock for the gears
White cardstock to stamp on
Chipboard for the wings
A silver wax or paint
Scissors
Colored pencils or markers
Glue


 Step 1- Paint the canvas in metallic green and let dry.


 Step 2- Use a stencil to create a background using the copper metallic paint.

 Step 3- Die cut the gears and the wings, and stamp the Skeleton  head on vintage key stamp onto white cardstock.

 Step 4- Paint the wings metallic purple.

 Step 5 Color the Skeleton  head on vintage key stamp and cut it out.

Step 6 - Add some silver wax or paint to the gears to give them a metal look.

Step 7 -Adhere all parts to the canvas like in the picture.


Hope you are inspired!
For more inspiration with Sincity stamps, pls visit our Facebook page - or the Sin City Fan page, you are very welcome to post your projects using Sin City Stamps there so everyone can see them.

To purchase these fab stamps pls visit -  http://sincitystamps.com/

Thanks so much for stopping by.

Wednesday, March 1, 2017

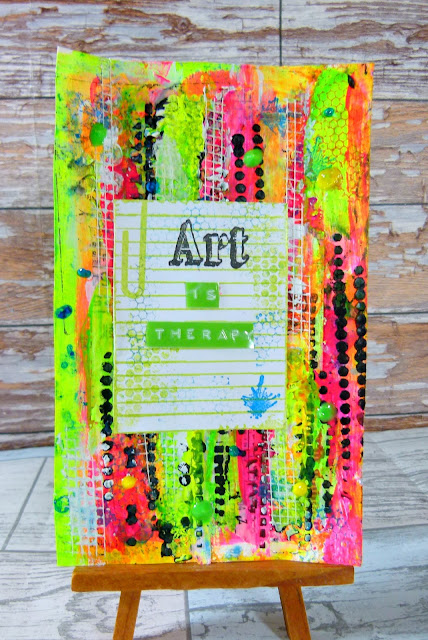
Art is Therapy Art Journal Page


Hi all!

Today I am going to show you how to create this bright Art Journal page using the
 Sin City Stamps!

Product list:

Sin City Stamps Art Journaling Stamps
Dry Wall Tape
Black ink pad

Acrylic paint in White, neon pink, neon orange , neon green and neon yellow
Gesso
Bubble wrap
Favorite background stencil
Black modeling paste
Newsprint washi tapes
Neon 3D Pearls in Blue and Green


                Paint the page with green neon paint and then yellow.
Next paint over with white gesso and leave to dry.


Paint neon orange paint over the top and then another layer of gesso.


 Paint neon pink in the middle and splash over some blue paint and leave to dry.


 Using the random letters stamp from the journaling set and your black ink pad, stamp around the page in a no particular pattern.


 Apply some white paint to the bubble wrap and press onto the page, revealing a nice design.


Use a stencil to add modeling paste to the page and let it set.


 Add more paint over the stenciled design.


Tear up strips of washi tape and add them to the page before covering them over with a little gesso.


This time use black modeling paste with a stencil and let it dry before going over it with gesso.


Add more paint and then another stencil using black modeling paste.


Use the texture stamps from the journaling stamp set to build up more texture.


Cut up pieces of dry wall tape and paint over with gesso.
Stamp out the note pad stamp onto cardstock and cut out.
Add texture stamps around the edges and then stamp the word Art at the top.
Finish by adding the rest of the words using a label maker.

Friday, February 3, 2017

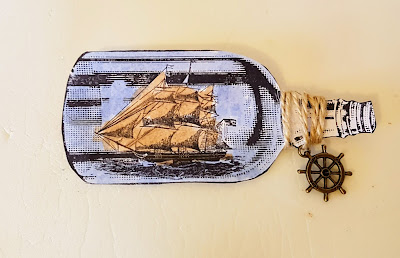
Boat in a Bottle Greeting Card

 
Hi all,
Today I am going to show you how to create this boat in a bottle card using Sin City Stamps!

Supplies used:
Blue and black ink pads
Watercolors
Acrylic paints in shades of ocean blue.
The Crafter's Workshop Ledger Stencil
Molding paste
White cardstock for your card base. 
Patterned background cardstock
Gelli plate and brayer 
A spackle tool or a used gift card
Jute twine and burlap fabric or ribbon
Canvas Corp Brands Washi tape
Small sea shells, assorted seaside charms and coordinating embellishments. 
Adhesive and foam tape

Gelli Plate painting


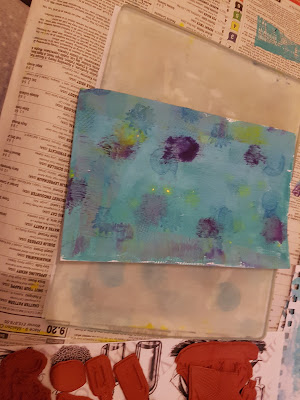
1. Squeeze few shades of acrylic paint on to the Gelli plate and roll with a brayer to blend the colors. 
2. Place your paper over the paint and smooth down. Peel your paper off and set aside.

Close up of stamp
3. Stamp one of the shells from the Nautical set using blue ink onto the plate and then place the paper back over the top, face down. Then peel the paper back off to reveal that the shell images have transferred.

close up of painted page

4. Once your painted paper is dry, cut out a square smaller than the front of your card..

Using the stencil

5. Place the stenciling over the top of the paper. 
6. Place a bit of modeling paste at the top of the card and spread out, covering the stencils patterns.
7. Carefully lift up the stencil and set card aside so paste can harden.

Close up of patterned paper

8.Cover the front of your card with the patterned paper and then adhere the stenciled sheet onto the center.

Close up of boat in a bottle stamp

9. Stamp out the bottle stamp onto a piece of smooth cardstock and color in using watercolors.
10. Thread a charm through some jute twine and wrap it around the neck of the bottle, holding in place with tape at the back of the bottle to hold the twine in place.

close up of card
11. Adhere the bottle into the center of the card using 3D foam tape.
12. Dye your burlap with the blue ink. Place this onto your card as shown with the washi tape, sea shells and other embellishments.
close up of flowers
13. Finish your card with a stamped sentiment.

Thank you for visiting

Saturday, January 28, 2017

If the broom fits.....


 Hi all, Mo here with a spooky fun card because in my world it's always Halloween :-)

List of Supplies used:
  1. Sin City Stamp set Halloween Bingo  
  2. Sin City Stamp set Skeletons Halloween 
  3. Ink pads- purple, light pink, dark brown and black. 
  4. Black and white cardstock.
  5. Patterned scrapbook paper
  6. Decorative twine
  7. A piece of sisal rope
  8. Halloween charms
  9. A small twig
  10. Thin wire
  11. Blending tool or sponge
  12. Water in a spray bottle
  13. Heat gun
  14. Adhesive
  15. Scissors
  16. Distressing tool or edge of scissors.


See the steps below or click on this link for an instructional video.


1. Use the purple ink to stamp the Bingo onto the white card stock.

2. Cut the bingo card out and use your tool to distress the edges, then add some pink and brown ink with your blender.


3. Stamp the Skellie on the broom with the sentiment.


4. Take apart some of the rope, wet it and dry it using heat gun to straighten the rope.
5. Use the wire to attach the straightened rope the stick. Trim rope to a broom like shape.

6. Use black cardstock to cut out a mat and rough distress the edges.


7.  Assemble the card and add the twine, broom and charms.


Thanks for visiting!


To purchase the stamp supplies used in this project please visit www.sincitystamps.com


For more inspiring paper-craft projects from the Design Team, be sure to follow us on Facebook.

Monday, January 23, 2017

Heart Canvas


Hi Mo here again, almost Valentines day so thought to do a heart canvas for my Sin City inspiration post.

Supplies used:
Sin City stamp set Skeletons Halloween
Sin City stamp set Wing it
Canvas 10 x 10 cm
Tissue paper
Acrylic paint in : Desert turquoise, True Red
Fluid acrylics in Cobalt Teal Hue and Primary yellow
Metallic silver paint
Triple thick gloss glaze
Decoupage glue for napkins
Waterproof stamp ink in black
Heart wings die and machine
Chipboard ( I used a box from a frozen pizza)
Craft mat
Paintbrushes
Baby wipes or wet cloth
Permanent black marker.
Adhesive


1. Paint the canvas turquoise.
2. Die cut the heart, wings and crown from your chipboard.
3. Paint the heart red and the wings and crown silver.
Set aside to dry.


4. Cut a piece of the tissue paper big enough to cover the whole canvas and use a waterproof ink to stamp the Ornate Metalwork look stamp to make the background.
5. Paint the backside of the tissue paper with the turquoise paint to get a brighter color when it is glued to the canvas.


6.Using a paint brush, spread some black paint onto your craft-mat and press the Ornate Metal work stamp into the paint then quickly stamp it onto the heart.
7. Repeat this step using the Wing it set stamps onto the silver painted wings.
8. Clean the paint off the rubber stamps quickly using a baby wipe or wet cloth.


9. Adhere the the tissue paper to the canvas with decoupage napkin glue.

10. Apply a layer of gloss glaze on the heart and let dry

11. Paint a piece of the chipboard with red paint and stamp the sentiment from the Wing it set on it.

11. Cut out the words (as shown above) and use the marker to line the edges black.

12. If you want to add more color to the canvas (as I have done), mix yellow and turquoise translucent paints to achieve a brighter color.

13. Attach all your pieces to the canvas with adhesive.


Thanks for visiting!


To purchase the stamp supplies used in this project please visit www.sincitystamps.com


For more inspiring paper-craft projects from the Design Team, be sure to follow us on Facebook.


Copyright Text

Blank Page Muse 2018 Sin City Stamps 2013