Showing posts with label Happy Birthday. Show all posts

Sunday, December 7, 2025

Birthday Hugs


     Birthday Hugs

Good day, fellow crafters. It's Tamara once again, with a new post showcasing my latest card created using  Blank Page Muse products! Today, I want to send you the biggest birthday hug imaginable—one that's warm, full of joy, and overflowing with all the love you've shared so selflessly. May your year ahead be as beautifully layered and full of life as these petals, with every twist and turn leading to moments that make your heart sing. Let's dive in!


To create this project, you will need the following:

Stamps

 Paper

  • (1) White Cardstock  - 4.25" x 5.5"
  • (1) White A2 card base 

Tools and Consumables

  • Sticky mat (optional but very useful to hold work in place without using tape)
  • Scissors
  • Liquid glue
  • Paper Trimmer
  • Purple Ink
  • Black ink 
  • Ink-blending brush(s)
  • Stamping tool (I use a Misiti)
  • Colored Pencils
  • Masking sheet - 4.25" x 5.5"
  • Low-tack adhesive 
  • Sentiment of your choice (Mine came from my stash) 
Process: 
  • Secure the white cardstock to the stamping tool.
  • Align the carnation stamp in the center of the panel.
  • Use low-tack adhesive on the back of the carnation stamp and then secure it to the stamping platform with some light pressure.
  • Ink the stamp with the Black ink, and then stamp the image. Reapply ink to the stamp and restamp if required for complete even coverage.
  • Remove the stamped panel from the stamping platform and secure the masking sheet in its place.
  • Ink the stamp with the Black ink, and then stamp the image. Reapply ink to the stamp and restamp if required for complete even coverage.
  • Remove the masking sheet and trim it along the edges of the image with scissors.
  • Peel the masking sheet back and apply it over the image previously stamped on the cardstock panel.
  • Secure the masked panel to your worksurface or the sticky mat.
  • Use the Purple ink and an ink brush to ink blend a background around the image to the desired hue.
  • Once the ink has dried, slowly peel the masking sheet off at a 45-degree angle to minimize the chances of tearing the image below.
  • Remove the panel from the sticky mat and secure it to a work surface.  I prefer my glassboard because it is ultra smooth, but I have also found a clipboard to work well.
  • Use colored pencils, Pinks, Reds, and Greens, to color in the image.
  • Secure the panel into the stamping platform, align, secure, ink, and then stamp the sentiment.
  • Remove the panel from the stamping platform.
  • Secure the background panel to the black cardstock with liquid glue.
  • Adhere the completed panel to the A2 card base with liquid glue.

The stamps I used can be found by following the links in the materials list, or you can find them with a quick search on www.blankpagemuse.com. Visit our social media sites for more stamping fun!


Friday, November 7, 2025

Fantasy Flourish

      Fantasy Flourish

Good day, fellow crafters. It's Tamara once again, with a new post showcasing my latest card created using  Blank Page Muse products! Today, I’m crafting a Birthday card using a "new to me" technique, using a stencil, ink, and glossy accents. Let's get started!


To create this project, you will need the following:

Stamps or Stencil

 Paper

  • (2) Black Cardstock - 4.25" x 5.5"
  • (1) Light Blue Cardstock  - 4.25" x 5.5"
  • (1) White A2 card base 

Tools and Consumables

  • Sticky mat (optional but very useful to hold work in place without using tape)
  • Scissors
  • Liquid glue
  • Paper Trimmer
  • Die-cut machine
  • Glossy Accents
  • Blue ink (Shade or your choosing)
  • Ink-blending brush 
  • Squegee or plastic store card 
Process: 
  • Secure the light blue cardstock to the sticky mat.
  • Secure the Fantasy Flourish stencil over the cardstock.
  • Use the Blue ink and the ink-blending brush to fill in the stencil to your desired hue. I choose to make some areas a little darker than others for additional interest.
  • For the "new to me" technique!!! Do NOT remove the stencil.  Instead, use the Glossy Accents to put a thin bead along the bottom of the stencil.
  • Use the Squegee or plastic store card to pull the Glossy Accents across the stencil.
  • Repeat if necessary to ensure the stencil is filled in.  
  • The trick of the technique is time.  The resin needs time to start to set before you pull the stencil, but not too much time, or it gets too hard and you can't get the stencil off without ripping the paper.  I personally watch for it to start to show a light haze, which indicates it's drying, before peeling the stencil off at a 45-degree angle.
  • Immediately wash the stencil to remove the excess resin.  
  • Use the die-cutting machine, a sentiment of your choosing, and one of the Black cardstocks to cut out the sentiment.  
  • Cover the sentiment in a light coat of the glossy accents and allow to dry fully, and for me, this was overnight.
  • Secure the second Black cardstock to the card base with liquid glue.
  • Trim the background panel to size. I wanted just a slight reveal, so I took 1/8th inch off all sides.
  • Secure the background panel to the mat and card base with liquid glue.
  • Secure the sentiment in place with liquid glue.

The stamps I used can be found by following the links in the materials list, or you can find them with a quick search on www.blankpagemuse.com. Visit our social media sites for more stamping fun!


Friday, September 5, 2025

Tattered and Worn Happy Birthday Card

 Hi everyone, Steph Ackerman here today using some amazing stamps and papers from Blank Page Muse.


Stamps: Happy Birthday Background


Stamp the birthday stamp on a panel from the paper pack with black ink.
Emboss with clear embossing powder, then tear all edges.
Mat with gold cardstock, also tearing the edges.
Adhere chipboard elements to the panel with brands.


Create a pocket inside the card to hold a gift card.
Stamp the birthday stamp with black ink and emboss.
Adhere the pocket to the card and slip a gift card inside.


Thanks for stopping by.

Steph

Looking for more Inspiration? Click the links below!
The Blank Page Muse Shop https://blankpagemuse.com/


Friday, August 1, 2025

Crafting a Vibrant Birthday Masterpiece with the Jacobs Ladder Technique

Crafting a Vibrant Birthday Masterpiece with the Jacobs Ladder Technique

Good day, fellow crafters. It's Tamara once again, with a new post showcasing my latest card created using  Blank Page Muse products! If you're ready to dive into creating a stunning "Happy Birthday" card using the Jacobs Ladder technique, you're in for a treat. This vibrant project combines the fluidity of water-based inks with creative manipulation to craft a one-of-a-kind masterpiece. Whether you're a beginner or a seasoned crafter, this step-by-step guide will walk you through the essentials to get started—gathering your materials, setting up your workspace, and unleashing your creativity.


To create this project, you will need the following:

  • Fantasy Flourish stencil from Blank Page Muse
  • White cardstock panel - 4.25" x 5.5"
  • White A2 Card base
  • Water-based inks in preferred colors (I chose red, green, blue, and purple)
  • Ink-blending brush(s)
  • Sticky mat (optional but very useful to hold work in place without using tape) 
  • Scissors
  • Liquid glue
  • Paper Trimmer
  • Sentiment of choice
  • Die-cut machine
  • Watermark ink 
  • Black ink 
  • Heat Tool 
  • Clear embossing powder 

Process:


  • Apply the white card stock to the sticky mat securely.
  • Use the water-based inks and ink-blending brushes to blend the chosen color palette to the desired hues for each. Allow the ink to dry.
  • Apply the Blank Page Muse stencil over the inked cardstock and secure to the sticky mat as seen in the image on the right.  
  • Use the watermark ink and ink-blending brush to fill in the stencil.

  • Remove the stencil and the inked card base from the sticky mat.
  • Apply a generous amount of clear embossing powder to the card base, tap to remove excess, and then heat set with the heat tool. This will act as a resist for the next inking.
  • Return the card base to the sticky mat and secure it in place.
  • With a pouncing motion, generously apply the black ink to the entire card base.


  • Using the micro-fiber towel, gently wipe the ink from the embossed areas.
  • Allow to dry completely.
  • Using the sentiment of choice, in this case a die cut of Happy Birthday, adhere the sentiment to the panel with liquid glue.
  • Lastly, to complete the card, adhere the panel to the white A2 card base. 

The stamps I used can be found by following the links in the materials list, or you can find them with a quick search on www.blankpagemuse.com. Visit our social 

media sites for more stamping fun!

Sunday, September 15, 2024

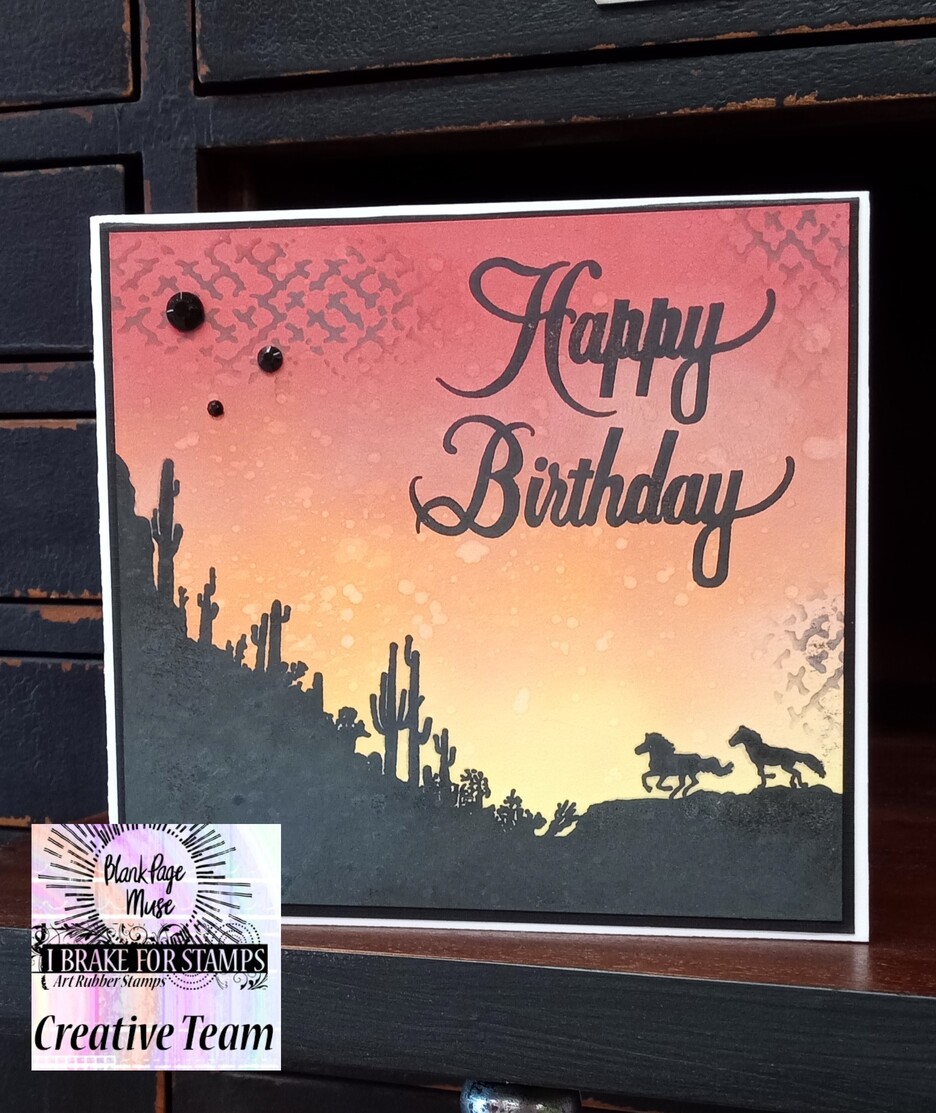
Running Horses & Cactus Silhouette at Sunrise

 Horses are beautiful animals. 

Horses running free are majestic! 

This silhouette of the horses running in the desert against the setting sun is MAGNIFICENT!!  

On this card I wanted to create a sunrise.  The horses running with the sunrise behind them reminds me of the OLD WEST. 


I Brake for Stamps used:
Horses and Cactus Silhouette
Happy Birthday Sentiment

Stencil from Blank Page Muse
TCW554 Stencil Butterfly Collage - 6x6

Other supplies: 

Tim Holtz Distress Oxide Inks 
Squeezed Lemonade
Festive Berries
Spiced Marmalade
Scorched Timber
Blending brushes
White Cardstock
Card base
Water in Spray bottle
Staz-on Black Ink
Stamp Platform
Paper towel
Heat tool
Parchment Paper
Gems

To create the sunrise I blended my Tim Holtz Distress Oxide Inks: Squeezed Lemonade, Festive Berries and Spiced Marmalade on white cardstock with blending brushes or any blending tool. I started with the Squeezed Lemonade working toward the darker Festive Berries.


Using a stamping platform and Staz-on Ink I stamped the desert silhouette with the running horses. After the set I lightly spritzed the card with water and dabbed it off with a paper towel, then dried with a heat tool.  This gave the sky some interest.


For the placement of Happy Birthday, I used baking parchment paper with lines over the stamped image. This helps to see if I got the sentiment lined up. Then I stamp the sentiment on the parchment, if it is straight, I carefully remove the parchment and stamp directly on the inked panel.
 

After getting to this point, I found I had a smudge on my panel! I was really happy with the inking and did not want to start over.  I was up for the creative challenge... What do I do to redeem my panel.  Stencil are your friend in this instance.  


Using the - Butterfly -stencil,  I gently stenciled over the smudge with Tim Holtz Distress Oxide Scorched Timber and then in two other areas on the card. It looks like I intended to add the stenciling. Three black gems were added to the upper left. 

The panel was then mounted on a black mat and adhered to a card base. 

What do you think of my creative save?


Please visit our social media sites for more stamping fun!

I Brake For Stamps - https://ibrakeforstamps.com/
The Blank Page Muse- https://blankpagemuse.com/


Tuesday, February 13, 2024

How to Create and Elegant Stamped Sympathy Card

 Greetings!  Today I am sharing this elegant sympathy card. Lately I have been playing around creating slimline cards. They are simple to create and fit into a standard business sized envelope!


Simply cut your cardstock to 7 x 8.5 inches. Score at 3.5 inches and fold and you have your card base!

For this card I  die cut my patterned paper to fit onto my card base.  Stamp your flowers from the Florals Sheet Flowers for you Bouquet Happy Birthday Thank you Set from I Brake for Stamps onto cardstock with coordinating ink.  Cut out the flowers and adhere to your card. 


Add your greeting to finish your card.  I even added Liquid Pearls to my flowers to add more elegance. 

I hope you are inspired to get creative with your stamps and papers from Blank Page Muse and I Brake For Stamps.  Don't forget to use my discount code BPMChris. 


Be sure to follow us at 

The Blank Page Muse- https://blankpagemuse.com/


I Brake for Stamps-https://ibrakeforstamps.com/


FB Fan Page-  https://www.facebook.com/groups/blankpagemuse/


Instagram Shop-  https://www.instagram.com/blankpagemuse/


Instagram Blog-  https://www.instagram.com/blankpagemuseblog/


Twitter-  https://twitter.com/BlankPageMuse


Pintrest- https://www.pinterest.com/blankpagemuse/boards/


Thursday, January 25, 2024

Elegant Stamped Vellum Birthday Card

Greetings!
   Chris here! Today I am excited to share to elegant Happy Birthday Card.
In my family, January and February are loaded with feminine birthdays! 
What a better way to beat the winter blues than with a bouquet of flowers! 
Even Stamped ones! 

 This card uses:


Start by stamping your image on Vellum.  Let the ink dry then flip your vellum to the back side and color your image. (I used alcohol markers) 


As you can see it creates a subtle colored image! 

Layer you image onto your Blank Page Muse Sweet Passion 6x6 inch sheets Paper Pack designed by Pam Bray .  Hint I only used adhesive in the corners and then added Pearl gems to hide the adhesive. 


I hope you are inspired to get creative with your stamps and papers from Blank Page Muse and I Brake For Stamps.  Don't forget to use my discount code BPMChris. 


Be sure to follow us at 

The Blank Page Muse- https://blankpagemuse.com/


I Brake for Stamps-https://ibrakeforstamps.com/


FB Fan Page-  https://www.facebook.com/groups/blankpagemuse/


Instagram Shop-  https://www.instagram.com/blankpagemuse/


Instagram Blog-  https://www.instagram.com/blankpagemuseblog/


Twitter-  https://twitter.com/BlankPageMuse


Pintrest- https://www.pinterest.com/blankpagemuse/boards/


Wednesday, October 18, 2023

Easy Colourful Birthday Cards!

 Hi Stamping Fans!

Hope you have all been enjoying the creations this month! the DT have made some great projects for your inspiration!

Today I have some cards inspired by an online art journal class I did last month.


I've used Lindy's magicals to create the shiny coloured strips on the cards.

Here are the supplies I used and links to them in store:
Butterfly Breezes Clear Stamp Set
Numbers & Flowers Half Sheet Set


These cards are really easy! Cut some strips of watercolor paper and use whatever you have on hand to color them - I used Lindy's Magicals - you could use watercolors, any ink sprays you have - delve into your stash!
Once dry stencil with black paint - lots of stencils in store you can use for this step! I used the "dots" from the Numbers & Flowers half set to add a few spots of black to the coloured strips.
Stamp your images on watercolor paper and color with Lindy's Magicals or whatever you used for your strips then fussy cut.
Add some white outlines and paint splatters along with your stamped images and your cards are done!


Thanks for joining me today - make sure you pop back regularly to see what the rest of the DT are creating!

Pop over to MY BLOG to get more info!

Happy stamping!

Sharon

***Remember to us the code BPMSharon at the store for 15% off ***
So many fab stamps to choose from!
Note: you can use the code at either the IBFS Store OR the BPM Store - why not do an order from each and increase your stash!

And visit our social media sites for more stamping fun!
I Brake For Stamps -https://ibrakeforstamps.com/ 

Monday, September 25, 2023

How to Create a Watercolor Stamped tag

 Hello!  Chris here today and  I am excited to share this colorful tag I created using both rubber and clear stamps! How fun it was to mix both kinds of stamps on my project.


I started by layering distress inks on my surface. 

After spritzing inks with a bit a water I laid my tag into the ink. 


Just look at the gorgeous colors! 


I then grabbed two of my favorite stamp sets. 

I Brake for Stamps Florals Sheet Flowers for you Bouquet Happy Birthday Thank you SB132B

Using the  Florals Sheet Flowers for you Bouquet Happy Birthday Thank you SB132B  from I Brake for Stamps, I stamped the floral image repeatedly onto the tag and then heat embossed the images.


Grabbing my Beyond the Border Mixed Media Set 1 CLEAR Stamps designed by Pam Bray from Blank Page Muse, I stamped two borders onto the tag. You can see the first border below. 

I finished my tag by matted the tag onto black cardstock and then adding a die cut butterfly and a die cut "hello" 

I hope you are inspired to get creative with your stamps and papers from Blank Page Muse and I Brake For Stamps.  Don't forget to use my discount code BPMChris. 


Be sure to follow us at 

The Blank Page Muse- https://blankpagemuse.com/


I Brake for Stamps-https://ibrakeforstamps.com/


FB Fan Page-  https://www.facebook.com/groups/blankpagemuse/


Instagram Shop-  https://www.instagram.com/blankpagemuse/


Instagram Blog-  https://www.instagram.com/blankpagemuseblog/


Twitter-  https://twitter.com/BlankPageMuse


Pintrest- https://www.pinterest.com/blankpagemuse/boards/


Copyright Text

Blank Page Muse 2018 Sin City Stamps 2013