Showing posts with label Sin CityStamps. Show all posts

Monday, January 30, 2017

Treasure - Journey - Cherish - Reflections...


Hello Everyone!
Today is my first post as a new DT member of Sin City Stamps and I am excited to share my Altered Playing Cards with you using butterflies from the stamp set "Dandelion Wishes with Butterflies" available now in the Store! There are just so many stamps on this sheet that I will be sharing more creations with you using this set - endless possibilities - and that's what I like with stamps - multiple uses! I have step by step details below for you and I hope you are inspired to try some altered cards yourself!

Supplies List:
Sin City Stamp Set Dandelion Wishes with Butterflies
Playing cards - any size - old or new!
Sandpaper
Gesso
Stencil and Texture Paste
Water Spritz Bottle
Ink Sprays - any colors you like - I used 2 coordinating colors for each card
Charcoal Pencil
Black Archival ink
Markers or Pencils
Scraps of Muslin/Cheesecloth - ink sprayed to match
Colored cotton to match
Words - purchased or computer generated
Glue
General crafty tools like scissors, spatula, tweezers etc.


1. Okay let's get started by 'assembling" your supplies - LOL if you are like me you might add as you are going along! But to start I grabbed what I needed to get the cards prepped and drying and whilst waiting for them I have the items to stamp and color!


2. Firstly I sanded the cards because the ones I have are very "plastic" (is that a word??) and I wanted to give the Gesso something to grab when applied. I am a bit lazy and hate washing paint brushes so I tend to just use my spatula and smear the Gesso over the card - it doesn't matter if it is not all totally covered - I like the any bits showing through just adds to the texture and overall look. Once they dried I used one of my favorite stencils and some texture paste and randomly applied over the cards. I'm working on 4 cards at once - a good way to get multiple items made at once and you can have a production line going!


3. Once the texture paste is dry it's time to get inky fingers - and luckily I have a "bloke's" job so it doesn't matter if I have stained fingers! I used 2 colors on each card to get a shaded type look with some dark and light spots around the texture. I spritzed the cards with water and then ink sprayed and let it run off. I always grab an index card or scrap of card to drip the excess on to - a great way to have a fun colored background for another creation - waste not want not!


4. Whilst everything dries you can be stamping your images, coloring them and fussy cutting them out. I used markers in coordinating colors and various sized butterflies for each card. You will see that I do a lot of fussy cutting - I have a fear of white space so I spend a lot of time cutting all the excess away on my creations!


5. I wanted more definition and depth on the base cards so I used a charcoal pencil to outline the pattern of the stencil and then a cotton bud to smudge it all out and give the shadow look - I always love this sort of effect and the black looks good on the bright colors.


6. We are nearly finished! Assemble all your "bits & pieces" and start to play with the layout. I ink sprayed the scraps of muslin to match the colors on each card plus wound some matching sewing cotton around my fingers to make the circles of fiber. I had some perfect colored little "words" but you can always make your own on the computer as an alternative. Then glue everything onto the cards! I glued the "body" of the butterflies and raised the wings for more of a 3D effect. And we are done!


I love using playing cards as a base to work on - just like an ATC - a little work of art. And what I like about this is you can get quite a few made at once - I'm hoping to join an altered playing card inspirational word swap and we need to make 22 altered cards so this process is a perfect way of getting so many done efficiently! Hope you feel inspired and we would love to see any of your creations shared over at the Facebook Group!

Sharon


Quick Links"
Sin City Stamps Store
Facebook Group
My Blog to see more of what I like to do!

Saturday, January 28, 2017

If the broom fits.....


 Hi all, Mo here with a spooky fun card because in my world it's always Halloween :-)

List of Supplies used:
  1. Sin City Stamp set Halloween Bingo  
  2. Sin City Stamp set Skeletons Halloween 
  3. Ink pads- purple, light pink, dark brown and black. 
  4. Black and white cardstock.
  5. Patterned scrapbook paper
  6. Decorative twine
  7. A piece of sisal rope
  8. Halloween charms
  9. A small twig
  10. Thin wire
  11. Blending tool or sponge
  12. Water in a spray bottle
  13. Heat gun
  14. Adhesive
  15. Scissors
  16. Distressing tool or edge of scissors.


See the steps below or click on this link for an instructional video.


1. Use the purple ink to stamp the Bingo onto the white card stock.

2. Cut the bingo card out and use your tool to distress the edges, then add some pink and brown ink with your blender.


3. Stamp the Skellie on the broom with the sentiment.


4. Take apart some of the rope, wet it and dry it using heat gun to straighten the rope.
5. Use the wire to attach the straightened rope the stick. Trim rope to a broom like shape.

6. Use black cardstock to cut out a mat and rough distress the edges.


7.  Assemble the card and add the twine, broom and charms.


Thanks for visiting!


To purchase the stamp supplies used in this project please visit www.sincitystamps.com


For more inspiring paper-craft projects from the Design Team, be sure to follow us on Facebook.

Monday, March 30, 2015

Love Card - Stamping on Vellum

Hello stampers!   I'm so glad you stopped by today, because I want to share a technique known as Pergamano, or parchment craft.  So, what is Pergamano.  Wikipedia says:
Parchment Craft, also known as Pergamano, is the art of embellishing and decorating parchment paper (or vellum paper) through the use of techniques such as: embossing, perforating, stippling, cutting and coloring.
When I first began learning the fine art of Pergamano, each image was first traced onto vellum using a dip ink pen and white ink before the embossing began.  This was, as you might imagine, very tedious, to say the least.  Of course, I sometimes love tedious, but don't always have the luxury of that much time.  So, I am going to show you a shortcut using rubber stamps.  The effect is elegant and unique!


Supplies used:

Sin City Stamps Angel Art stamp set
Ink Pads: StazOn Opaque Cotton White; Versamark
Vellum (medium weight)
Embossing Tool (stylus)
Detail white embossing powder
Heat tool
Dies: Spellbinders; Momenta
Pearl stickers
Pink ribbon

Directions:

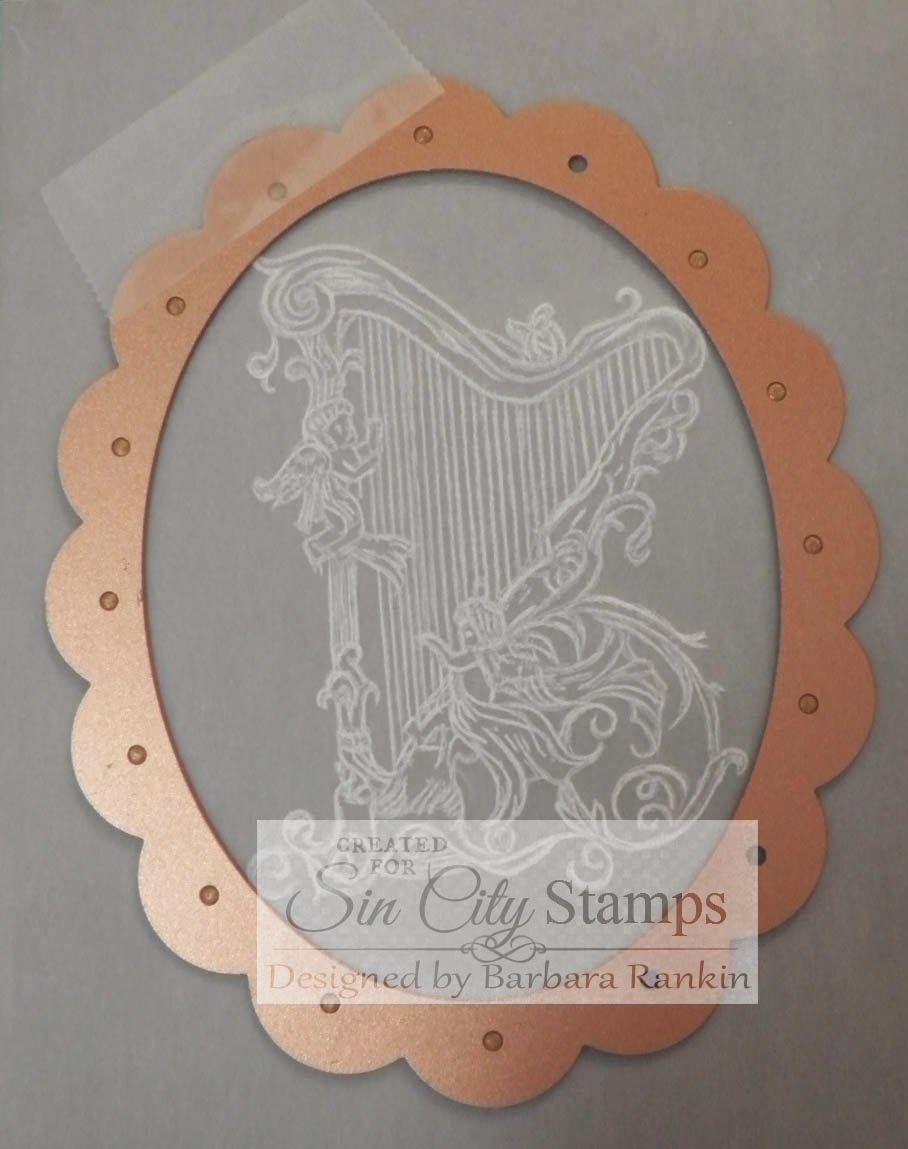
Stamp large harp onto vellum with white StazOn.  Let dry.  
Using an embossing tool with a small ball tip, dry emboss the reverse side of the harp image to raise the stamped lines and whiten the vellum even more.
Now, of course, you can skip the embossing with a stylus part and go right for the quick technique, which is to stamp the image with white pigment ink and heat emboss with detail white embossing powder.   It may not show well in the photo, but the biggest difference is that the embossing powder leaves a shine.  
However, if you are a purist, you may want to try the Pergamano technique.  It is quite therapeutic and can be done while watching TV, or waiting to pick up the kids.  I really enjoy hand embossing my vellum when I have the time.  

No matter which way you prepare your image, the next step is to cut out the harp image with the lacy oval die, which fits quite nicely inside the pink decorative oval die cut (shown below).
Stamp and heat emboss "LOVE" onto scrap of pink card stock with Versamark ink and white embossing powder.  Trim with label die.
Die cut a second lacy oval from brown print card stock, and a decorative oval from pink card stock.  Here are the pieces you will have for your card front.
Adhere brown print die cut to the back of the vellum.  Vellum needs a strong color beneath it to show off the image.  This is a good time to use those really bright colors of card stock that you may have wondered, "What was I thinking?"  
The trick to adhering vellum to anything without the adhesive showing is to either add the adhesive beneath a part that will be hidden, or in this case, apply the adhesive over the entire piece of vellum.  I used my Xyron for this.

To put the card together, I cut brown card stock to 10" x 7" to make a side-folded 5"x7" card base.  I then cut another piece of the brown print paper to slightly smaller than the card front, roughly distressing the edges, and adhered that to the card.  I love the shabby chic with elegant look.

Adhere the pink die cut, then use foam dots to raise the harp image.  Add some brown distress ink to the edges of the "LOVE" tag and adhere with foam dots.  

Make a double loop bow with pink seam binding ribbon and adhere to the card with Beacon 3-in-1 glue.  Add pearl stickers around the oval for added elegance.
There you have it, a beautiful card that looks like you spent many, many hours making, but with the help of rubber stamps, you cut your time in half.

I hope I have inspired you today with my Pergamano approach to stamping, or simply stamping an image onto vellum for an easy, beautiful card!

Be sure to like us on Facebook, and stop by the shop to see the beautiful stamps and supplies that Sin City Stamps has to offer.  

Thanks for stopping by, and have a crafty week!

Barbara

Thursday, January 1, 2015

New Year's Card with Shabby Style

Happy New Year, everyone!  Are you ready for a fantastic year?  I know I am.

I decided to make a card with elements that I feel represent a year's passing.  The wings represent how time flies, while the clock hands and gears are parts of that fast-moving clock that seems to never slow down.  And of course, the Roman numerals represent the year, 2015.


Cut tan card stock to 6" x 12", fold in half to make a 6"x 6" top folded card.

Adhere 5-3/4" x 5-3/4" print paper to card front, edging with similar colors of ink to match the paper colors.

Stamp Roman numerals, as shown.  You will need two "III", an "X" and a "V".
To change the "III"s to M's to represent each 1,000 years, I used post-it notes to mask areas of the "III" and stamped the bottom of the "V" between each "I I I" to turn it into an "M".
Fussy cut the Roman numerals and adhere to card front.

Stamp wings from the Sin City Wings stamp set twice onto scrap tan card stock and fussy cut each.
Layer wings onto card, lifting the top pair of wings with pop dots.

Stamp small clock hand onto scrap tan card stock, fussy cut and adhere to center of wings with more pop dots.  Add Stickles glitter glue to wings (Antique Linen) and clock hand (Vintage Photo).
I wanted a bit more shabbiness, so I added splotches of Frayed Burlap distress crackle paint.

After it dried, I added some Vintage Photo distress stain to bring out the cracks, and then some metal gears to the bottom splotch and to the bottom of the clock hand.

Supples used:

Sin City Stamps:  Sin City Wings stamp set; Clockworks Inspired by Terri Sproul stamp set;
Other: Tan card stock; Print paper (Prima); Distress Stickles (Vintage Photo, Antique Linen); Distress Ink Pads (Black Soot, Vintage Photo); Distress Stain (Vintage Photo); Metal gears (various); Distress Crackle Paint (Frayed Burlap); foam dots

I hope you enjoyed my shabby style New Year's card today.   If you like it, I hope you will visit the Sin City Stamps online store to see what other stamps and accessories they have.  Be sure to also visit the blog regularly as the team has so much inspiration to offer.  Also, I would love for you to stop by my blog to see more of my work!

Thanks for stopping by, and have a wonderful weekend!

Barbara

Copyright Text

Blank Page Muse 2018 Sin City Stamps 2013