Showing posts with label Winter Wonderland. Show all posts

Sunday, December 22, 2024

Merry Christmas Cozy Snow Day by Steph

 Hi everyone, Steph Ackerman here today.

Today I am using some amazing products from Blank Page Muse and I Brake for Stamps.


I Brake for Stamps:  Pretty Winter Friends
Blank Page Muse Stencil:  Bones Snowflakes
Blank Page Muse Stamps:  Penguins on Ice


Since I wanted a snowflake background, I placed the stencil on gray cardstock.
Using modeling paste, I moved the stencil until I had the background I wanted.


Color the image with Copic Markers then fussy cut her.
Mat the panel with red cardstock and add a torn strip across the card.
Add the image to a die cut oval with foam adhesives for dimension.
Adhere to a white card.


Using blue ink, stamp assorted snowflakes on a white panel
Mat with red cardstock and add to the card base.
Stamp the sentiment in the center.

Stamp and mat Merry Christmas, adding it above the image.

Thanks for stopping by.


Steph

Looking for more Inspiration? Click the links below!
The Blank Page Muse Shop https://blankpagemuse.com/

Save 15% of your Blank Page Muse orders with discount code:  BPMSteph


Tuesday, December 7, 2021

Holiday Ink Smooshed Card

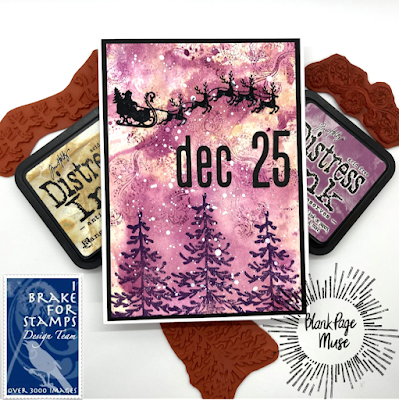
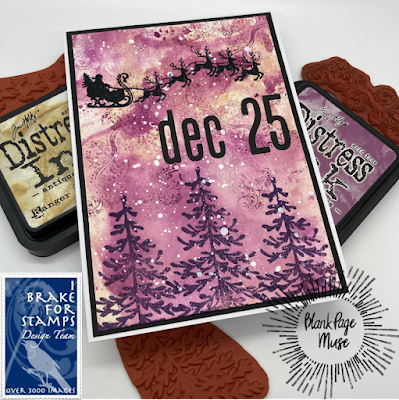
Happy Holidays BPM/IBFS Fans! Betty here today. Here's a fun, fast, and easy card to make with no coloring whatsoever! Just playing with some Distress Inks and stamping with red rubber stamps from Blank Page Muse/I Brake for Stamps. I used three stamps from three different sets to make this card. The first one is a stamp called Santa on Sled with Reindeer Art Silhouette from the Winter Wonderland set (the single stamp is also available); second one is the trees from the Sir Holiday Gnome Tree No Place Like Gnome set; and the third is the fancy swirl stamp from the Background Grunge set by Pam Bray. It's always fun when I get to do some ink smooshing and stamping!

You can save 15% on these stamps and all purchases at Blank Page Muse and at I Brake for Stamps by using my special code BPMBetty. 

Head on over to my blog for the list of supplies and instructions on how to make this card: Betty's Blog


Looking for more Inspiration? Click the links below!
The Blank Page Muse Shop https://blankpagemuse.com/
I Brake for Stamps Shop https://ibrakeforstamps.com/

Saturday, November 2, 2019

Wonderland Magic Christmas Greetings

I love the sparkle of fresh fallen snow!  I may not love all the shoveling and slippery-ness that comes with the snow, but I have always been mesmerized by falling snow!  I decided to try to re-create this sparkly magic in the Christmas Greeting card.  


Supplies needed

Patterned Paper
Black Archival Ink
Watercolor Markers
Glitter
Liquid Glue
Jute

Stamp images from Blank Page Muse Winter Wonderland Art Rubber Stamp Sheet Set and Blank Page Muse Country Vintage Christmas Rubber Art Stamps Sheet by Pam Bray Designs onto cardstock with black archival ink,


Color images with watercolor markers as desired. 


Mat colored images onto patterned papers and add to card.  Add jute bow to card.  Using a liquid glue add a small amount of glue and sprinkle with glitter to finish. 


I hope you are inspired to get crafty with your stamps! Be sure to follow us 
The Blank Page Muse- https://blankpagemuse.com/


Thursday, February 1, 2018

Ice Skaters Winter Card

Hi, Thanks for stopping by today for my "Quick Idea" about stamping directly onto pattern paper.  It is a great way to create a quick card at the last minute. Everyone needs a little short cut now and then.

The January Challenge - turquoise, silver, sparkle

Ice Skaters Winter Card


TIP: torn edges look great on snow covered wintery cards


Supplies: Winter Wonderland Art Rubber Stamp Sheet Set


Other Supplies: black permanent ink pad, teal ink pad, iridescent glitter glue, gems, small snowflakes, transparency, pattern papers, card base
To purchase the stamp for this project, visit www.blankpagemuse.com

For more inspiring paper-craft projects from the Design Team, be sure to visit us at

Follow us on Facebook!
join us and share your projects on
The Blank Page Muse Fan Group 
To learn more about our designer Karen, please visit her blog, Art & Soul.
Thanks for visiting!

Friday, December 15, 2017

Stamping on Pattern Paper

Hello,
You will be glad you stopped by for today's "Quick Idea"  This could be a life saver to help you create a last minute Christmas card.  Stamp onto pattern paper incorporating the design of the stamp.  Then to really make the image pop, highlight parts of the design lightly with chalks.  The original paper had the two different words "believe" on a distressed green background of holly & argyle.  I stamped Santa's sleigh off the edge of the paper, added faux stitching with a white gel pen, and matte it with plaid paper.


Supplies:
1. Winter Wonderland Art Rubber Stamp Set (Sin City Stamps)
2. clear acrylic mounting block
3. black ink pad
4. chalk
5. pattern paper
6. white gel pen
7. dimensional clear glaze
8. card base 5x7"
http://sincitystamps.com/winter-wonderland-art-rubber-stamp-sheet-set/

A Closer Look:

To purchase the stamp for this project, visit www.sincitystamps.com

For more inspiring paper-craft projects from the Design Team, be sure to visit us at

and follow us on
Facebook
join us on and share your projects on
The Sin City Stamps Fan Group 

To learn more about our designer Karen, please visit her blog, Art & Soul.
Thanks for visiting!

Tuesday, November 7, 2017

Sled & Snowflake Tag

Hi Stampers,
Karen here to share today's "Quick Idea".  I need to point out that I tried something new and rather than stamping onto paper, I stamped directly onto a wooden tag. I began by stamping the script background design with black ink and then heat embossed a scattering of white snowflakes.  Next, I sprayed the wooden tag with blue mist so that the wood grain would show through.  I added white crackle paint to add the appearance of snow drifts along the edges.  Finally, I embellished the tag with a wooden snowflake and attached a bow and ribbon for hanging. The tag could be used as a gift topper or be hung as a tree ornament.

Sin City Stamps:

http://sincitystamps.com/art-journaling-2-rubber-stamp-set-by-terri-sproul-sc24/

3. clear acrylic mounting block
4. wooden tag
5. black ink pad
6. blue spray mist
7. white embossing powder
8. heat gun
9. white crackle paint
10. glitter glue
11. chalk
12. wooden snowflake
13. ribbons

A Closer Look:
 
 
To purchase these fun winter stamps, visit www.sincitystamps.com

For more inspiring paper-craft projects from the Design Team, be sure to visit us at the
Sin City Stamps Blog and follow us on Facebook.

Join the Sin City Fan Group
To learn more about our designer Karen, please visit her blog, Art & Soul.
Thanks for visiting!

Monday, December 21, 2015

Let It Snow


Chris here sharing this fun winter layout using Sin City Stamps! I love using my stamps on layouts.
I started with these stamps:


 So let's get started.

Supplies used:
Sin City Stamps- Winter Wonderland
Ranger Archival Ink - Red Geranium
Cardstock - White, Pink, Red
Patterned Paper - KI Memories
Sizzix Die- Tim Holtz Tag
Red Jute
Punch- Martha Stewart Snowflake

To Start off I cut three 3 1/4 inch squares.
Onto each of these square I stamped an image from the Winter Wonderland set using the Red Geranium Ink.  I then matted the stamped images onto red cardstock and then onto an 11 1/4 x 4 inch  piece of pink cardstock.
I just love the red/pink color combination.

I then cut my patterned papers into 1 x 11 1/2 inch strips  and attached them to a 12 x 12 piece of red cardstock.

I double matted my photo first in red then pink and added my matted stamp images and photo to my layout.

I then Stamped my Let It Snow title on white cardstock and matted it onto red cardstock and then onto my die cut tag.

I added some red jute to the tag and attached to my layout.  I added some punched snowflakes and added embellishments to the center of the snowflakes.  How you enjoyed this layout! 

Monday, November 16, 2015

Twas the Night Before Christmas


Hi Chris here and I am sharing this Christmas Eve layout I created using Sin City Stamps! To get started I used the following supplies:

Sin City Stamps: Winter Wonderland - sleigh, small snowflake
                          Peg Round Christmas
                          Tiny Numbers for ATC 
Vellum
Patterned paper-Crate Paper
Cardstock
Ink- Staz-on, Ranger Archival (Jet Black, Red Geranium)
Tim Holtz Distress Markers-Ripe Persimmon, Squeezed lemonade, Fossilized Amber, Pine Needles, Iced Spruce, Festive Berries, Ground Espresso
Spectrum Noir Markers- TN3, TN5, DR3, PP5, CT3, TB3, JG1


I started out by first stamping the sleigh from Winter Wonderland onto vellum with Staz-on Ink.


I then fussy cut out my stamped image.


I then turned my image onto the back side and began coloring the image with my Spectrum Noir markers, I used TN3 and TN5 on the reindeer, and then  DR3 on Santa. I then used PP5, CT3, TB3, and JG1 to color the toys. Here is the result.

I then took the large candle banner from Peg Round Christmas.  This is a huge stamp, I angeled the stamp on my block for a better fit. 

After stamping my image I colored my image with the Distress Markers.

I then hand wrote my title

I then started on my layout by matting my background papers onto cardstock.  I choose bold papers to match the kids jammies. I then added a large red block to the background.

I then added a large circle cut from patterened paper.

 I then decided to add some small snowflakes to the red block for visual interest.

I then added my photos and then added the stamped sleigh at the top of my photos and the stamped title to the bottom of my layout.  I stamped the year on the bottom of the red block. 
 I hope you enjoyed this layout!.

Wednesday, December 25, 2013

Noel, noel

Hello everyone, Astrid here from the UK and I would like to start by wishing you all the most wonderful, peaceful and fulfilled Holiday Season!!

Today I am sharing a cover I made for a mini book that is going to contain photos of our family Christmas. My grand daughter is over from Australia and I know there will be many treasured memories to scrap.
These are the products I used for my project:
Stamps:
Winter Wonderland plate
Other products:
Carta Bella Christmas Day collection DP
Ranger Potting Soil Archival ink
3 sheets buff coloured A4 card (8.5 by 11")
Other scraps of white card and DP
Martha Stewart decorative edge punch
Tim Holtz/Sizzix Tattered Pinecones die
Various Snowflake dies
Vintage Photo Distress Ink and glitter
Iced Spruce Distress Ink
Antique Linen Distress Paint
Lace trim
Dark brown lace
Cream coloured smooth card
Sewing machine (if wished).
Your favourite adhesive.

1.I started by creating the central panel. I cut the piece of cream coloured card to 5.5 b 5.5" and stitched around the edges with my sewing machine. (This step could easily be left out).
2. Next I distressed the edges and inked around the outside with Vintage Photo Distress Ink and stamped the skating children and some of the snowflakes in Potting Soil Archival Ink. I also did some first and second generation stamping of the snow flakes with Iced Spruce Distress Ink. I then glittered the children and the centre of the brown snowflakes with Vintage Photo Distress Glitter.
Here you can see the background stamping with Iced Spruce a bit better

3. Next I worked on the word Noel die cut, this was a gift from a friend and came from another Tim Holtz/Sizzix Die. I dabbed it with the Antique Linen Distress Paint and when dry dabbed some Potting Soil Archival ink over it.
4. Time to create the actual covers. For this I cut two pieces of the buff card to 8.5 by 10"
For the spine I cut a further piece to 8.5 by 3" and scored it 1 3/8" in from both sides, leaving me with a 1/4" bit in the middle. I gave one of the sides a decorative edge. I glued that around the two covers on the outside.
5.For the inside I created an accordion binding by scoring a bit of 8.5 x 6" card every half inch. I then folded it accordion style and glued in place on the inside of the covers as you can see from the photo.
The inside pages will later be tucked in between the folds and glued in place.
6. Before adhering the central panel to the covers I inked the corners from the back and curled the edges for a bit more interest.
7. Now for the fun bit, - embellishing the cover:
I cut the pine cone and branches from some scraps of card and coloured them with my two chosen colours of Distress Inks. I also cut various snowflakes and layered them up together and finally the whole thing was finished with some lace and beaded trim as you can see from the photos.


Well, I hope you like my mini book cover, I can't wait to start to design the inside pages and fill them with my holiday photos.

Thanks you so much for visiting today and don't forget to spent some time being creative this holiday season!!

Copyright Text

Blank Page Muse 2018 Sin City Stamps 2013