Friday, April 16, 2021

Art Journal - Nature's Art

Hello BPM Fans! It's Betty here! My favorite season of the year is Spring. I love how the trees are bare one week then full of leaves the next, the smell of fresh cut grass, and the sound of birds chirping. My husband and I walk every morning and it's been a delight to see all the different flowers blooming everywhere. This inspired me to create my art journal pages called Nature's Art using stamps from Blank Page Muse Art Rubber Stamps (please see supplies list below for list).

This is the perfect project to make for the BPM monthly challenge for a chance to win a prize! The theme for April is "nature." Here is the link to the challenge: CHALLENGE.


Supplies:
  • Blank Page Muse Art Rubber Stamps: 
  • Stamping block
  • Washi tape, wax paper, Press and Seal (to protect coils, margins, and other pages)
  • White gesso
  • Paint brush
  • Distress Spray inks: Bundled Sage, Salty Ocean, Chipped Sapphire, Seedless Preserves, and Picket Fence
  • Water spray bottle
  • Heat gun (optional)
  • Floral patterned paper of choice
  • White cardstock for stamping images
  • Coloring medium of choice. I used both Prismacolor pencils and Copic markers
  • Scissors
  • Black cardstock
  • Alphabet dies
  • Press and Seal or Transfer tape
  • Liquid glue
  • Distress ink pad: Black Soot
  • Distress ink blender brush/pad
  • Water dropper
  • Collage Medium (I used Tim Holtz Distress Collage Medium)
  • Sentiment stickers (I used Tim Holtz - Small Talk stickers)
Instructions:
  • Prepare the art journal pages by covering the coils with Press and Seal and the margins with washi tape. Add wax paper under the pages. 

  • Paint on a layer of gesso and let it completely dry.

  • Place the journal into a box so the over spray is contained in the box. 
  • Spray the Distress Ink onto the pages, but don't overlap too much. Spray water over the ink so the ink will spread. Gently use a paper towel to mop up puddles.  Use a heat gun to quick dry or air dry.


  • Using the Background Grunge stamps, randomly stamp images using a stamp block or without. The entire image of the stamp does not have to stamp to create the background. Select a variety of stamps from the set to use. 


  • Tear patterned paper corners and adhere using collage medium.
  • Stamp and color the butterfly, sunflower (stamp partial or cut flowers in half since they will be placed on edge of journal page), and dragonfly stamps then fussy cut. Use any colors you like, but here's what I used:
    • Butterfly (Copic markers): Y17, B02, RV02
    • Dragonfly (Copic markers): YG11, BV00, BV01
    • Sunflower (Copic markers): Y17, Y35, Y13, E33
  • Stamp and color the Girl with Basket of Flowers. Use any colors you like. Here are my Prismacolor pencil colors:
    • Skin: 116, 018, 019, 020
    • Cheeks: 082
    • Hair: 117, 114, 010
    • Blue: 042, 043
    • Tree & Basket: 114, 116
    • Green for leaves and flowers: 110, 061
    • Pink flowers: 080, 082
    • Grass: 057, 110, 061
    • Sky: 101
    • Walkway: 065
  • Stamp and color the Dragonfly Lady. Use any colors you like. Here are my Copic colors:
    • Hair: E39, YR27, YR24, Y32
    • Skin: E04, E11, E21, E00, E000
    • Cheeks: R20
    • Lips: R21
    • Dragonflies: YG11, BV00, BV01
    • Stars: Y24, Y11, Y15
    • Blue background: B00, B000
    • Bubbles: Y00, B000, BV000; plus Castle Arts colored pencil #35 lavender light.
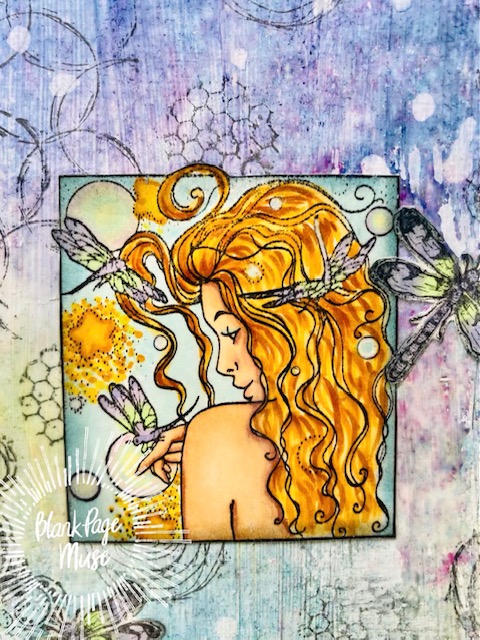
  • Using the Distress Ink in Black Soot, ink the edges of each image. Set aside.
  • Using alphabet dies and black cardstock, cut out the words "nature's art."
  • Using a self-healing mat or surface with grid lines, add a line of removable adhesive onto the mat. Line up the die cuts onto the mat and place a piece of transfer tape or Press and Seal on top to pick up all the letters at once. Use a spatula to help lift the die cuts off the mat.


  • Add liquid glue to the die cuts the place them onto your journal pages.

  • Carefully peel off the transfer tape or Press and Seal.
  • Using the end of the water spray pump, add a few big drops of water onto the journal pages for some texture (optional - this was a last minute, spur of the moment idea).
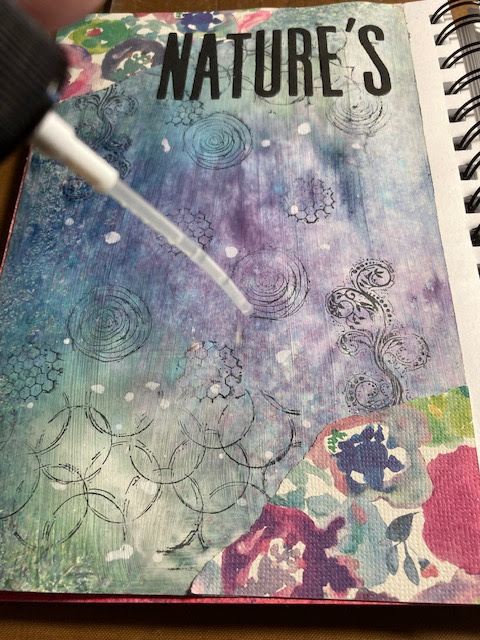
  • Adhere all the images onto the journal pages using collage medium. Add the sentiment stickers.
  • Lastly, apply a light coat of collage medium all over the pages.
The art journal page is complete! This was a really fun project to do. Give it a try!
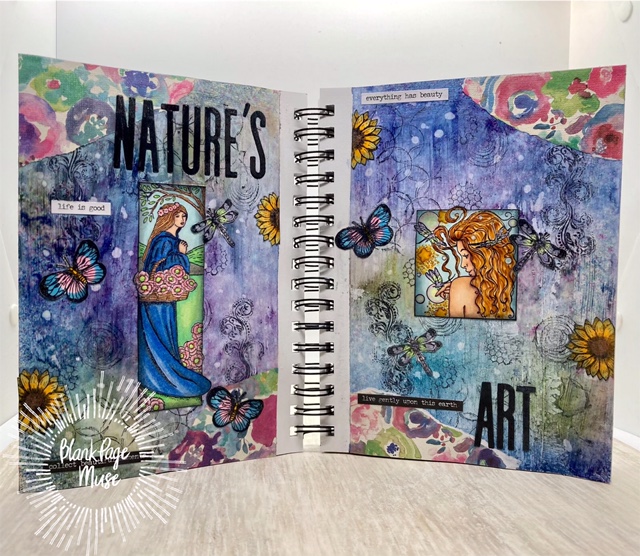

Thank you for stopping by and have a very creative week! ~Betty~

Be sure to follow us at:

Thursday, April 15, 2021

Make a Wish!

 Hi BPM Fans!

Hope you are all enjoying the "Nature" theme this month which is just perfect for soooooo many of the fab stamps available at the BPM Store!


Today I'm sharing some nature/natural feel cards using some of my scraps from my post here at the blog last month along with some new stamps I recently nabbed from the store!
Click here to see how I made the Floral Patterned Kraft Card used on these cards.


Supplies:
Blank Page Muse Stamp: Lady with Butterfly Wings
Blank Page Muse Stamp: Smile Winged Muse
Blank Page Muse Stamp: "Make a Wish" & "Butterfly" from the Dandelions Wishes with Butterflies Set
White Card and Black Ink Pad
Colouring Mediums ie. Copics or Pencils
Kraft Card Bases
Torn Scraps of Stamped Kraft Card
Embellishments
General supplies: scissors, tape or glue

Instructions:
Start by stamping your Main Winged Ladies and Butterflies on white card with black ink. Colour in and fussy cut. I had fun doing some pretty basic "gawdy" colouring to make the images stand out and look quite bold!


Stamp the "Make a Wish" sentiment on white card and tear around the stamp.


Grab some "scraps" of leftover stamped card - link above for how to make patterned paper using BPM stamps!


Gather your base cards, some hessian or fibre ribbon or the like and any other embellishments you want to use.


Arrange your coloured stamped images, patterned card strip and embellishments on the card front and adhere. 


Hope you feel inspired to create your own nature feel cards!
Remember we always love to see what people are doing with their BPM Stamps - we love to get inspiration from BPM "Fans" as well as sharing our creations with you!

Happy Stamping!

Sharon :)


Don't forget to check us out at all of our social media sites
The Blank Page Muse- https://blankpagemuse.com/


Wednesday, April 14, 2021

It's Raining Kitties!

Hi friends! Teri here with another card using Blank Page Muse products! As soon as I saw this cute kitty and parachuting mice, I knew a scene was in order! The stamps are from the Sending Smiles Whimsical set.


Here are the steps to create this cute Slimline card!

Ink blend the sky, sun and an area for grass using distress inks on a slimline white base cut with a stitched die.


Stamp the Kitty on the grass with two of his mice friends in black ink and color with Copic markers.


Stamp the mice with parachutes randomly falling from the sky using a Copic friendly black ink. Choose any color scheme you like (I went with primary colors). 


Stamp the You are my Sunshine Sentiment stamp on a die cut tag and add to the front of the card. Once done coloring, choose a coordinating color to frame the stamped piece!

I hope you enjoyed this fun whimsical card!
 Be sure to stop by Blank Page Muse to check out the variety of rubber stamps and stencils. 

Thanks so much for stopping by today! I'd love to have you follow/subscribe on my social media sites Instagram, Facebook, Blogger and You Tube.  Be well. Be creative!


Tuesday, April 13, 2021

Woodland ATCoins

  Hello crafty friends, Kelly on the blog today with Blank Page Muse! 

I used several of the Woodlands stamp set by Donna Gray to create a set of ATC Coins. 


Supplies - 

Gelli prints
Markers
Watercolors
Washi Tape
2 1/2" circle punch

These ATCoins were punched from gelli printed papers and the support is a cereal box. I glued this sandwich together with the ATC Coin Artist ID stamp, then stamped the Woodlands critters onto white cardstock and colored them with markers. I use watercolors and washi tape to enhance the critters. Fussy cut out all of the critters and then glued them down to the coin front. I now have coins ready for trading!


Thanks for stopping by and be sure to check out all of Blank Page Muse's links below.


Monday, April 12, 2021

Bloom Where You Are Planted

 Hi everyone, Steph Ackerman here again wishing for the flowers to start appearing.


Supplies:

Blank Page Must Stamps - Classic Wild Flowers Background, 
Cardstock
Ink


Large stamps are wonderful for creating backgrounds.  This stamp measures approximately 4" x 5".


Wanting gradient colors for the background, the stamp was inked with 3 shades of blue ink.


Cutting the panel, it was then inked with another shade of blue.  Distress Oxide Ink was used to create a soft effect over the stamped background.


The panel was matted with orange cardstock creating a nice contrast once placed upon a blue card.


The phrase was stamped on a white panel, then matted with orange and blue cardstock before being placed on the card with foam adhesives for dimension.


Thanks for stopping by.


Looking for more Inspiration? Click the links below!
The Blank Page Muse Shop https://blankpagemuse.com/

Sunday, April 11, 2021

Simple But, Adobe

Do you want to know how to make the most simple but, adobe card? 
Follow these fast easy  steps to make your own!


Rubber stamps used:

Additional items needed:
  • Imagination
  • Scissors
  • Alcohol markers
  • Paint brush
  • Water color crayons
  • Ink
  • Water color paper
  • Colorful Card Stock
  • Glue 
1. Stamp your water color paper. I am still a beginner stamp and found this stamp a little thickly to stamp at first. Practice makes perfect, paper crafts are very forgiving.
2. Color in your stamp. I used alcohol marker's first and made my lady bugs and shading pop. 


3. Add water color crayons to the peddles and background to make it pop.
4. Wet the page. Blending the colors together
5. Cut out and glue to any color card stock you choose and your done! 


Hope you enjoyed this Simple But, Adobe card. If you have any questions feel free to message Lasheet and if you choose to make your card tag her and Blank Page Muse. 
Thank you, happy crafting!! ♥


Looking for more Inspiration? Click the links below!
The Blank Page Muse Shop https://blankpagemuse.com/


Saturday, April 10, 2021

Mini Canvas "Wish"

 Hello everyone, Monique here on the blog with an inspiration idea.

For today's post I made a mixed media mini canvas. I like the idea of combining collage with stamping. We crafters have lots on tiny bits of paper that are left overs from our craft projects. Don't throw them away, keep them in a box and use them in small works of art like on ATC's, tags or on a small canvas like I did. You can even paint over, or stamp over the left over papers to match them to you project.


Supply list:

Blank Page Muse stamps: 

Dandelion Wishes with butterflies SC0085 by Terri Sproul

Correspondence Pens Ink & Postage SC KTL 001 by Katy Leitch

Small canvas (I used 6,5 x 6,5 cm)

Acrylic paint in: Moon yellow, Blue Chiffon, Sable Brown, Antique Mauve, Cobalt Teal Hue, Quinacridone gold.

Matte Medium

Left over papers from old books, music paper, patterned paper etc.

Bottle cap (or something round to stamp with)

Brayer

Palette knife

Waterproof stamp ink (I used mermaid lagoon and Vintage photo distress  archival ink)


For detailed instructions, see video here:


Here a closer look for all details


Don't forget to decorate the sides of the canvas, for a more finished look.


Thank you for stopping by and have a great day! I'd love to have you follow/subscribe on my YouTube channel


Thursday, April 8, 2021

Wildlife Silhouette

 This month the design team was challenged to create projects with a nature theme.  What's screams nature more than this gorgeous wildlife scene? I have had the Wildlife Zebra Lion Giraffe Elephant Collage Scene Rubber Stamp for a little while just waiting to be played with. 

This month's theme was a perfect excuse to break it out and play!


Blank Page Muse Supplies needed include:

Other supplies include: Watercolor paper, grey archival ink, distress inks, water brush , card stock, sentiment sticker


Add distress inks in sunset/sunrise colors throughout the background. I created a large round focal point to serve as my sun. 


Stamp your Wildlife Zebra Lion Giraffe Elephant Collage Scene Rubber Stamp  onto the BACK SIDE of a piece a water color paper. The front side is more textured and if you stamp the front side a stamp this detail will look broken as you can see below. 


Stamping on the back side will make blending the inks a little less easy but look at the image below!


Using distress inks and a water brush color your wildlife as desired.  

Mat your finished image onto black and then again on Kraft card stock.  Tie a jute bow around matted stamped image and add to your card base.  Finish by adding a sticker sentiment. 


Copyright Text

Blank Page Muse 2018 Sin City Stamps 2013