Showing posts with label birthday card. Show all posts

Friday, March 22, 2024

Happy Birthday Card

 Hi everyone, Steph Ackerman here today.

Today I am using some amazing products from Blank Page Muse and I Brake for Stamps.


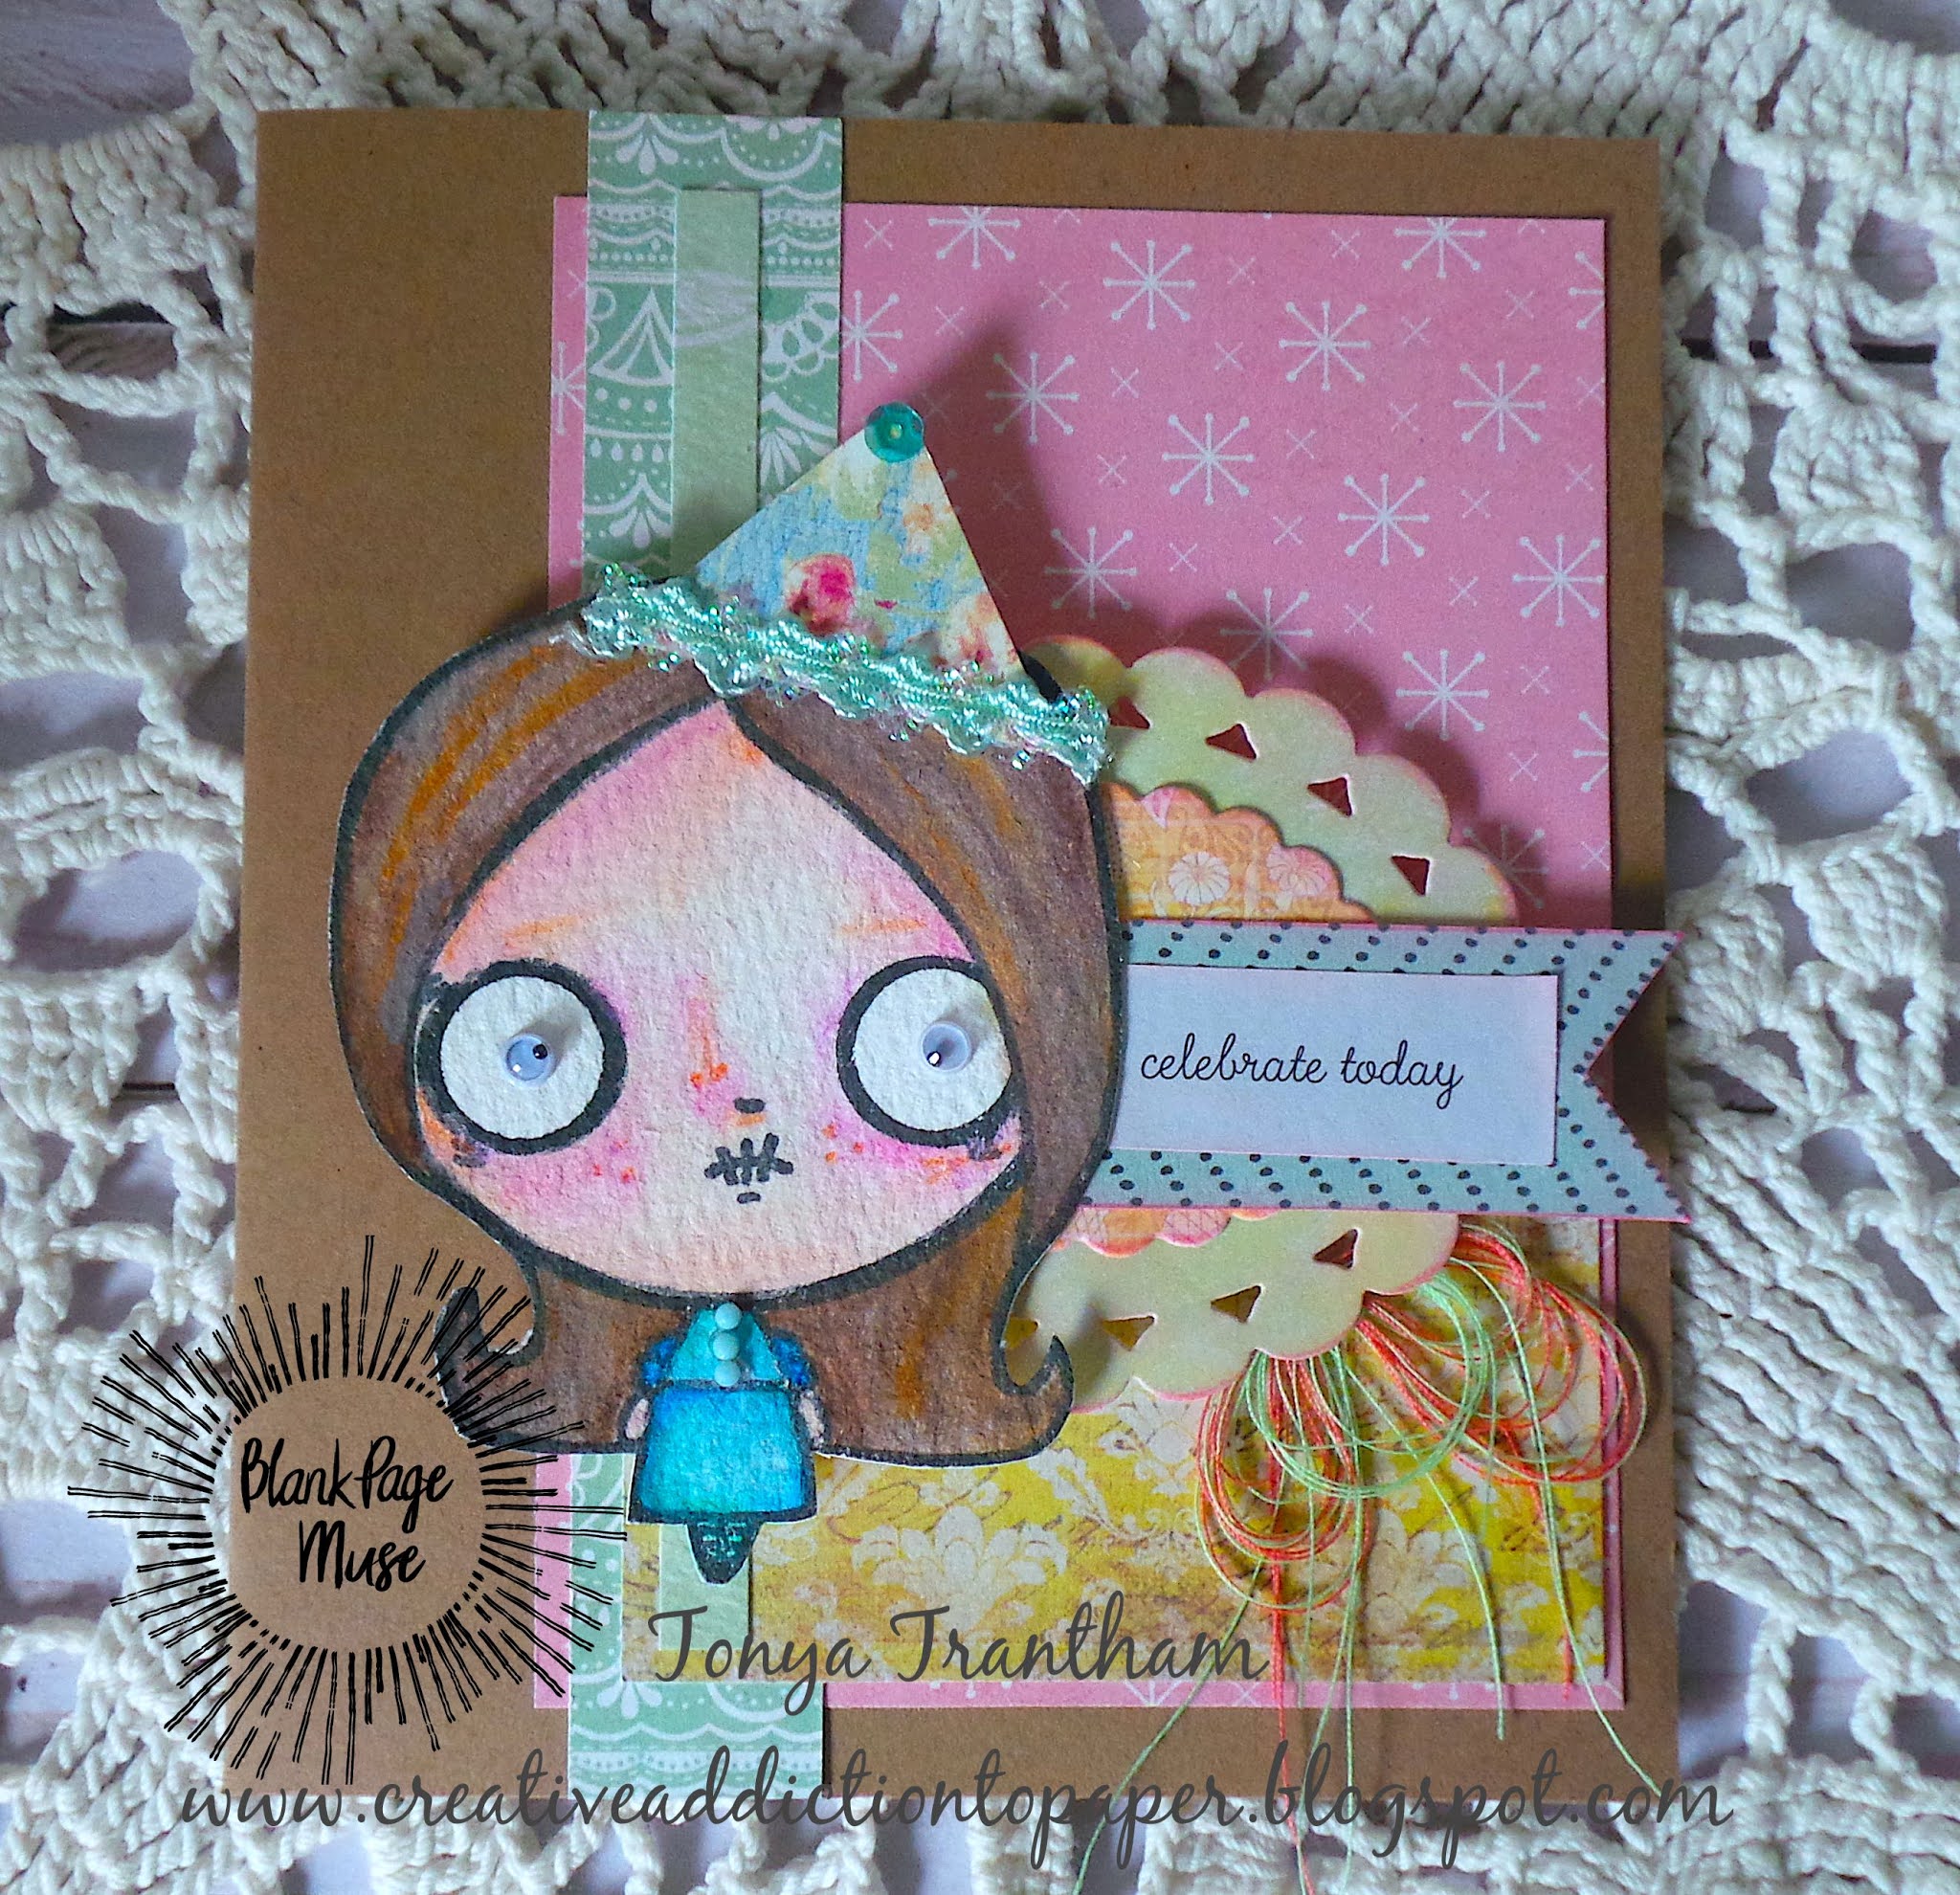
Blank Page Muse Stamps:  Special Day Clear Stamp Set
Blank Page Muse Digital Papers:  Frosty Night
I Brake for Stamps:  Happy Birthday Background Text

Use the newly available winter digital papers as a back drop for a birthday card.
Mix and match stamps for a unique look

Details can be found on my blog.

Thanks for stopping by.


Steph

Looking for more Inspiration? Click the links below!
The Blank Page Muse Shop https://blankpagemuse.com/

Save 15% of your Blank Page Muse orders with discount code:  BPMSteph

Sunday, January 22, 2023

Happy Happy Happy Birthday Card

   Hi everyone, Steph Ackerman here!

 Today I am using some amazing stamps from Blank Page Muse and I Brake For Stamps.


Paper:  Cyan Consortium


Stamp the birthday stamp on pattern paper and emboss.
Tear the right edge, mat with cardstock, then wrap with ribbon.
Adhere to a green card with foam adhesives.

Stamp and color Lexi with Copic Markers.
Fussy cut and add her over the ribbon.


The full tutorial can be found on my blog.

Thanks for stopping by.

Steph

Looking for more Inspiration? Click the links below!
The Blank Page Muse Shop https://blankpagemuse.com/

Save 15% of your Blank Page Muse orders with discount code:  BPMSteph

Thursday, November 24, 2022

Happy Birthday "NEW" Dad!

 Hi Stamping Fans!

Today I am sharing a "personalized card" I made for my daughter to give her partner as a "New Dad" for his birthday!
I've used stamps and a stencil from the Blank Page Muse & I Brake For Stamps Stores!


The Sentiment and Alphabet Stamps available in store are just perfect for adding to a personal card.
I added "Happy Birthday" and "DAD" letters to a  card base along with a photo printed on glossy paper along with a few other embellishments.


I used "handprint" stickers but you could also use the handprint stamp available in store - link below!
You can have a lot of fun making personalized cards - you could even use pics of your pets!


And don't forget to stencil the envelope to have a matching "set"!


Stamps/Stencil used:

***Remember to us the code BPMSharon at the store for 15% off ***
So many fab stamps to choose from!
Note: you can use the code at either the IBFS Store OR the BPM Store - why not do an order from each and increase your stash!


Saturday, July 30, 2022

Many Happy Returns!

 Hi BPM Fans

Hope you have all been enjoying the wonderful inspiration being shared here at the blog!
Remember to pop over to the I Brake for Stamps Blog too!
All the links are at the bottom of this post for our Social Media "haunts"!!!


I've created a Birthday Card for todays post!

Stamps used:

 License Plate Letters (from IBFS Store)


And I used some of my leftover "master board" from my "Feeling Colorful" creation click here also using BPM Stamps and Stencils.


***Remember to use the code BPMSharon at the store for 15% off ***
So many fab stamps to choose from!
Note: you can use the code at either the BPM Store OR the IBFS Store!

Pop over to My Blog and you can see all my stamping creations!

Thursday, April 15, 2021

Make a Wish!

 Hi BPM Fans!

Hope you are all enjoying the "Nature" theme this month which is just perfect for soooooo many of the fab stamps available at the BPM Store!


Today I'm sharing some nature/natural feel cards using some of my scraps from my post here at the blog last month along with some new stamps I recently nabbed from the store!
Click here to see how I made the Floral Patterned Kraft Card used on these cards.


Supplies:
Blank Page Muse Stamp: Lady with Butterfly Wings
Blank Page Muse Stamp: Smile Winged Muse
Blank Page Muse Stamp: "Make a Wish" & "Butterfly" from the Dandelions Wishes with Butterflies Set
White Card and Black Ink Pad
Colouring Mediums ie. Copics or Pencils
Kraft Card Bases
Torn Scraps of Stamped Kraft Card
Embellishments
General supplies: scissors, tape or glue

Instructions:
Start by stamping your Main Winged Ladies and Butterflies on white card with black ink. Colour in and fussy cut. I had fun doing some pretty basic "gawdy" colouring to make the images stand out and look quite bold!


Stamp the "Make a Wish" sentiment on white card and tear around the stamp.


Grab some "scraps" of leftover stamped card - link above for how to make patterned paper using BPM stamps!


Gather your base cards, some hessian or fibre ribbon or the like and any other embellishments you want to use.


Arrange your coloured stamped images, patterned card strip and embellishments on the card front and adhere. 


Hope you feel inspired to create your own nature feel cards!
Remember we always love to see what people are doing with their BPM Stamps - we love to get inspiration from BPM "Fans" as well as sharing our creations with you!

Happy Stamping!

Sharon :)


Don't forget to check us out at all of our social media sites
The Blank Page Muse- https://blankpagemuse.com/


Friday, September 18, 2020

Celebrate Today Card

Hi everyone! It's me, Tonya and I am here to share a quick and easy card I create using the Aster Creepy Cute Kid and Life is Short Rubber Stamps and leftover scraps from previous projects. 
I started by cutting and folding a piece of kraft cardstock, 4 1/4"x5" to create the base for the card. I layered and adhered scraps of patterned cardstock to the base. From my stash of diecuts I glued on top of each other added Foam Pop Dots to the back before placing on the card.


I printed from my computer the "celebrate today" sentiment. I cut out a banner, adhered the sentiment on top and added to the card.  I stamped the Aster Creepy Cute Kid and Life is Short Rubber Stamps onto a piece of watercolor paper. I watercolored, used colored pencils on the girl and fussy cut the girl out. I cut a party hat from a piece of scrap cardstock, adhered to the stamped image along with trim and a sequin to the hat. I also added googly eyes and mini gems to the eyes and the dress before adding foam pop dots and placing on the card.


I finished the card by gluing several thread bows to the underside of the diecut. As always if you have any questions about this project please let me know. If you aren't following Blank Page Muse on their social medias you can find them at the links below.


Watercolor Paper
Watercolors
Paint Brush
Black Ink
Colored Pencils
MISTI Stamping Tool
Kraft Cardstock
Paper Cutter
Scissors
Gems
Beacon Adhesive: Zip Dry Adhesive
Googlie Eyes, Trim, Sequin, Thread
Various Patterned Cardstocks
Foam Pop Dots
Printed Sentiment from Computer


Thanks for stopping by, hope your Friday is wonderful and enjoy creating!


Thursday, April 23, 2020

Party Gryz is Dreaming Big!

Hi Again Everyone!

Hope you are all staying safe and well!


Today I am sharing a nice sparkly and shiny birthday card - super quick and easy to make with minimal supplies because some of you may be getting low??? And I'm just joking because I don't think I would ever run out of supplies!

Supplies:
Blank Page Muse Stamp: Party Gryz designed by Magda Polakow
Blank Page Muse Stamp: Dream Big designed by Magda Polakow 
White Base Card
Scrap White Card for Stamping Images
Colouring markers or pencils
Black Card
Embossing Folder
Embossing Ink & Sparkly Embossing Powder
Big Kick/Cuttlebug or the like!
Heat Tool
Scissors, adhesive etc.

Instructions:


Start by embossing the black card. Using your embossing ink pad swipe all over the inside front panel of the embossing folder. Insert your black card and emboss on your embossing machine.


Remove card and sprinkle with sparkly embossing powder and use your heat gun to emboss. Trim card to fit your card base and adhere to card.


Stamp and colour your chosen image and sentiment.


Arrange your stamped images on the card front and adhere and you are done! 


A perfect way to make a card for any occasion.

Hope you have enjoyed this quick sparkly card today! 

Still time to play along with the "Sparkle & Shine" Challenge just link up!

Happy crafting!

Sharon

Don't forget to check us out at all of our social media sites
The Blank Page Muse- https://blankpagemuse.com/

Friday, March 13, 2020

Sparkly Awesome Texture~Card By Guest Designer Samantha!

Hello, hello! Samantha Ziegenfuss here. I am elated to be back on the Blank Page Muse blog bringing you another guest design.

It seems like I am always in need of birthday cards and I think that a birthday card made with the Henna Floral Motif Decorative Art Rubber Stamp by Shaloo Webster would be the perfect one to give to just about anyone.

To begin I stamped the Floral Motif stamp to a watercolor panel I'd cut to 4" x 5.25" with sticky embossing ink. I stamped it twice, shifting the stamp each time. I heat set the image with gold embossing powder.


Next I used Turquoise watercolor paint to fill in some of the leaves. When that was dry I filled in the remaining leaves with a vivid Hyacinth Violet watercolor paint.


When all the watercolor paint was dry I splattered black acrylic paint across the entire watercolor panel.


I stamped the Happy Birthday Phrase Rubber Stamp onto black cardstock and heat set in white embossing powder. I trimmed it down when I was done.


I layered my watercolored panel onto a piece of black cardstock cut to 4 1/8" x 5 3/8" and then adhered it all to a white A2 sized card base.


I placed my sentiment slightly overhanging the edge of the matted card panel and added a few gold sequins to tie it all together.


Thanks so much for stopping by! Be sure to head on over to the shop to check out these amazing red rubber stamps!

Until next time,
Samantha Ziegenfuss

Monday, February 17, 2020

Vintage Birthday Greetings

In our house the month's of January through March are jam packed with birthdays!   So I always try to stock up on my stamped birthday greetings!   Today I am sharing this easy stamped card using 3 different Blank Page Muse Stamps.


Supplies Used
Water Color Paper
lace Stencil
Blank Page  Muse "Flitter" Butterfly against a Honeycomb Background Art Rubber Stamp
Blank Page  Muse Windows of Time Vintage Window & Shutters Art Rubber Stamps Set designed by A Vintage Girl 
Blank Page  Muse Happy Birthday! Word Rubber Stamp by Pam Bray Designs
Distress Ink
Archival Inks


Start by ink your stencil with distress inks on water color paper.


 Stamp Blank Page  Muse Windows of Time Vintage Window & Shutters Art Rubber Stamps Set designed by A Vintage Girl  with archival ink.


 Stamp butterfly from Blank Page  Muse "Flitter" Butterfly against a Honeycomb Background Art Rubber Stamp with archival ink.


 Stamp Blank Page  Muse Happy Birthday! Word Rubber Stamp by Pam Bray Designs with distress ink matching your stenciled pattern.


To Finish, mat your stamped pieces on card stock and add to card base.

I hope you decide to join us for this month's challenge!

Be sure to follow us and to play along with this month's challenge 

The Blank Page Muse- https://blankpagemuse.com/


Thursday, January 23, 2020

A Mini Happy Birthday!


Hi Again BPM Fans!

We've had lots of fab birthday ideas this month - should keep you all inspired for any special occasions you have coming up for the year!


Today I am sharing a little concertina folded card which can be used for any occasion!


Supplies:
Blank Page Muse Stamp: "You are Wonderfully Wonderful" from Mermaid Fantasy Set
Blank Page Muse Stamp: "Flower" from Petals & Flowers Set
Blank Page Muse Stamp: "Happy" Word from Fairytale Fantasy Figures Set
12 x 12 Double Sided Scrapbooking Card Note: one sheet will make 4 mini cards!
3 x Pieces 7 x 7cm Coloured Cardstock in co-ordinating colour
3 x Pieces 6 x 6cm Plain White Card Plus small scrap pieces
Stamp pad in co-ordinating colour
Piece thin ribbon either a sheer white or co-ordinating colour
Square punch or Square Metal Die
Double sided tape, Glue, scissors

Instructions:
Cut your 12 x 12 paper into 3 inch width strips. Fold as shown below - in half and then fold back on each end to make the "concertina" fold. Use your square punch or die and cut a "window" into the front panel.


Adhere the plain coloured cardstock to the 3 inside panels as shown in the photo below.


Edge the pieces of white cardstock with your co-ordinating stamp pad, stamp a sentiment on one piece, stamp the "happy" word onto a scrap piece of card along with the small flower.


Adhere the white card pieces onto the base card as shown below. Attach the "happy" word to the card front with mounting foam and also use a small piece of mounting foam to attach the small flower in the square "window".


Fold the card and turn over. Attach a piece of double sided tape approx 1cm down from the top of the card back and adhere your ribbon centrally as shown below. Turn the card over and tie the ribbon in a bow.


Your card is now finished! You can write your greeting inside on the blank card before tying with the ribbon.


Happy Stamping!

Sharon

Don't forget to check us out at all of our social media sites
The Blank Page Muse- https://blankpagemuse.com/

Copyright Text

Blank Page Muse 2018 Sin City Stamps 2013