Monday, June 23, 2014

Free

Hey!  It's Robin Redd (a.k.a. RockinReddRobin!)
 
  
Today, I worked on an art journal page based on week 4 of The Documented Life Project.  If you don't know about The Documented Life Project, click the link, here, for more details.

Personally, I don't keep the weekly journal as they do.  I just use the art journal prompts when I can get to them.  Like I said, this is the art journal prompt for week 4 and they are on week 26!

Week 4's journal prompt was to "Write a secret message and then paint over all but one key word."
I had written a letter, a while back, on watercolor paper for this use.  I didn't know of this prompt, specifically, but it's kind of cool how it worked out.

I used the background stamp and the wings stamps from the Classic Spark collection.  I LOVE these wings and that background stamp will get used over and over, for sure!

 I LOVE these wings.

 And, that background stamp will get used over and over, for sure! 

I hope I have inspired you to create something today.

Until next time...

Thursday, June 19, 2014

Embossing Resist Techniques with Sin City Stamps

Hello everyone.  I hope you all have had a wonderful week and are ready for a fabulous weekend.  Today, I want to share a couple of embossing resist techniques that are more of those oldies but goodies.  I made a similar card using part of this metal foil sheet, and on my desk was the section I had cut off.  I did not want to throw it away, so I made this card in a similar fashion.  Nothing goes to waste, especially if it is metal.


Supplies Used:

Sin City Stamps:  Mannequin Tags 2 :  Dream

                            Art Journaling with Terri Sproul:  diamond border, solid bubble, notebook page

                            Time: Time clock face

Kaisercraft Check In 6-1/2"x6-1/2" paper pad

Off white textured card stock (cut to 10" x 7", folded in half to make 5" x 7" card)

Glossy White Cardstock

Wax paper

Ink Pads:  StazOn Midi:  Jet Black, Gothic Purple; Versamark; Evergreen Bough, Frayed Burlap

Versamark ink pad

Tim Holtz Fragments acrylic charms

Tim Holtz Compass embossing folder

Tim Holtz mirrored sheets

Sizzix Super Crescent Tag die

Glossy Accents

Seam binding ribbon

Pop Dots


Directions:


This is the metal foil sheet I embossed for another project, and cut off the portion you see on my card.  I used StazOn Orange Zest and Hawaii Blue to patina it.

I had just this small piece left.

Since I really wanted the compass for my card, too, I took a piece of white glossy card stock and wax paper, embossing together with the compass embossing folder.  I had already added color to the card stock using Evergreen Bough.

I used a hot iron to melt the wax from the wax paper onto the card, removed the wax paper, and added Frayed Burlap over the card.  The wax caused a resist, giving it this shabby look.  I really like it.

I began layering my papers, as shown.  First was a print from the Kaisercraft paper pad (4-1/2" x 6-1/2"), the embossed glossy card, and the scrap piece of metal, aligning it with the card stock.

Now to make my focal image.  I die cut another piece of glossy card stock into a tag shape.  Using Versamark ink, I stamped and then heat embossed the solid bubble image a few times.  Next, I sponged Gothic Purple StazOn over the entire tag.

I removed the ink from the embossed areas and wiped the whole tag with a baby wipe.  It actually blended the ink a bit more on the tag, too.
Stamp note paper with Gothic Purple onto scrap card stock.  Distress and ink edges with Frayed Burlap.  Adhere to tag.
Use black StazOn to stamp Time clock face onto mirrored card, cut out and adhere to tag.  Stamp diamond border along bottom edge of notebook paper.
Use black StazOn to stamp "Dream" onto Kaisercraft print paper.  Adhere clear acrylic charm with Glossy Accents.  When dry, cut out with craft knife.

Adhere seam binding ribbon to tag, then attach Dream charm to ribbon with vintage pin.

Close up of Time clock face stamped onto mirrored card, without my reflection showing in the mirror.

Lastly, adhere tag to card with foam dots and the cut out portion of a travel file label from one of the Kaisercraft printed papers, as shown.  Adhere to right side of tag.


I hope you have enjoyed my project today.  I hope you will visit often for more inspiration from the rest of the team.  And stop on over to see all the newest stamps and product releases in the online shop.


Have a wonderful, creative weekend!!!


Barbara

Wednesday, June 18, 2014

Fly Away, Be Free! by Linda Hess

I am a mom of 3 beautiful children, 1 boy and 2 girls.  They are in various stages of growth and I have discovered along the way that age does not guarantee what stage they shall be in at any given time!  Looking through the Sin City Stamp collection I stumbled on this wonderful saying and knew I had to use it on a canvas.  It makes me think of growth and beauty and the wings we all must sprout eventually to learn our true potential in life.  With that in mind, may I present "Fly Away, Be Free!"

Materials:
Sin City Stamps (www.sincitystamps.com):
Love of Butterflies (plate), Caterpillar (SC32-6)
Bird cage Chipboard Book (sccb68)
Branch Stencil (scs29)

8"x8" Artists Loft back-stapled traditional canvas
variety of acrylic paints ( I like metallics)
assorted polymer clay butterflies ( see info below to contact)
Creative Paper Clay
Color Box Archival Dye (Coal Black)
"The Ultimate" Glue (www.crafterspick.com)
Pentel Metallic Brush Pens in red, gold, green (www.pentel.com/store/metallic-brush-pen)

Procedure:
1) Paint canvas using colors of choice.  I am not much of a painter so I tend to sponge paint in layers: blue, pearl, a little more blue, maybe some purple until I am happy with the look.  Don't forget to paint the sides along with the top!  Set aside to dry.


2) Paint birdhouse cage in bronze or gold.  Set aside to dry.
3) Rubber stamp "to become..." saying on a sheet of computer paper.  For this canvas I wanted the words to be larger, so I scanned it into my computer and enlarged it before printing on a piece of vellum. (PLEASE NOTE: To keep ink from smearing on vellum I rub it first with the Perfect Printing Pouch from www.scraperfect.com
4) Choose a few smaller butterflies from "Love of Butterflies" plate and cut out as shown. 
Rubber stamp on vellum using Color Box ink.  If desired detail with pencils or markers before cutting out individual butterflies.
5) Use "The Ultimate" glue (my favorite!) to attach vellum butterflies to canvas.  Glue painted cage over the butterflies. Glue rubber stamped saying in the upper corner.
6) Mix a small amount of Creative Paper Clay with water, just enough to make a paste.  Position Branch Stencil as shown.  Smear paste over stencil, filling the openings. 
Remove stencil.  Rinse and dry stencil before repositioning.  Repeat process until happy with look.  Let dry.
7) Color in flowers, leaves and stems as desired.  I like Pentel's Metallic Brush Pens because they are so easy to use and give the perfect pop of color. 
Also use the Brush Pens to detail stamped saying.
8) Finally, polymer clay butterflies are glued in place. (PLEASE NOTE: All shown are made by me and vary in size and color [obviously]  Email me at polymercreations4u@msn.com for info)
 
 
Thanks for visiting.  Have fun flying free!


Monday, June 16, 2014

"Flutter By" Sin City Design Team Project by~ WildHeart Art ~


 ~Flutter By~
 Sin City Design Team Project 
By WildHeart Art


I have always loved butterflies with  the beautiful colors in their wings as well as the transparent colors in stained glass artwork so I decided to check out my "stash" for this design team project and try to incorporate them both together.  I love the outcome and it was a very fun and easy project to do!

~Supplies~

Journal page
Gesso
Glass Bead Gel
Fine glitter
Alcohol inks
Dylusions Ink Sprays
Prima Color Bloom Spray
Black ink pad
Blue acrylic paint


   1) Gesso your art journal page and let dry.
2) Spray randomly with the ink sprays and let dry.

  3)Apply the butterfly die cuts and using bead gel medium and a palate knife, spread the bead gel medium over the die cut to cover, in a very thin layer. Sprinkle some fine glitter over the butterflies and let dry.

4)  When dried add the alcohol inks by drops onto the wings  and body  randomly to emulate the beautiful  colors on the wings.
 5) Using  the swirl stamps in the Terri Sproul Art Journal stamp set, apply the stamps here and there with black ink. Then using the butterfly stamp to stamp in the middle right of the page.


 As you can here in the close up of the wing the bead gel and glitter give it that texture and the alcohol colors give it that lovely transparent color.


 6) Here I finished off with some dots of acrylic paints  in blue to bring it all together

Hope you have enjoyed this unique butterfly project!
Have a beautiful creative day!
~In love & Faith~
Sherri

Friday, June 13, 2014

SinCityStamp Windchime

 Hello! Peggy here and I am excited to show you my altered windchime now a fabulous steampunk bird windchime.
Supplies I used today are

  • Sin City Stamps
  • Laser Wood Birds
  • Flower Die Cuts
  • Embossing powder (black and white)
  • Heat tool
  • Fishing Line
  • White Gesso


I started with my wooden pieces that I painted with white gesso.
I took separate pieces of cardstock to stamp my bird images on with versa mark ink and embossed in white and black. I adhered the embossed cardstock to five wooden birds and stamped images on the back of the wood.  I alternated black and white on either side.  


I strung my birds with fishing line in different lengths to fill in the mobile/windchime.


I hope you enjoyed my short tutorial and I encourage you check out Sin City Stamps for your chipboard, wooden pieces, stencils, stamps and more!!


Monday, June 9, 2014

Wrong Way

 
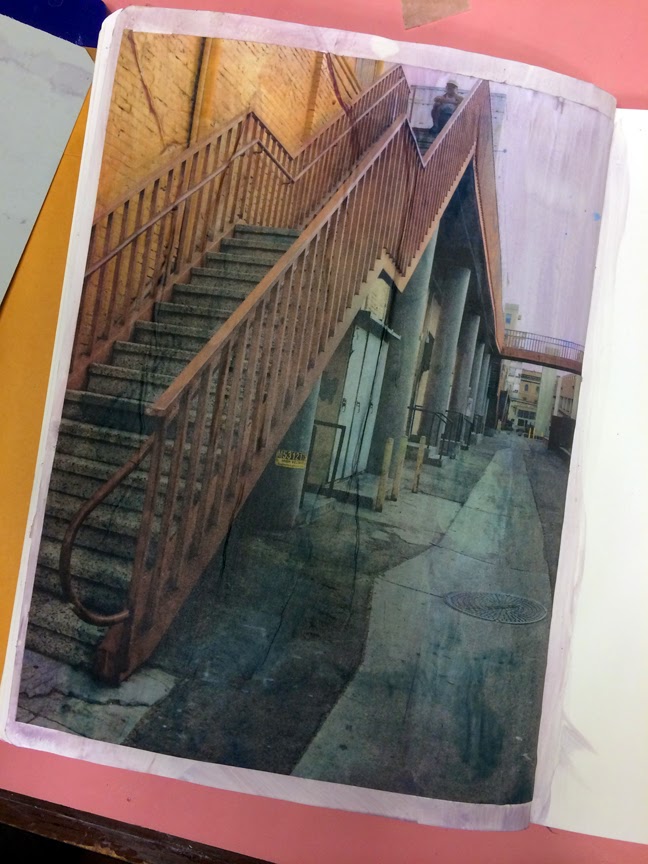
 I took this picture while strolling Santa Ana in the Art District one afternoon.  
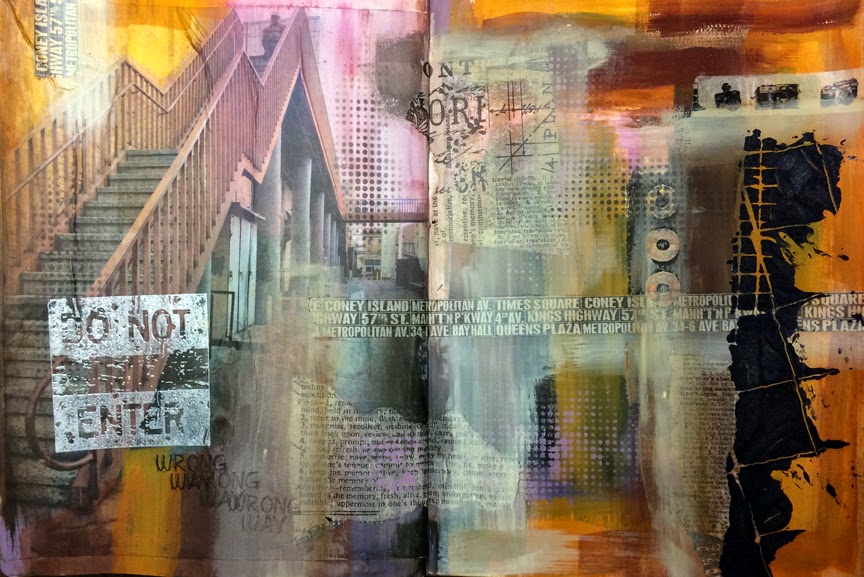
I wanted to use my Urban Grunge stamps on a journal page 
and chose to use a photo I had taken myself as the main subject.  
I printed it on plain copy paper and glued it to my art journal page with Liquitex Matte Medium.

 I added paint on the opposite side of the page using colors that were in the photo, that way, when painting over my printed image, it blends through to look as if one painting.  I used both acrylic paints and Art Anthology paints.  I wanted the paint to be semi transparent in some places so the photo would show through.  Art Anthology Paints are transparent so this was the perfect tool.

 I collaged some Tim Holtz Tissue Wrap, 
some Washi tape and decorative hole reinforcers around the two-page spread.

 Then, I added another layer of paint unifying everything.
 I stamped the Do Not Enter stamp from the Urban Grunge Stamp Set 
with the White Daisy stamp from Close To My Heart.
It's a pigment ink so I added clear embossing powder over it to heat set the image.
I also used the Wrong Way stamp from the Urban Grunge Stamp Set.

 I used Art Anthology's black Stone Effects with The Crafter's Workshop stencil.  
I love how it's so gritty and thick.

Here is the full two-page spread.

I hope I have inspired you to create something today.
Until next time...

Copyright Text

Blank Page Muse 2018 Sin City Stamps 2013