Showing posts with label Versamark ink. Show all posts

Friday, May 10, 2019

Steampunk in your Art Journal


Hello, today I share with you a Steampunk art journal page that has an aged feel to it. I used Distress Oxides to create the awesome background and stamps from Blank Page Muse.


The stamps used from Blank Page Muse are:


Other supplies used:
  • Distress Oxide -Vintage Photo, Antique Linen, Rusty Hinge
  • black embossing powder
  • Versafine Pigment Ink - black
  • VersaMark Watermark Stamp Pad
  • white cardstock
  • black cardstock
  • art journal
  • heatgun


Stamp an image with VersaMark water mark ink and allow to dry.


Now go over the entire page with Distress Oxides. Sprits with water to get that speckled look. Allow that to dry thoroughly before moving on.


Now stamp the gears and air balloon on the page. 


Stamp and emboss more gears on cardstock. Cut them out.


Stamp and mount your sentiment/saying.


Arrange the gears and saying on the page. When you are happy, glue them in place. 


You are all done! Wasn't that easy?


To purchase your stamps, visit blankpagemuse.com and use the following discount code BPMDtSuzette2019  to get 15% off. Offer expires on July 31st, 2019.


Thank you so much for stopping by. I do hope you enjoyed this tutorial. Remember to subscribe so you don't miss a post and look us up on social media (links below).

Happy crafting!
Suzette


Instagram Blog-  https://www.instagram.com/blankpagemuseblog/
Twitter-  https://twitter.com/BlankPageMuse
Pintrest- https://www.pinterest.com/blankpagemuse/boards/

Sunday, May 5, 2019

Vintage Look Sunshine Card

Hello, hello! Samantha here and I hope you're having a fantastic day.
I adore vintage books. I frequently scour garage sales and thrift stores for them. I love the yellowed pages and the cracked spines. There's so much history in them and each one has its own story to tell, no pun intended.
This card was inspired by my love of old books. Don't worry, no actual antique books were harmed in the making of this card.

To save 15% off of your next Blank Page Muse order use code BPMDtSamantha2019 at checkout


To begin I tore a page from a student dictionary that I got from a yard sale for a quarter. This is my go to book for page art.

I cut it down to 5" x 3.75", ripping the edges to create a distressed look.

I stamped all across the page using two floral stamps from the beautiful Flower & Bird Sketches Art Rubber Stamp Sheet  and a medium brown ink.

To get a really interesting and even further aged, distressed look I crumpled the page into a ball over and over until I ended up with the look I wanted.

Using a dark brown ink and my ink blending tool I inked along the edges of the page as well as across the page face. Inking across the page face very lightly  helped to define some of the wrinkles.

I mounted the page to Kraft cardstock and then to an ivory colored card base, inking the edges of both with my dark brown ink.

With Versamark Watermark ink and clear embossing powder I stamped and heat set the You Are My Sunshine Small Word Art Rubber Stamp by Pam Bray Designs along the lower right edge of the card.

I finished the card with three droplets of Nuvo Crystal Drops in Caribbean Ocean. I love the fun pop of color this adds.


Thanks for stopping by and taking a look at my card. I can't wait to see how you use your Blank Page Muse stamps!

Until next time,
Samantha


Looking for more inspiration?
Click the links below!

The Blank Page Muse Shop
Facebook Fan Page
Instagram- Shop
Instagram- Blog
Twitter
Pinterest

Wednesday, April 8, 2015

Just a note to light up your day!


Hello All Lanette Here!

Today I am going to share a couple sweet little cards that can be used for almost anything!

Lets start by taking a look at my finished cards, then I will show you how I made them :)


Sin City Supplies Used: Baby Animals Art Rubber Stamps

Just look how cute they are!!!


Other Supplies Used: Tim Holtz Distress Markers, Ranger Water Brush, Tim Holtz Mask Material, Faber Castell Gelatos, Staz-on Ink, Versa mark Stamp,& Heat Embossing Powder.

Now lets look at my process......

I started by stamping my image on my two cards and the masking material.


Next I fussy cut my masked image.


My Next step was to add my verse stamp, that is also found in the Baby Animals Art Rubber stamp collection.  I heat embossed my verse so it would resit the gelato background.


After placing my masked image over my stamped image I started created my background using Gelatos. 

My last step was to remove my mask and color my zebras shirt using Distress Markers.


Lets take one more look at my cards just for fun! After all they are super cute!


Thank you so much for stopping by today!

I hope that I have inspired you to have some inky fun of your own!


Remember to like us on Facebook and stop by the store for all your stamping needs!!

As always feel free to stop by my blog Stacks of Scraps anytime!

Monday, February 16, 2015

Fairy Wings

 
Hi Chris here today sharing this adorable layout using Sin City's Anime Fairies 2 and Sin City Stencils Pattern 20  For this layout I used
 
Copic Markers ( E00, E31, E33, E37, Y 11, Y15,  Y21, Y26,  B21, B24, V01,V06, G24, G28, colorless blender)
Vellum (WordWin)
Graphic 45 Secret Garden
Ranger Stickles
Mounting tape/strips (Elmer)
Cardstock (WorldWin)
Staz-on Ink (Jet Black)
Versamark Ink
Sheer ribbon
 
 
To create this layout I first fussy cut out the interior of the Secret garden paper to create a floral overlay.

 
You will notice that at first I had the little girl left in.  After laying my whole project out, I decided to fussy cut her out of the layout. I placed the fussy cut floral overlay onto the card stock background and lightly marked where the floral overlay would sit. I then used the  Sin City Stencils Pattern 20 and used Versamark embossing ink to create the background.


I printed my journaling block and attached to the background cardstock and then added my photo.  I attached the floral overlay using mounting tape and strips so that there was some dimension to the layout.  I added a ribbon strip and bow to the layout along the bottom.
 
I then stamped multiple fairy images onto vellum using Staz-on Ink. I stamped 5 of what I call the "buttercup fairy", one of the fairy bust with the hair wrapped around, several of the butterflies (but only used one) and one of the Fairy torso with her hand over her heart.  You can see the exact images in the posts below.  


I then turned my vellum to the back side (the side not stamped) and colored in my images with Copic Markers. A few hints about coloring on vellum- the colors show up a bit lighter than you anticipate so you may want to choose a darker shade, if you go outside the lines its ok, just use your colorless blender to remove the ink. I did not due any fancy shading with the Copic markers, but I did add 2-3 colors on the hair. 


I then fussy cut out each of the images. 


I added the fairies and butterfly onto the layout.  Since the vellum is see thru, I was able to used the back side of several of the images switch the way the fairies were facing.  I added stickles to the wings of the fairies for a little fairy dust.  And here is the final product.  I love how the fairies are see thru, it makes them seem more magical.


Wednesday, May 7, 2014

Handmade Birthday Card by Linda Hess

A friend of mine recently said that the only thing she would like for her birthday was a mailbox full of handmade cards, so that she would receive something besides bills.  Be careful what you wish for (hehe)...off to the studio I go!

First thing I pulled out was Creative PaperClay.  Those who know me realize that this is a "clay" outside my normal realm, but the time I spent on the Creative Paperclay design team was an eye opening experience into what can be done with this product.  For this project, it should be the perfect base for my card.  I conditioned a bit by squeezing it in my hands and then rolled it flat in my pasta machine.  (NOTE:  for those of you  who do not own a pasta machine for clay or might even use your pasta machine for...well, pasta...you may roll the clay flat with a rolling pin or acrylic rod.  An even thickness can be obtained by rolling between 2 pieces of cardboard or a stack of playing cards...you get the idea)

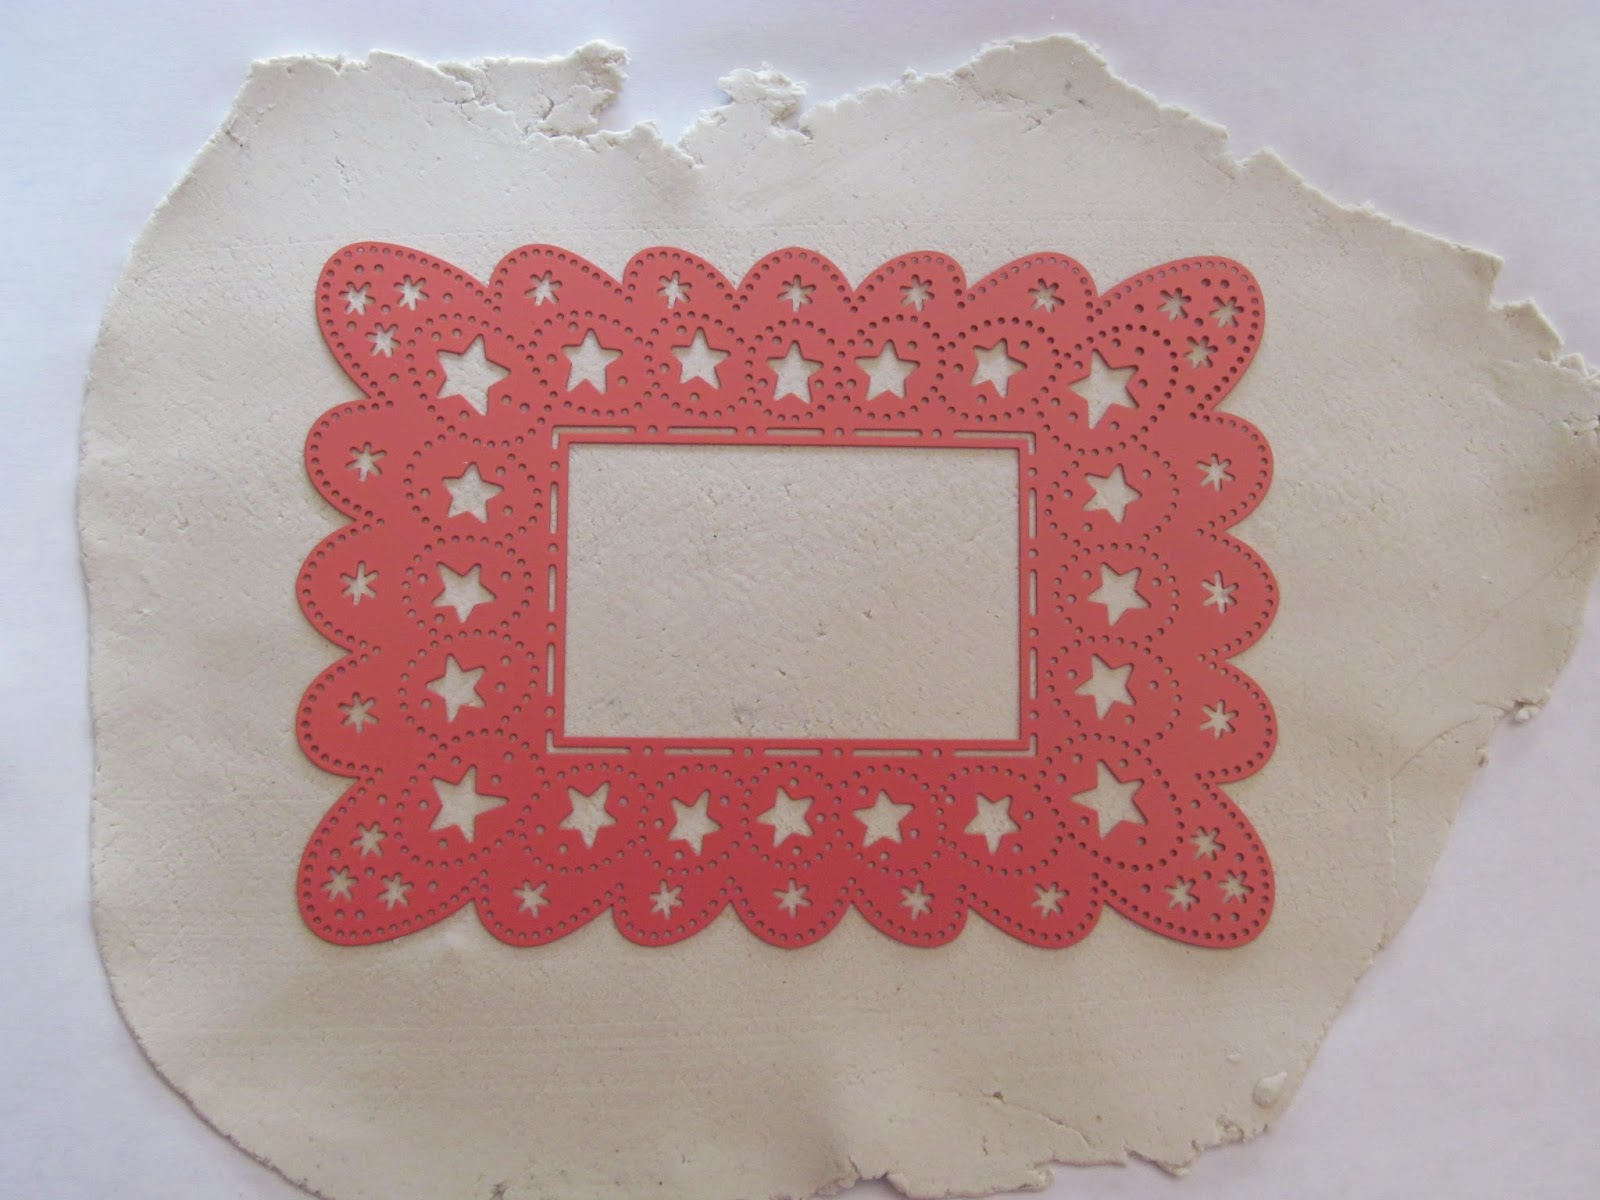
Once rolled flat I placed the clay on a sheet of paper to work on the design.  In our box of goodies for this month we received a metal template (Ornare Vellum) from Ecstacy Crafts (www.ecstacycrafts.com).  I placed it on top of the sheet of clay and then rolled over it with an acrylic roller to press the clay into the openings. 
Once I had the clay impressed with the template design I used an exacto knife to cut around the edges.
I opened the tiny pinholes in the template using a turkey lacer (NOTE: a beading pin or sewing needle will also work).  This will take some time...you may have to give your hand a stretch every so often. 

I brushed over the other openings using Pearl Ex powders in multiple colors.

Then carefully, slowly I peeled the PaperClay away from the template.  At first it came away easily, but then I ran into a glitch.  I started peeling too quickly and of course the clay ripped :-(  They are pretty scraps, but not exactly what I want to send to a friend. 
Back to the drawing board.

This time I powdered the surface with cornstarch before repeating the above steps.  With luck the cornstarch acts as a release and the design peels easily away from the template.

Woohoo!  The template came up nice and clean.  Only "drawback" (if there is one) is that you need to hold the template in place as you go around cutting and detailing.  Otherwise the design will move.

After cutting and piercing, I brushed the surface lightly with rubbing alcohol before applying Pearl Ex powders.  During the process of powdering (with cornstarch) and then detailing, etc. Creative PaperClay will begin to dry out.  The addition of rubbing alcohol re-wets the surface and helps the Pearl Ex to adhere. 

Now to unveil....WHEW! 
Obviously I used a bit too much rubbing alcohol in the one corner, but it can be covered with embellishments :-)  Brush around the edges with rubbing alcohol to clean up any roughness.

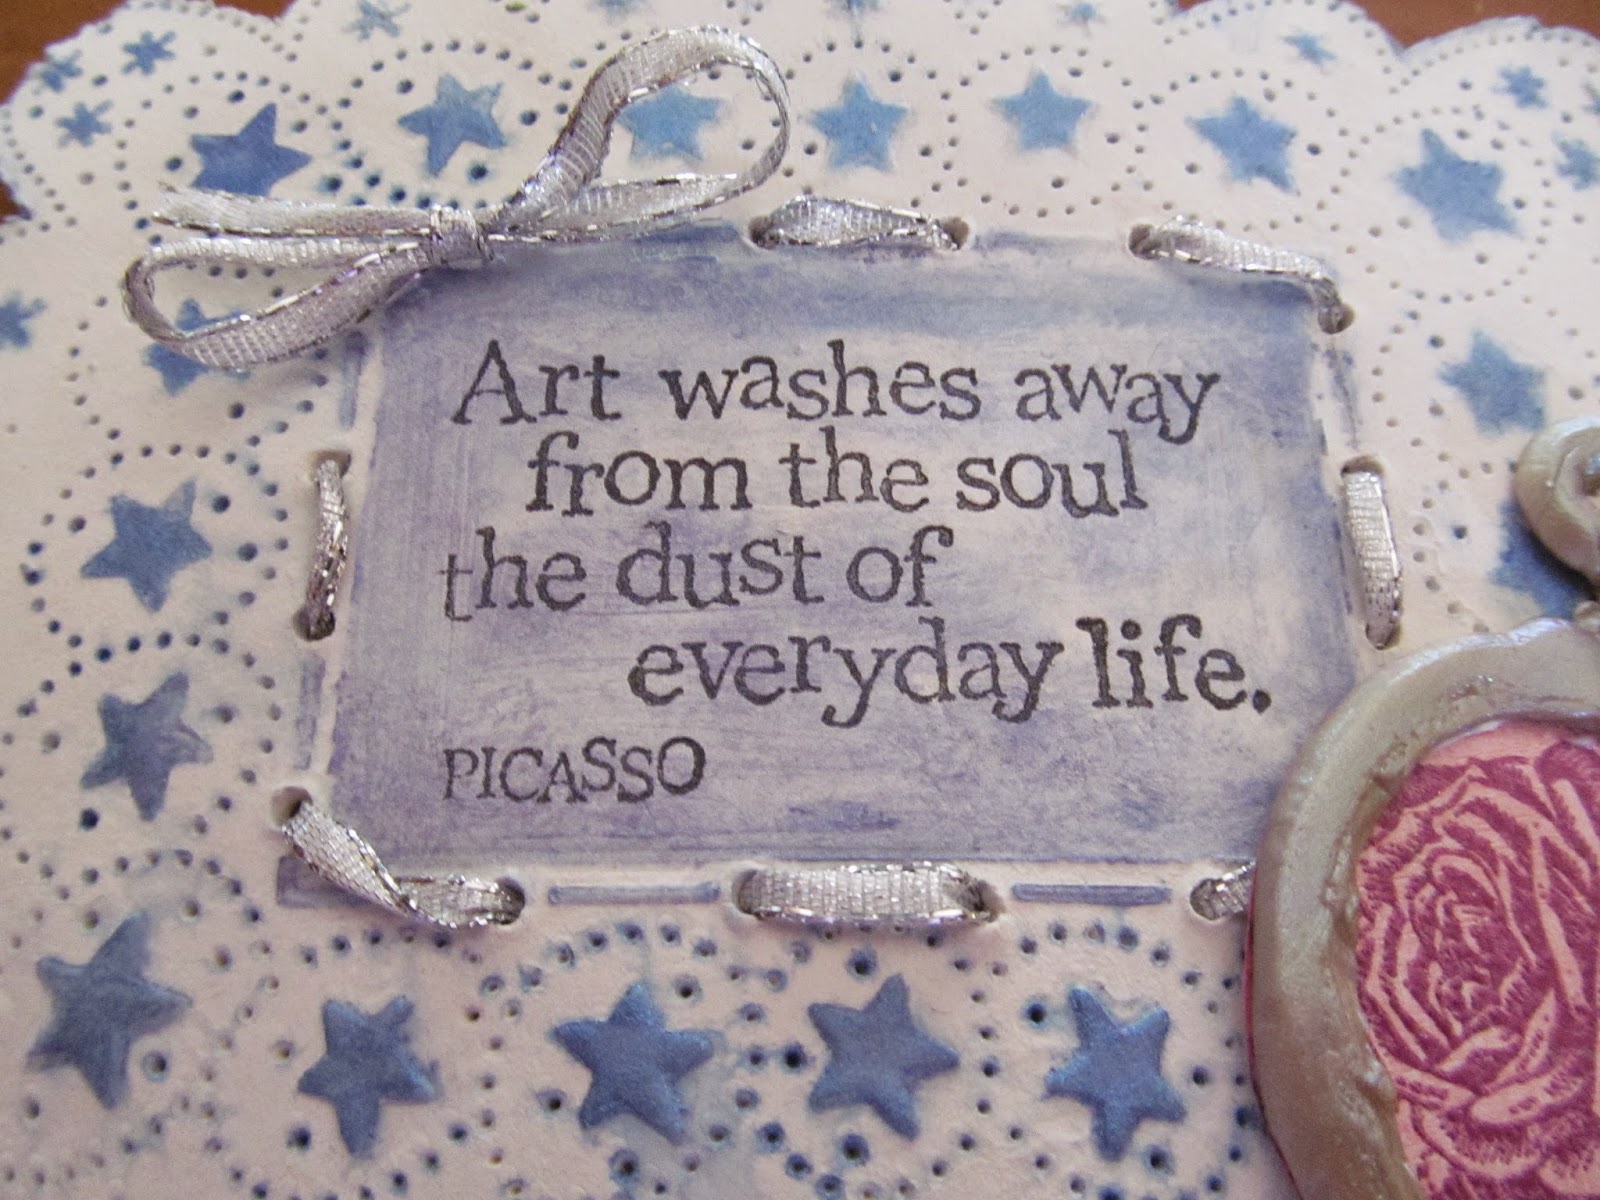
The center is stamped with one of my favorite sayings using ColorBox archival ink in "Wicked Black".  Holes are opened slightly around center image using a turkey lacer.

From my stash of paper I found a soft pink.  It was stamped using the "Romantic Background" unmounted stamp from Sin City Stamps and VersaMark ink, sprinkled with Recollections "plum" embossing powder, and heat to set.  Then I cut out the image.


Roses are placed in corners to cover "boo-boos".  For now they are only placed.  Once the Creative Paperclay dries they will be glued in place using "The Ultimate" glue from Crafter's Pick (my favorite glue).

Being an impatient sort when it comes to projects, I placed the card in the oven and baked at 275 degrees for about 15-20 minutes.  This speeds the drying process, so that I can continue rather than wait (the little kid in me rearing her ugly head!).  (PLEASE NOTE:  Creative PaperClay will draw up and curl slightly if "forced" to dry.  A weight of some sort might be desired on top of the image will keep it flattened).

Now to finish the embellishments.  Looking at the rubber stamped images I realized that something else was needed....maybe a little dimension.  I pulled out the mold that I made a few projects ago ("New Wave "Batik" canvas: Pt 2 [http://sincity-stamps.blogspot.com/2014/04/new-wave-batik-canvas-part-2.html]) and a little bit of polymer clay.  I pressed clay into the mold, shaved off the excess, and unmolded the watch. 
Using an exacto knife I cut out the center of the fob as well as the center of the watch (opening it up).  I brushed it with Pearl ex powder and baked it at 275 degrees for 15 minutes.  Once cooled, the "Romantic Background" image is cut to fit inside and glued in.  Gives the illusion of painted picture in a frame, don't you think??  (Please use your imagination here)
 
A silver ribbon highlights the rubber stamped center.  (Note: I used a wired ribbon to ease the threading process). 


The watch is glued into place (over the boo-boo).  A tiny charm designates this card as "hand made" just as my friend requested :-)

Now to create an envelope....but that will be a demo for another day.  See you soon!


Copyright Text

Blank Page Muse 2018 Sin City Stamps 2013