Showing posts with label Sincity Stamps. Show all posts

Monday, January 30, 2017

Treasure - Journey - Cherish - Reflections...


Hello Everyone!
Today is my first post as a new DT member of Sin City Stamps and I am excited to share my Altered Playing Cards with you using butterflies from the stamp set "Dandelion Wishes with Butterflies" available now in the Store! There are just so many stamps on this sheet that I will be sharing more creations with you using this set - endless possibilities - and that's what I like with stamps - multiple uses! I have step by step details below for you and I hope you are inspired to try some altered cards yourself!

Supplies List:
Sin City Stamp Set Dandelion Wishes with Butterflies
Playing cards - any size - old or new!
Sandpaper
Gesso
Stencil and Texture Paste
Water Spritz Bottle
Ink Sprays - any colors you like - I used 2 coordinating colors for each card
Charcoal Pencil
Black Archival ink
Markers or Pencils
Scraps of Muslin/Cheesecloth - ink sprayed to match
Colored cotton to match
Words - purchased or computer generated
Glue
General crafty tools like scissors, spatula, tweezers etc.


1. Okay let's get started by 'assembling" your supplies - LOL if you are like me you might add as you are going along! But to start I grabbed what I needed to get the cards prepped and drying and whilst waiting for them I have the items to stamp and color!


2. Firstly I sanded the cards because the ones I have are very "plastic" (is that a word??) and I wanted to give the Gesso something to grab when applied. I am a bit lazy and hate washing paint brushes so I tend to just use my spatula and smear the Gesso over the card - it doesn't matter if it is not all totally covered - I like the any bits showing through just adds to the texture and overall look. Once they dried I used one of my favorite stencils and some texture paste and randomly applied over the cards. I'm working on 4 cards at once - a good way to get multiple items made at once and you can have a production line going!


3. Once the texture paste is dry it's time to get inky fingers - and luckily I have a "bloke's" job so it doesn't matter if I have stained fingers! I used 2 colors on each card to get a shaded type look with some dark and light spots around the texture. I spritzed the cards with water and then ink sprayed and let it run off. I always grab an index card or scrap of card to drip the excess on to - a great way to have a fun colored background for another creation - waste not want not!


4. Whilst everything dries you can be stamping your images, coloring them and fussy cutting them out. I used markers in coordinating colors and various sized butterflies for each card. You will see that I do a lot of fussy cutting - I have a fear of white space so I spend a lot of time cutting all the excess away on my creations!


5. I wanted more definition and depth on the base cards so I used a charcoal pencil to outline the pattern of the stencil and then a cotton bud to smudge it all out and give the shadow look - I always love this sort of effect and the black looks good on the bright colors.


6. We are nearly finished! Assemble all your "bits & pieces" and start to play with the layout. I ink sprayed the scraps of muslin to match the colors on each card plus wound some matching sewing cotton around my fingers to make the circles of fiber. I had some perfect colored little "words" but you can always make your own on the computer as an alternative. Then glue everything onto the cards! I glued the "body" of the butterflies and raised the wings for more of a 3D effect. And we are done!


I love using playing cards as a base to work on - just like an ATC - a little work of art. And what I like about this is you can get quite a few made at once - I'm hoping to join an altered playing card inspirational word swap and we need to make 22 altered cards so this process is a perfect way of getting so many done efficiently! Hope you feel inspired and we would love to see any of your creations shared over at the Facebook Group!

Sharon


Quick Links"
Sin City Stamps Store
Facebook Group
My Blog to see more of what I like to do!

Sunday, November 8, 2015

LEAF CARDS WITH "TERRI SPROUL'S LEAVES" STAMPS

Hello and thanks for visiting!  Today, I am sharing some cards I made using the "Terri Sproul's Leaves" stamp set from SinCity Stamps.

It's the time of year where we give thanks.  And giving really pretty leaf cards to the people we are thankful for is so nice!  


I started by stamping my leaves on watercolor paper and heat embossing them.  I cut the paper to 4"x5.25" so they would mat well on a card base.

Next, I wet the paper by spraying it with water.  Then, I used watercolors to add light mottled color to the stamped paper.  I also added really fine glitter to the watercolors so the leaves would sparkle a little. Aren't they soooo pretty??  That is why I heat embossed the leaves first, so they would have a perfect outline and wouldn't get ruined by the water.

EXTREME CLOSE UP!!  I wanted you to see the glitter and the shine from the heat embossing.  LOVE THIS!

To finish, I wrote 2 sentiments on the bottom.  I wrote Blessings in colored pencil and Thank You in pen.  The very last thing I did was splatter some spray ink on the cards. (just because I love splatter!)
Wouldn't you love to give these to the people you are thankful for this year?  You see I have 3 more stamped leaf images left to add to my collection of cards.  I will be making them tonight for sure!  I already know who I'm giving them to!

I hope you enjoy making something for the people you are thankful for!!
xxDaniella


Sunday, February 8, 2015

TERRI SPROUL INSPIRED ART JOURNAL PAGE

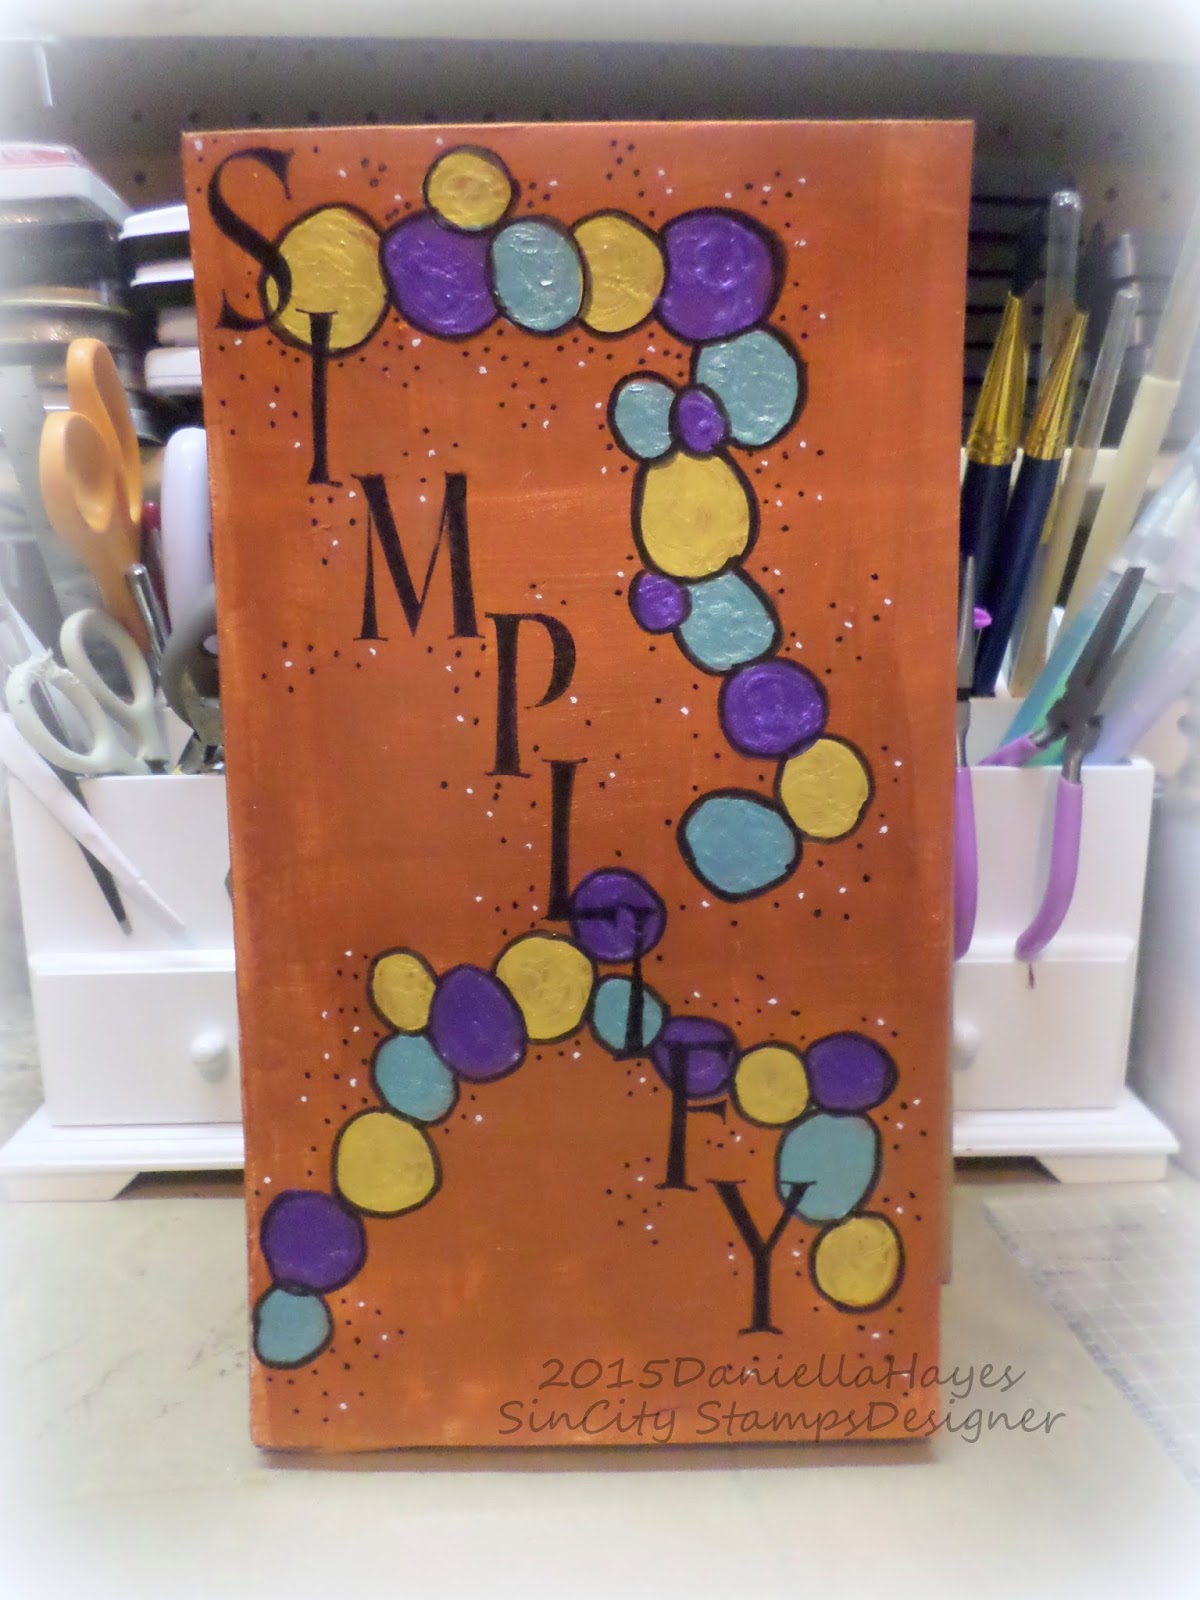
Hello!  I am sharing an art journal page today that I made for SinCity Stamps.  I follow along with Terri Sproul's Facebook group "All Things Terri Sproul", where she shares art journaling and mixed media art techniques.  Her first prompt in her new journal was her word for the year.  I too have a new journal and a word for the year so I decided to play along!  My word is SIMPLIFY.
Supplies:

I started by painting my background bronze and letting it dry.  I also got my other 3 paints ready for the next step.

Next I painted my circles. 


Then I outlined them with black marker.  I wasn't sure I liked how this was turning out at this point.


But when I added the stamps I LOVED it!!  A few little tiny dots of black and white filled it in perfect, I think!

Thanks so much for visiting!  I hope you check out SinCity Stamps and Terri's show!

What's YOUR word for the year?

xxDaniella

Sunday, January 25, 2015

HOOT OWLS AND WAVY SQUARE STENCILS

Hello!  I have a card to share with you today using SinCity Stamps ~ Stamps and Stencils.
Is he the cutest owl or what???
SUPPLIES:


Cut a piece of watercolor paper to 5.25"x4".  Mix paint with gesso and apply it to the paper with a palate knife.  Let dry.

Ink around the edges with Distress Ink.  Apply stencil on top of paper and spray with brown ink.  My paper was on an uneven surface so some of the ink dripped under the stencil but I love how it looked!

I love how some of the green is showing through the stencil, and some of the brown ink followed the stencil pattern!  I bet if I tried to do it again, I couldn't.  But I want to!!  I splattered some white and black paints on top.

Now,I cut out all my stamps *I know I stamped after I stenciled but you get the point I hope??* and I stamped right on the paper.  I used the branch, owl and the word Hoot.

To finish him I did some coloring and added white sprinkles to his eyes.  Last was the bow.

Thanks so much for visiting today!!  And be sure to try some of these SinCity Stamps products.  You will LOVE them!!
xxDaniella

Friday, December 12, 2014

Steampunk Tray

Hello! Peggy here to show you how I made my shadow box out of a serving tray. This month we partnered with Walnut Hollow Prooducts to showcase Siin City Stamps.

Products used today are
Acrylic paint brown/black/gold/silver
sandpaper
Metal tape
Chipboard lettering
Chipboard gears
Tim Holtz Chipboard clock
Gold Embossing powder
Cardstock
Patterned paper
Foil embellishments 
chain
Versa Mark ink
heat gun
Distress ink

I started by painting my box brown with a large brush in the same direction of the grain.
Second coat was watered down black acrylic paint appied with a cloth


This is my result. Next distress paints in gold and silver lightly appied to the edges and outside. Now for some sandpaper to further distress the edges.
I hand cut a butterfly by folding a piece of cardstock in half and cutting half of a wing leaving the center in tact. When opened I had a matching wing butterfly.

Next I cut small pieces of metal tape and applied it solely vertically and horizontally. Then I glued chipboard gears and lettering and covered with metal tape. I used the bottom of a paint brush to bernish all indentations. I also ran some black acrylic paint over the lettering and rubbed off creating shadows in the crevasses.

Below I stamped background journaling stamps from the Terri Sproul collection as well as some steampunk images. I also distressed the edges with distress stain.

I found the perfect spot to stamp the thee headed lady by Sin City Stamps. I also needed a steampunk airshiship and balloon which I stamped on black cardstock with Versa Mark ink and gold embossed using my heat gun.
One more stamp embellishment a steampunk pocket watch stamped with stazon ink on metal.

Put it all together with chains hanging from the ballon and on the handles. A few more metal gears on the outside and thats it!


I hope you enjoyed todays tutorial! Please stop by Walnut Hollow and Sin City Stamps for your crafting needs.

Sunday, December 7, 2014

TERRI SPROUL INSPIRED TECHNIQUE

I am sharing a Christmas Card I made for SinCity Stamps today.  I used a technique I learned from Terri Sproul's Tuesday night show.  She does a live "Art Journal" show every week and she shows us many techniques!  Click her link above to find out more.

She showed us the technique I used for this card several times but I never tried it until now.  It is awesome and I know it will be in my "favorite techniques" file for sure!
Supplies:
This technique is like reverse stenciling.
I took out my stencil, paint and baby wipes.  I loved the flourish of the fish's tail so I taped off the rest of the fish.  I painted my whole piece of paper and let it dry.  I put my stencil on top and used the baby wipes to wipe off the paint that was inside the stencil.


How cool is that???  I can't believe I didn't try it sooner!  The flourishes look like flowers, I think.  

I stamped the Merry Christmas directly on the reverse stenciled, dry, paper.  I love how crisp these stamps are!!

I also stamped the postal stamp on some patterned paper to add to the top right corner.
I matted the reverse stenciled and stamped paper and added a bow with a button.

I hope you try this technique.  If you do be sure to let Terri know, I'm sure she'd love to see!!  Check out her Art journal group, All Things Terri Sproul!


xxDaniella

Sunday, November 9, 2014

COLD PRESS BLOCKS

I love Cottonwood Arts Cold Press Art Journals.  I have 2 of the 6"x12" journals and use them all the time.  The pages are thick and you don't have to prime them.  They do not leak or bleed in the spine.  They are thick and perfect for mixed media art journaling.

So when I got my package from them (to use this month~they are our sponsor) filled with delicious 6"x6"  "Cold Press Blocks", I couldn't wait to dig in!

These blocks are "Cold press paper, laminated for stability".  These cold press blocks are "easy to use and give you the flexibility of a stiff board without the warpage of a normal cold press block."

I made 2 blocks. 

They were so fun to make!  It was true, I used gesso, spray ink, water, regular ink, stamps and paint and they didn't warp at all!  Amazing!  I might frame these and put them on my foyer table.  Or, I could add them to my art journal.  Taking several of these blocks and binding them into a journal would be a fabulous use for them.  There are so many possibilities!
SUPPLIES:
I also made a Snapguide tutorial for you.

Check out How to Make Mixed Media Cold Press Blocks by Daniella Hayes on Snapguide.

Thanks for visiting!  Make something AWESOME today!!
xxDaniella

Tuesday, April 15, 2014

Art Block by Pam Bray

I am totally hooked on these Artist Block using Sizzix XL Scoreboard and using it with my Fall Collection Stamp Set 2 made and amazing Art Block.
Start by cutting out two of the XL Scoreboard, stamping the "small dragonfly" using Black Ink.
Using your Tim Holt Distress Inks, distress over the top of the XL Scoreboard til you achieve the look you would like.
 Stamp lots of sunflowers and dragonflies on water color paper using a die black ink.
Color the sunflowers in using Tim Holtz Distress Markers
Repeat with your distress markers for the dragonflies...cut each of them out with scissors. Layer two dragonflies in the center so the wings will look like they are flying. 
The "Brick Wall" is Sin City Stamps Art Journaling with  Terri Sprouls 2. Layer sunflowers together with pop dots and the centers are made using Sage Flower Soft and Quick Dry Glue. Add them to your project when dry.
 For the top of the box I used wood letter journals along with just a tiny bit of French Country from Graphic 45, some metals and a few of the sunflowers and dragonflies I made earlier. Added a red sheer ribbon bow to finish the top off.
Here is the other side of the box using more of the wood letter pieces, sunflowers and dragonflies. My legs are recycled screws that were removed from an old cabinet....don't you love to re-purpose parts...lol. I hope you enjoyed my Art Block and please check out SinCity Store to check out my line of stamps along with other stamps, chipboard, die cuts, stencils, etc that are available. Hugs Pammejo
Supplies:
SinCity Stamps Pam Bray's Fall Collection 2
SinCity Stamps Art Journaling with Terri Sprouls 2
Sizzix/Eileen Hull XL Scoreboard Die
Graphic 45 French Country
Tim Holtz Distress Inks
Tim Holtz Distress Pens
Sage Flower Soft
Red Sheer Ribbon
Metal Knob
Black Ink
Stick Pins

Copyright Text

Blank Page Muse 2018 Sin City Stamps 2013