Showing posts with label Beacon. Show all posts

Monday, June 1, 2015

Tea Party Fun


Hi Chris here sharing this super cute tea cup!  Perfect to collect your favorite trinkets.  To create this project I started with the following supplies:

Sin City Stamps:   Alice  & Alice 2 
Ink: Tsukineko Memento Ink-Tuxedo Black
Tissue Paper
Beacon-Fast Finish Decoupage
Alcohol Markers - Copic Markers & Spectrum Noir (Colors listed by character)
Mad Hatter: Copic- E00, V01, V06, BG 45 Spectrum Noir DR 6, PP1, TN3, TN5, TN8
Alice: Copic E00, Y11, Y21, Y26, B21, B24
Rabbit: Copic Y11, B21, B24, Spectrum Noir RR3, DR6, TN3, TN5
Do Do Bird: Copic Y21, YR04,V01, B21
Cod Fish: Copic B21, B24, Y21, Y26, C5,  Spectrum Noir CG1, PP3


To create this project I started by stamping multiple images from the Alice and Alice 2 Stamps onto tissue paper.  (I stamped the hearts but did not end up using them for this project)

I then cut around each image and colored each image as stated above. 


 I FOUND THAT IT IS ESSENTIAL THAT YOU PLACE A PIECE OF PAPER UNDER THE TISSUE PAPER WHEN COLORING!  IF YOU DO NOT, THE MARKERS WILL BLEED OUTSIDE THE LINES OF YOUR STAMPED IMAGES! Here is the paper I used


I then tore a bunch of "filler" pieces of tissue paper .

I then started by applying a thin layer of the Beacon Fast Finish to the cup and then over the stamped image. I proceeded to add the other images around the cup.  I added the torn pieces to fill in the spaces.  After I was finished, I re-coated the entire cuo with the Fast Finish again.  


I hope you enjoyed this project!


Monday, March 30, 2015

Love Card - Stamping on Vellum

Hello stampers!   I'm so glad you stopped by today, because I want to share a technique known as Pergamano, or parchment craft.  So, what is Pergamano.  Wikipedia says:
Parchment Craft, also known as Pergamano, is the art of embellishing and decorating parchment paper (or vellum paper) through the use of techniques such as: embossing, perforating, stippling, cutting and coloring.
When I first began learning the fine art of Pergamano, each image was first traced onto vellum using a dip ink pen and white ink before the embossing began.  This was, as you might imagine, very tedious, to say the least.  Of course, I sometimes love tedious, but don't always have the luxury of that much time.  So, I am going to show you a shortcut using rubber stamps.  The effect is elegant and unique!


Supplies used:

Sin City Stamps Angel Art stamp set
Ink Pads: StazOn Opaque Cotton White; Versamark
Vellum (medium weight)
Embossing Tool (stylus)
Detail white embossing powder
Heat tool
Dies: Spellbinders; Momenta
Pearl stickers
Pink ribbon

Directions:

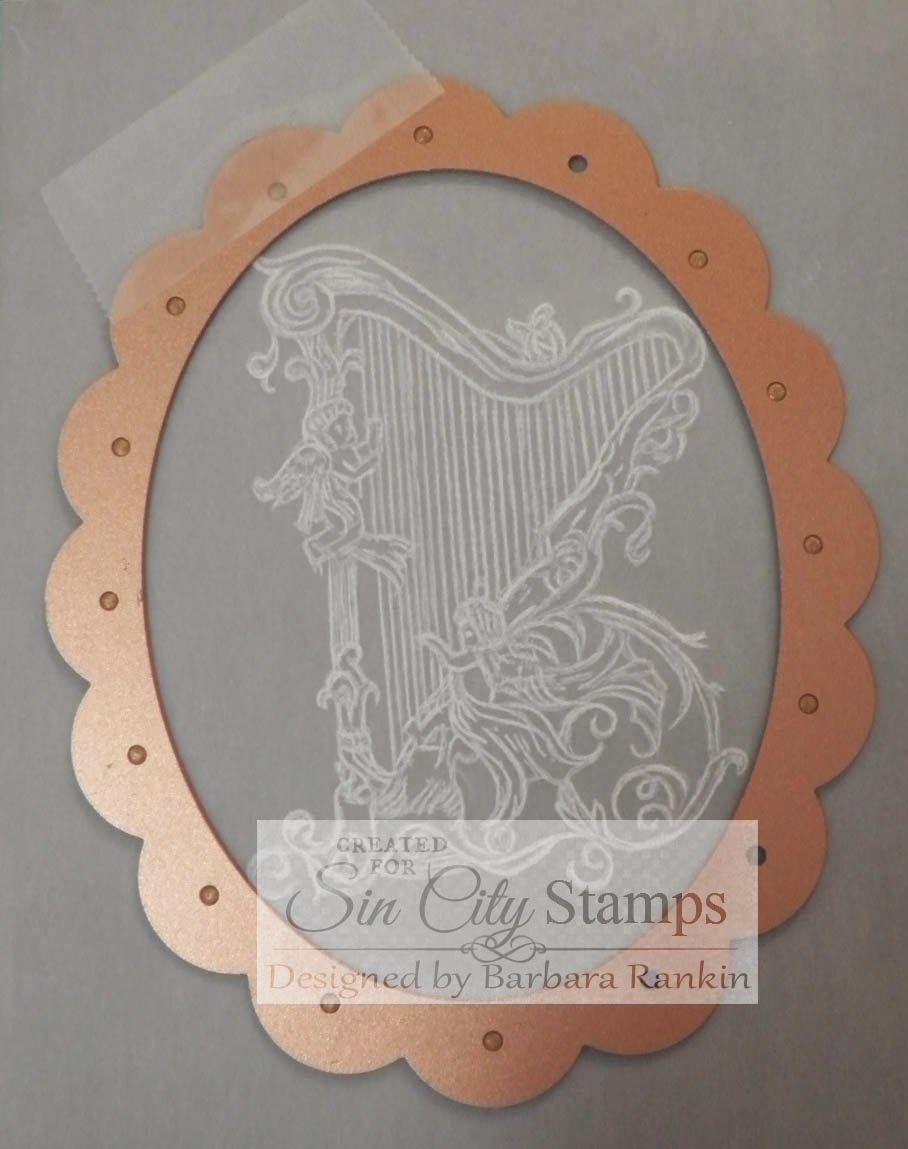
Stamp large harp onto vellum with white StazOn.  Let dry.  
Using an embossing tool with a small ball tip, dry emboss the reverse side of the harp image to raise the stamped lines and whiten the vellum even more.
Now, of course, you can skip the embossing with a stylus part and go right for the quick technique, which is to stamp the image with white pigment ink and heat emboss with detail white embossing powder.   It may not show well in the photo, but the biggest difference is that the embossing powder leaves a shine.  
However, if you are a purist, you may want to try the Pergamano technique.  It is quite therapeutic and can be done while watching TV, or waiting to pick up the kids.  I really enjoy hand embossing my vellum when I have the time.  

No matter which way you prepare your image, the next step is to cut out the harp image with the lacy oval die, which fits quite nicely inside the pink decorative oval die cut (shown below).
Stamp and heat emboss "LOVE" onto scrap of pink card stock with Versamark ink and white embossing powder.  Trim with label die.
Die cut a second lacy oval from brown print card stock, and a decorative oval from pink card stock.  Here are the pieces you will have for your card front.
Adhere brown print die cut to the back of the vellum.  Vellum needs a strong color beneath it to show off the image.  This is a good time to use those really bright colors of card stock that you may have wondered, "What was I thinking?"  
The trick to adhering vellum to anything without the adhesive showing is to either add the adhesive beneath a part that will be hidden, or in this case, apply the adhesive over the entire piece of vellum.  I used my Xyron for this.

To put the card together, I cut brown card stock to 10" x 7" to make a side-folded 5"x7" card base.  I then cut another piece of the brown print paper to slightly smaller than the card front, roughly distressing the edges, and adhered that to the card.  I love the shabby chic with elegant look.

Adhere the pink die cut, then use foam dots to raise the harp image.  Add some brown distress ink to the edges of the "LOVE" tag and adhere with foam dots.  

Make a double loop bow with pink seam binding ribbon and adhere to the card with Beacon 3-in-1 glue.  Add pearl stickers around the oval for added elegance.
There you have it, a beautiful card that looks like you spent many, many hours making, but with the help of rubber stamps, you cut your time in half.

I hope I have inspired you today with my Pergamano approach to stamping, or simply stamping an image onto vellum for an easy, beautiful card!

Be sure to like us on Facebook, and stop by the shop to see the beautiful stamps and supplies that Sin City Stamps has to offer.  

Thanks for stopping by, and have a crafty week!

Barbara

Wednesday, March 25, 2015

Mixed Media Madness!!


Hello All Lanette Here!

Today I am going to share a mixed media collage, My first one ever!!!

Lets start by taking a look at my canvas, then I will show you how I made it :)


Sin City Supplies Used: Rosette Hearts & Dress forms plates of Rubber.
(Plus a bit of trimmings from a plate I'll show you the trick later)

Other Supplies Used: Beacon 527, Quick Grip & 3 -in-1 Adhesives, Liny Stamp Gang Mists. Inka Gold Rub, Prima Glitter & Beads. LOTS of  Chipboard & random trinkets from my stash.

Now lets look at my process......

I started by building my canvas by gluing random chipboard pieces, metal trinkets and buttons to an old canvas.


After my glue was dry I covered everything with 2 coats of gesso.(That's why I was able to reuse a canvas I had given up on.)
 

While my gesso was drying I took some time to mount my stamps. and I had a fun idea! 


Finally it was time to start laying down some color!!!


Next I went back and added a bit of gesso
and Inka Gold to highlight some pieces.
 
 
After that layer was dry, it was time to add a bit of
stamping, glitter, trinkets and beads to finish of my canvas,
 
 
 Which brings us back to......


I may still go back and add a quote but for now I'm pretty happy with my canvas.
I've been wanting to try this technique forever :)

Now just a few details just for fun!


Here you can see the extra detail 
the random stamping adds to my project.


Thank you so much for stopping by today!

I hope that I have inspired you to have some inky fun of your own!


Remember to like us on Facebook and stop by the store for all your stamping needs!!

As always feel free to stop by my blog Stacks of Scraps anytime!


Wednesday, March 11, 2015

A Magical Thank You!


Hello All Lanette Here!

Today I am going to share a bright little thank you  card that I made for a dear friend , she just loves all magical things.

Plus it was a great reason to get a little ink on my hands :)

Lets start by taking a look at my finished card, then I will show you how I made it :)


Sin City Supplies Used: Knock on Wood ,  Rosette Hearts & Anime Fairies 2 Plates of Rubber and Stencil #437

Other Supplies Used: Dylusions Mist. Prima Flowers, Ranger Ribbon & Glossy Accents, Art Anthology Sorbet & Dimensional Paint and Faber Castall PITT Marker

Now lets look at my process......

I started by building my base using one of the Knock on Wood background stamps.


I continued building my background by adding lots of amazing color using a mix of Dylusions sprays.


I even added a bit more to the background using this fun Sin City Stencil. 


And for a bit of Sparkle I added a bit of Art Anthology Sorbet through Stencil #437


Next I stamped my sweet little Dragon. (Using waterproof ink) 

Isn't she so cute you can find her on  Anime Fairies 2 Plate.


After a bit of color I used a PITT marker to out my dragon, 
this little trick makes it so much easier to fussy cut.


After misting a few flowers and a bit or ribbon it was time to 
bring my pieces together using Beacons 3-in-1 glue. 


Which brings us to :


And a little Thank You from the Rosette Hearts Collection.


Thank you so much for stopping by today!

I hope that I have inspired you to have some inky fun of your own!


Remember to like us on Facebook and stop by the store for all your stamping needs!!

As always feel free to stop by my blog Stacks of Scraps anytime!

Friday, February 20, 2015

Save The Date.. Card wth Tamiko


Happy Friday!!  Today's post is a Save The Date- card I created for my baby brother Ian and fiance Jean, for their upcoming wedding on June 14th, 2015, hence the VI- XIV- XV.   I have the Clockworks Inspired by Terri Sproul Rubber Plate and I was convinced that my first post using this stamp set WOULD NOT be a CLOCK as it is perfectly geared for.  
::chuckles at pun::  Well here is the card.


Below is a picture of the supplies used to create the card front. 
  • Sin City Stamps- Clockworks Inspired by Terri Sproul & Pattern 2 Stencil by Terri Sproul
  • Liquitex Matte Medium
  • Deco Art- Media Line Titanium White Fluid Acrylic and White Gesso
  • Deco Art- Americana Multi-Surface Satin- Canary, Flamingo, Iris, Deep Turquoise
  • Strathsmore 400 Series Mixed Media Paper (not seen)
  • Stazon Ink Pad-  Gothic Purple
  • Beacon 3 in  1 Adhesive
  • Stabilo ALL pencil in black
  • Misc. - brayer, paint brush, baby wipes and Tim Holtz Tissue paper (from stash not seen)


I started out with a piece of mixed media paper and some small pieces of Tim Holtz's  tissue paper.  I planned to put that on the page with the matte medium.


I then wrote some things I wished for my brother and his wife to be.  I picked this up from a great artist name Amanda Trought of Reality Arts.  To me it's almost like praying or wishing positive thoughts into the piece.. or in this case.. this milestone event.  I wish them love, patience, honesty and understanding.  I wish them so much more, but at the time, these things came to mind first.  I chose the stabilo all pencil because it is water soluble. so this will smear and fade and no longer be visible as my layers build. (smile)  But you and I know it's there.. :)  Next to it is how the page looks once I apply a little watered down gesso.  See message is gone.. but NOT forgotten.. :)


Then I began to brayer small amounts of acrylics in layers, first the canary and deep turquoise.  I dried it and added a bit of gesso because of what I wanted to be able to do with my next layer of acrylics.. this flamingo and iris that I brayered on.  Not a cute stage.. but it looks like I want it to!!


After that layers was down.. I took my Pattern 2 Stencil by Terri Sproul and a baby wipe and  rubbed  some of my layered paint off. (smiles)  A while ago I would have thought I was wasting paint, but when I think about how much I actually used, to achieve the yumminess I am about to disclose...  It's SOOO WORTH IT!!  (smile)


Then I took my Purple Gothic Stazon ink pad and inked my stamp from the Clockworks Inspired by Terri Sproul Rubber Plate .  I gently placed even pressure on the acrylic block after deciding placement of the images.  


After my images were all placed and the card and my edges were all lightly inked.  I decided to use that Beacon 3 in 1 Adhesive and check it out!  Thanks again BEACON!!


The last thing I did after mounting the card front to the card base was a few quick splatters with my small round paint brush, a drop of fluid acrylic and a drop of water.  That ties in my base card with my front image.


Well I hope you like this tutorial along with a show and tell of my brothers save the date wedding card.  Don''t forget when you are shopping for stamps and supplies, you should ALWAYS have an all occasions type set that allows you to be prepared to CREATE with LOVE for those YOU LOVE.  


You CAN do that shopping at SIN CITY STAMPS!  

Copyright Text

Blank Page Muse 2018 Sin City Stamps 2013