Showing posts with label shrink plastic. Show all posts

Sunday, December 22, 2019

Mermaid Mini Christmas Tree Ornament

Hello!  Susie on the blog today with a mermaid themed mini Christmas tree ornament.

I am a fan of mini Christmas trees and shrink plastic is the perfect way to create homemade ornaments for them!  I also like Christmas trees with themes, and since I grew up near the beach and love scuba diving and the ocean, it really is no surprise that I reached for a mermaid stamp, is it?

Time to play...


Supplies:
The Femmes Mermaid Ocean Scene Large Rubber Stamp
Shrink Plastic
Archival Ink, black
Stamping platform
Sharpie markers
Crop A Dile
Beads
Jute

Directions:
  • Stamp image onto shrink plastic using permanent black ink.
  • Use permanent markers to color on the reverse side of the image. (I used Sharpies - so many colors and you can buy them everywhere!) 
  • Punch holes as desired and then bake according to the manufacturer's instructions. 
  • Add sparkle and texture with beads and a tassel. 

What kind of a themed tree do you want to create?  Your stamps probably reflect your interests - I think I feel a cat ornament coming on...

Thanks for stopping by and I hope you find some time to play today!
Susie

Looking for more inspiration?
Click the links below!

Sunday, October 6, 2019

Celebrate Mad Hatter Day with Blank Page Muse

Hello!  Susie on the blog today and we are celebrating Mad Hatter Day!

In the realm of Weird & Wonderful (our theme for the month!) there are none weirder or more wonderful than the characters found in the pages of Lewis Carroll's classic, Alice in WonderlandMad Hatter Day is celebrated on October 6th because the original illustration shows the character with a paper marked 10/6 in his hat (actually referring to the cost of the hat - 10 shillings and 6 pence).  The stamp from Blank Page Muse does not actually include this detail but I decided to add it when I created a shrink plastic charm for my bracelet.

Time to play...
Supplies:
Alice in Wonderland Characters Rubber Stamp Sheet Set 2
Archival ink, black
Stamping platform
Shrink plastic - I used Shrinky Dink for this project
Crop A Dile hole punch
Walnut Hollow Oil Color Pencils
Oven
Micron Pens
Traditions - Instant Gratification Bracelet and "We're All Mad Here" Focal Pendant
Split Rings

Directions:
  • Stamp image on shrink plastic with black Archival ink and allow to dry.
  • Color image on reverse side with oil colored pencils.
  • Trim out image with scissors.
  • Punch hole for hanging charm.
  • Optional:  Use Micron Pen on front of shrink plastic to add in 10/6 on hat.
  • Bake/shrink according to manufacturer's directions.


  • Add charm to bracelet with split rings.


FYI:  Here's a size comparison of the stamp and the finished charm.


Blank Page Muse actually has 2 sets of stamps with lots of the characters we know and love. Check them out and use this quick and easy idea to add a weird & wonderful character to your jewelry collection!

Thanks for stopping by and I hope you find some time to play today!
Susie

Looking for more inspiration?
Click the links below!


Tuesday, September 3, 2019

DIY Halloween Wine Glass Charms

Hello!  Susie on the blog today and I am pulling out the shrink plastic again!

Time to create some DIY Wine Glass Charms!  This is a fast and easy project and if you are like me you will probably spend more time choosing which stamps and beads to use than actually crafting!

Time to play...


Supplies:
Halloween Takes Flight Rubber Stamp Set
Halloween Bingo Rubber Stamp Set
Shrink Plastic (I used Shrinky Dink brand)
Walnut Hollow Colored Pencils
Archival Ink - Black
Colored pencils
Hoop earrings
Split rings
Beads
Heat Gun
Scissors
Crop A Dile
Pliers
Stamping platform
Craft mat

Directions 
Select desired Halloween themed stamps and position them in a stamping platform.
Stamp the images onto shrink plastic with Archival black ink.
When the ink is dry trim out the shapes and punch holes as desired.


Color images on the reverse side of the shrink plastic with colored pencils (or whatever is recommended by your shrink plastic).
Shrink using  a heat gun on a craft mat.


Thread split ring onto each charm and add to hoop earrings with beads.


Option:  Create charms without adding any color.


The holiday party season is just getting started and these would make really cute hostess gifts.  I am already planning some for Thanksgiving and Christmas!

Thanks for stopping by and I hope you find some time to play today!
Susie


Looking for more inspiration?
Click the links below!


Sunday, April 9, 2017

Get Book Marked......

Hi Everyone!


How did you all enjoy the "Sugar Skull" Blog Hop we had in March - lots of fun????? I loved creating with Michelle's Day of the Dead Sugar Skulls Stamp Set so I decided to play around with them some more and I made these colorful bookmarks to share with you today!!


Supplies List:
  • Sin City Stamp Set Day of the Dead Sugar Skulls
  • White paper or cardstock
  • Black Cardstock
  • Ink Sprays in colors of your choice
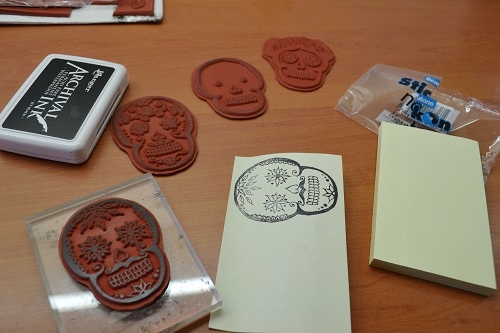
  • Black Archival ink & Black Stazon ink
  • Sticky Note Pad (big enough to stamp sugar Skulls) for masking
  • Colored string or raffia
  • Shrink Plastic
  • Colored Pencils
  • Heat gun & heatproof tray
  • General supplies: scissors, ruler, guillotine, double sided tape, glue, hole punch

Instructions:


1. Firstly you need to cut your white paper or card into strips for stamping on (you can leave as a whole sheet - ink spray and then cut to size - totally up to you!) You can cut any size you like - these are cut at 6cm width by 21cm in length which allows for 3 of the "skull" stamps overlapping. An alternative is to make your bookmarks shorter and just use 2 of the skulls!


2. Grab your ink sprays - any colors - remembering that lighter colors work best as they allow your stamped image to show clearly. You can mop up any excess spray with paper towel (the mop up paper towel makes for great backgrounds for other projects!!) Set these aside to dry while you work on the next step!


3. As you can see on the finished bookmarks the stamping of the skulls is overlapped so we need to make up some masks. Stamp skulls onto sticky note pad sheets and cut out - LOL remember to stamp part of your image onto the sticky part of the piece so it actually sticks to your project when masking!!!


4. When your ink sprayed pieces are dry you can start stamping!! Stamp one image in the middle of the strip and cover with the "mask" and then stamp skulls above and then below. I like things running off the page and at different angles for more interest!


5. Cut your black card slightly larger than your inked and stamped strips and adhere with double sided tape or a glue stick and punch a hole in the middle at the top of the book mark.


6. Now you can just add colored raffia or string to the tops of these bookmarks and call them finished but I still wanted to play with the stamps so I made some shrink plastic "additions" to add and what fun it was!!! Use black Stazon to stamp your shrink plastic (I had a small piece of clear plastic and also white - you can use whatever you have on hand - mine is years old but still shrinks perfectly!!)

Color images with colored pencils and cut out - remember to use your hole punch to punch a hole at the top so it can be threaded through after you have "shrunk" it!
Use your heat gun and a heat proof tray to shrink the plastic - shrinks to under half the original size.


7. Thread the colored raffia through the shrink plastic skulls and attached to the tops of the bookmarks, tie bows to finish them all off!
Now you have some bright and sweet sugar skull bookmarks!


Thanks for joining me today!!


And before I go here are some handy links for you!!
Sin City Stamps Store - where you can grab all your fav stamps!!!
Sin City Stamps Fan Group at Facebook - where we all can share our creations!!!
And of course here at The Blog where the DT share all their amazing creations!!!

Happy Stamping!

Sharon


Copyright Text

Blank Page Muse 2018 Sin City Stamps 2013