Showing posts with label greeting cards. Show all posts

Wednesday, October 18, 2023

Easy Colourful Birthday Cards!

 Hi Stamping Fans!

Hope you have all been enjoying the creations this month! the DT have made some great projects for your inspiration!

Today I have some cards inspired by an online art journal class I did last month.


I've used Lindy's magicals to create the shiny coloured strips on the cards.

Here are the supplies I used and links to them in store:
Butterfly Breezes Clear Stamp Set
Numbers & Flowers Half Sheet Set


These cards are really easy! Cut some strips of watercolor paper and use whatever you have on hand to color them - I used Lindy's Magicals - you could use watercolors, any ink sprays you have - delve into your stash!
Once dry stencil with black paint - lots of stencils in store you can use for this step! I used the "dots" from the Numbers & Flowers half set to add a few spots of black to the coloured strips.
Stamp your images on watercolor paper and color with Lindy's Magicals or whatever you used for your strips then fussy cut.
Add some white outlines and paint splatters along with your stamped images and your cards are done!


Thanks for joining me today - make sure you pop back regularly to see what the rest of the DT are creating!

Pop over to MY BLOG to get more info!

Happy stamping!

Sharon

***Remember to us the code BPMSharon at the store for 15% off ***
So many fab stamps to choose from!
Note: you can use the code at either the IBFS Store OR the BPM Store - why not do an order from each and increase your stash!

And visit our social media sites for more stamping fun!
I Brake For Stamps -https://ibrakeforstamps.com/ 

Friday, May 24, 2019

Old Fashioned Love

Hello BPM Fans! Mercy here with a blast from the past of sorts.  As a fan of all things vintage, this project really was something that allowed me to use Victorian inspiration (and my stash!) to create a card for Mother's Day.


Supplies:
4 Small Red Roses
Black Pigment Ink
Black Embossing Powder
Page Corner Rounder punch
Alcohol Ink Pens in green, purple, orange, & red
Tim Holtz Alterations Sizzix 3D Impresslits -Scallop
Yellow Dylusions Spray Ink
Red Glossy card stock
Velum with decorative star bursts
Purple A6 Greeting Card blank
White Cardstock postcard (4.5" X 6.5")

Instructions:
1. Stamp the corner curvy flower stamp, centered on the top of the card (right up against the edge) with pigment ink, corner pointing up.  Rotate the card 180 degrees, add a corresponding corner stamp facing the first stamped one like a mirror, placing that one centered up against the edge of the card.


 2. Stamp the "Love" stamp with the pigment ink in the center.


3. Pour black embossing powder across the card and heat emboss.


4. Spray a few spritzes of the Dylusions Yellow ink across the card. Leave some of the white cardstock showing.


5.  On either scrap paper or on other white cardstock, stamp and emboss in black embossing powers a few more "Love" stamps.  Color those in red and one in purple.  Fussy cut each letter out from the scrap ones.


6. Color the rest of the flowers/vines. Glue roses to be just above and below the "Love" stamp in a square (in my case, I ended up spray dying white roses I had to red). Using foam tape, layer the letters over the base "Love" to add more dimension.


7. Using the Tim Holtz 3d Impresslits border, emboss four strips of the glossy red card stock.  Cut those down to wrap around the postcard base. Glue them to create a border around the stamped image.


8. Mount a 5X7 cut of the velum to the card base.  Once that is mounted, use foam tape to glue down to the velum card, centered.  Use a page rounder to trim the edges.


9. Add a note or greeting to the inside of the card. 

This project is definitely themed to fit for a variety of holidays and reasons to create.  Changing out the messaging on the inside of the card is key towards versatility.


More ideas & crafts by Mercy

Want an extra 15% off on your next order? Use this code on your order! Good until June 1, 2019. BPMDtMercy2019

Sunday, May 19, 2019

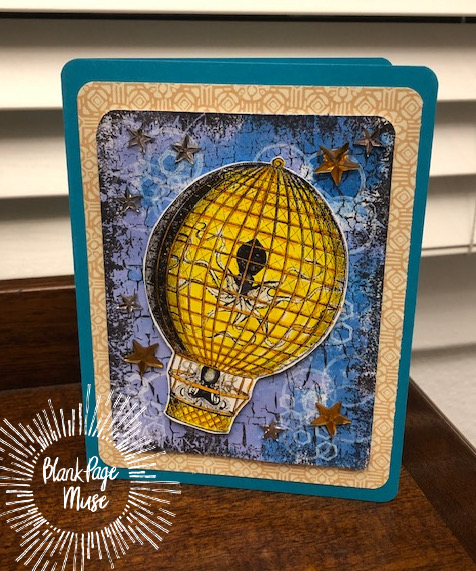
Octopus AWAY!


 Are you looking for a fun, masculine card to create for a special someone?  This easy Steampunk themed greeting card is great for Father's Day or any day you want to surprise someone, or warn them of the impending octopus apocalypse (just kidding!).


Supplies:
Crackle Background Stamp
Small Cluster GeoMetric Stamp and Interlocking Circles from this set
Octopus Airship Stamp from this set
Black archival ink
White Pigment Ink
Various Scrap pieces of cardstock in white, purple-blue, blue-green,and yellow decorative patterned paper (in the example it was a Graphic45.
Adhesive
Foam Double-sided Tape
Small Star Embellishments
Scissors

Instructions:

Create the card base from the blue green paper.  This one is a standard 5X7 sized card.  Cut the decorative paper about 1/8" smaller than 5"X7" and cut the purple-blue card stock another 1/8th" smaller than that one.  Using the black archival ink, stamp the crackle background first, then stamp the joined circles and the geometric cluster stamps randomly using the white pigment ink.


Stamp the Octopus Airship on the white card stock with the archival black ink.  Allow to dry and color in with your choice of medium (watercolor pens, oxides, pencils, etc).  Fussy cut out.


Layer the cards, adhering the patterned paper to the base card, then glue the decorative stamped blue card to the patterned paper (all should be centered).  Attach the fussy cut image using foam tape at a slight angle.  Add some star embellishments and you are done.

All ready to float away into an envelope.


More ideas & crafts by Mercy

Want an extra 15% off on your next order? Use this code on your order! Good until June 1, 2019. BPMDtMercy2019


Copyright Text

Blank Page Muse 2018 Sin City Stamps 2013