Monday, May 27, 2019

Bookmark From Snippets


If you often find yourself with leftover snippets of card, why not turn them into fun bookmarks? That's what Charlotte did here, using the Background Roses stamp and some quick alcohol marker colouring. Round the corners, punch a hole and add some twine, and you have a bookmark ready to go!


Looking for more Inspiration?

Click the links below!


Dad's Car

Hello! Getting ready for Father’s Day and it is hard to find really good dad-themed stamps but at Blank Page Muse there are all kinds of great stamps to create items for dad! Check it out at https://blankpagemuse.com

Today, I wanted to do a quick and really fun project for Dad or any man in your life. It is sometimes hard to find great stamps to create cards and other items for the men in our homes and this card is a great example of something that can be created and given to that special guy!


Supplies -
Classic Car  
Ranger Archival Inkpad Jet Black
Washi Tape
Kraft card and matching envelope
White cardstock
Black embossing powder
Heat tool

Stamp the Classic Car and Dad Word Art onto white cardstock at heat embossing with black embossing powder, cut out and set aside.


Stamp the tread from the Background Grunge stamp set along the front of the card horizontally and heat embossing with black embossing powder.  Stamps the Tread stamp vertically along the left edge on the front of the envelope. Set aside envelope.

Use some washi tape, line each side of the tread with tape. Next, using foam take add the Classic Car and Dad Word Art to the front of the card. 

Finished card and envelope -


The Blank Page Muse- https://blankpagemuse.com/


Sunday, May 26, 2019

Ombre Butterflies

     Hello, everyone! Samantha here and today I'm going to be sharing a quick and pretty card with you. I'm tired of winter and so I've been making lots of spring themed cards as of late.

(Be certain to use code BPMDtSamantha2019 to save 15% off your next order!)


     For this card I used one of the sentiments as well as the butterflies from the Dandelion Wishes with Butterflies Art Rubber Stamp Sheet by Terri Sproul. This is such a gorgeous stamp set and I highly recommend it.

     I stamped the butterflies in shades of blue (darkest on the lower portion and getting lighter as I moved up the panel) and heat embossed the sentiment onto a strip of vellum.

     To finish I added three small gems.


     I hope that you like my card and that it inspires you to make one yourself. Have a beautiful day!

     Until next time,
     Samantha


Looking for more inspiration?
Click the links below!

The Blank Page Muse Shop

Facebook Fan Page

Instagram- Shop

Instagram- Blog

Twitter

Pinterest

Steampunk Art

Hello, I have been busy playing with that Ultra Tick Embossing Enamel(UTEE) again. This time I printed directly in it with the rubber stamp. Look at the results! Truly amazing!


Now it's time to show you how I made this:

Blank Page Muse Stamp used is: Cogs & Gears Steampunk Background Rubber Stamp


Other supplies used are:
  • Black UTEE
  • Pebeo Patinating Wax - King Gold
  • black and silver cardstock
  • Golden Heavy Gel


Begin by melting the UTEE. While that is melting, completely cover your rubber stamp with VersaMark Watermark Ink. This will prevent the UTEE from sticking to the stamp so it is very important that you cover it properly!


Pour the melted UTEE on a heat proof, non stick craft mat and immediately press your rubber stamp in it.


Remove the stamp and allow to cool.


Now color it any way you choose. I used Pebeo Patinating Wax in King Gold. Other options would be metallic paint, Gelatos or Distress Crayons. Anything that is very pigmented would do.


Mount it on cardstock using Golden Heavy Gel.


Your are done! Look at that beautiful masterpiece!


Thank you so much for stopping by. I do hope you enjoyed this tutorial. Remember to subscribe so you don't miss a post and look us up on social media (links below).

Happy crafting!
Suzette


Instagram Blog-  https://www.instagram.com/blankpagemuseblog/
Twitter-  https://twitter.com/BlankPageMuse
Pintrest- https://www.pinterest.com/blankpagemuse/boards/


Saturday, May 25, 2019

Octopus on Your Face Postcard

Check out this colorful and quick hot glue resist postcard from Stephanie!
 It's bright and beautiful! 
Let's see how she made this quick and easy card!


Octopus on Your Face Postcard

Blank Page Muse Stamps Used:

Other Products used:
Pigment Powders
Spray Bottle
Glue Gun
Glue Sticks
Archival Ink Pad
White paint pen


 She added a few drops of glue on her blank post card and let it dry.


She sprinkled a few various colored pigment powders onto the card.


Next, she spritzed with water, tilted and moved the paper around.


Allow the colors to mingle and mix.


Ink and stamp the BPM  Octopus with the Top Hat in the lower right corner.


She finished the piece with a handwritten quote. Don't you just love the highly detailed octopus peeking out from the watery background?


Follow the links below to see more Blank Page Muse goodness!


More projects by Stephanie

Inspiring Creativity Mixed Media Art Journal Pages

Hello all

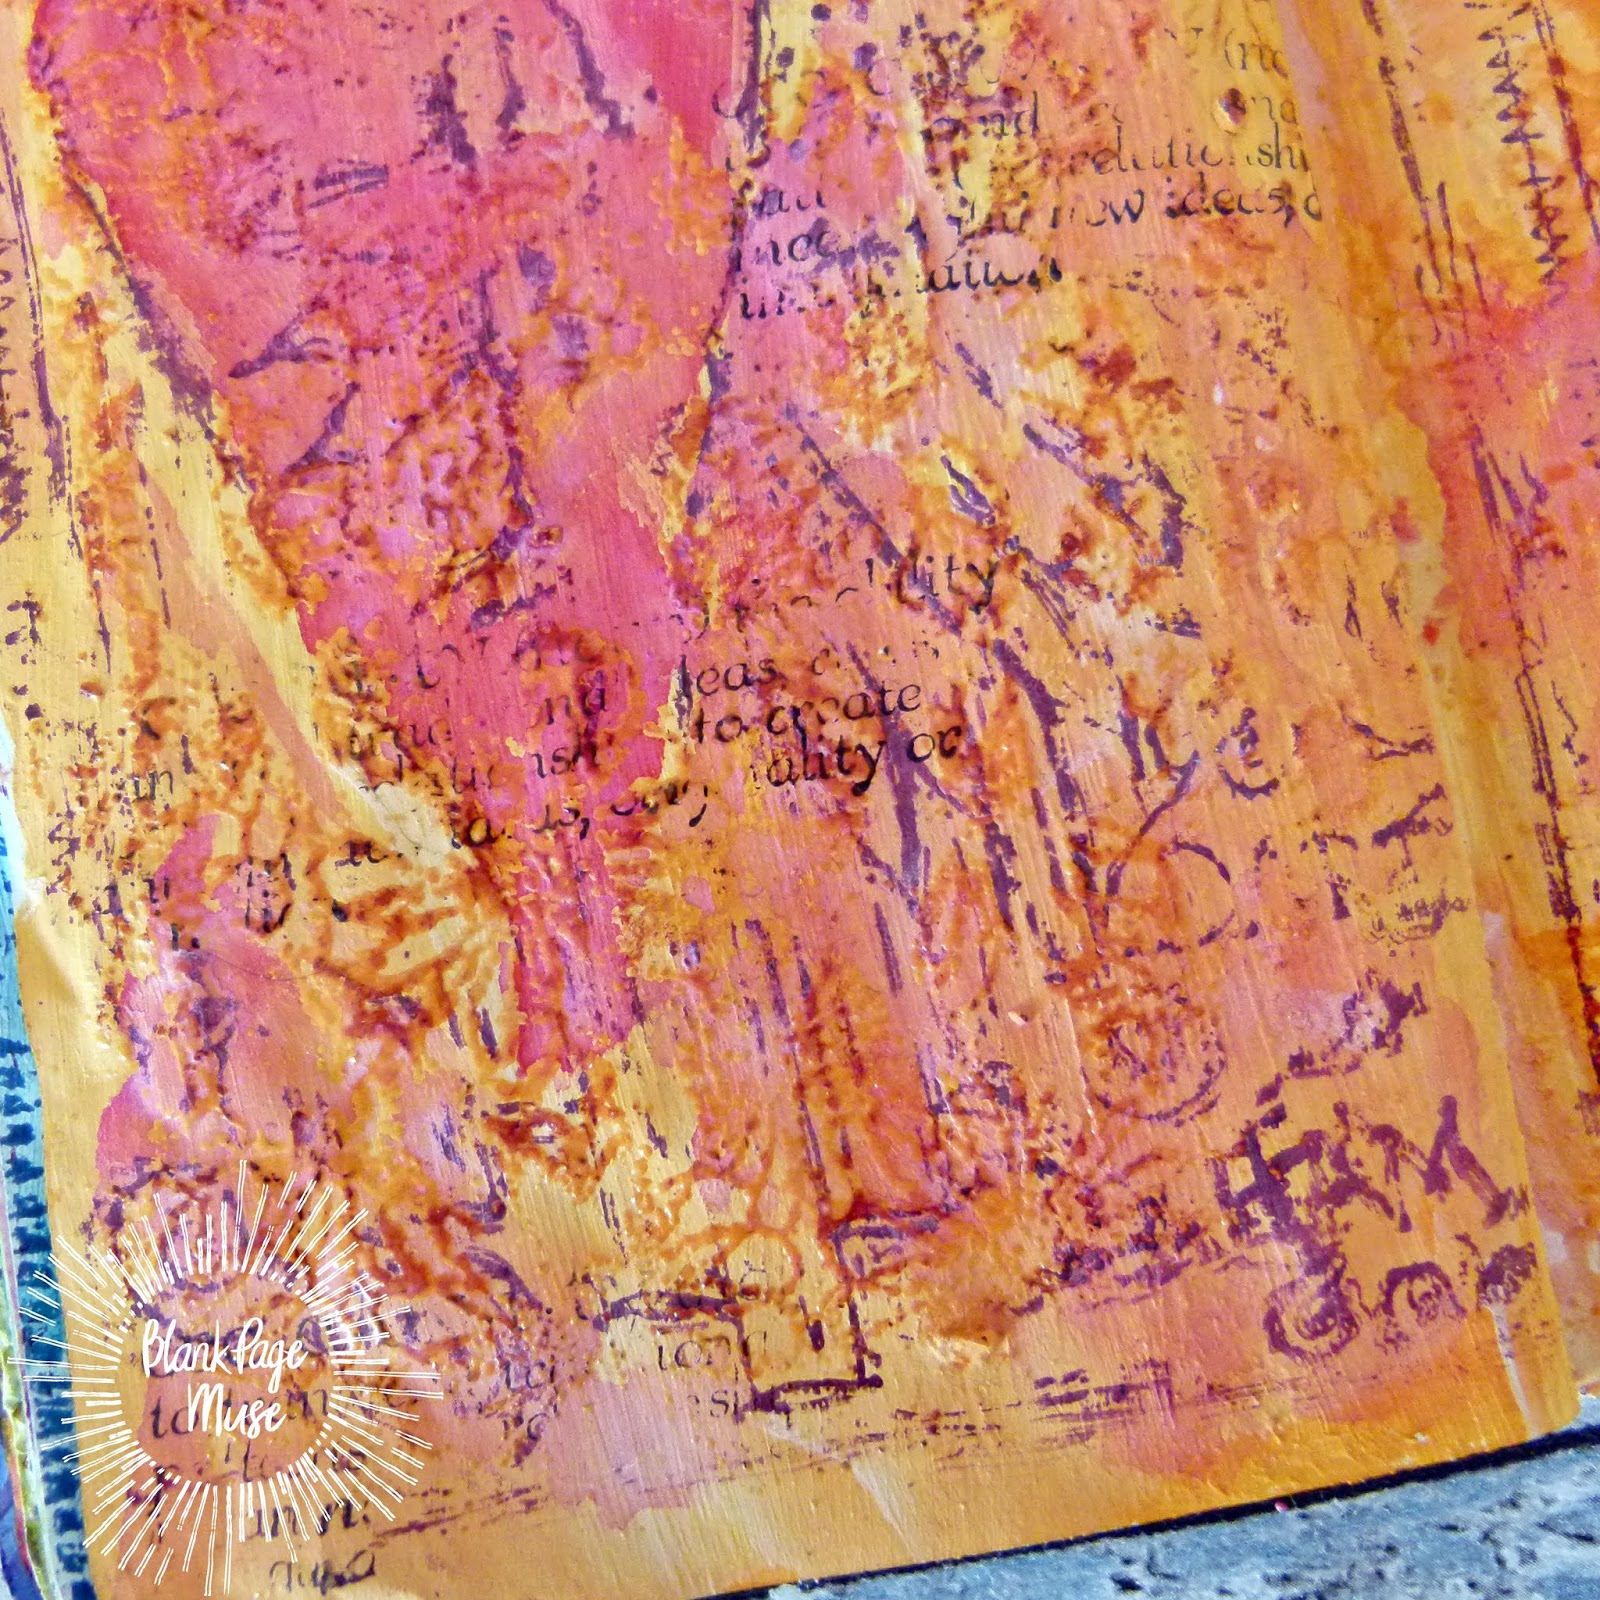
I am back with a quick idea using the one of the new stamps released this month. This gorgeous background stamp is called Dare to Dream and i also used the Scribble Daisy Background stamp both of these are available in May's releases. 


Paint the pages with gesso to stop the paint bleeding through to the page.
Paint the pages with a pale yellow acrylic Then allow to slightly dry before adding a light orange acrylic paint over the top.
Blend the colours a little before drying off fully.

Stamp the Scribble Daisy Collage Background stamp over the pages in embossing ink. 

The background does not have to come out perfect and it adds to the grungy look.

Sprinkle on orange embossing powder and once it has melted, allow to fully set before adding the Dare to Dream stamp.


Colour in sections with watercolour paints and once dry, take the Creativity word stamp and randomly stamp bits of it onto the pages. Finish off the page by adding a few sentiments.


Thank you for visiting

Products used 
The Blank Page Muse Dare to Dream Background Stamp
The Blank Page Muse  Scribble Daisy Background Stamp
Emerald Creek Crafts Baked Velvet Saharah 
DecoArt Acrylic Paint Buttermilk
DecoArt Acrylic Paint Tangerine 

Friday, May 24, 2019

Swirly Rose Card

Use an ombre ink pad to ink this beautiful background of swirly roses to create a quick card with minimal effort but maximum effect.


 The roses are easy to fussy cut and mount along the bottom edge with foam tape.  


For the final touch, use green velvet ribbon to easily create the stems. 


BPM Stamps:

Background Roses 4"x 5" Red Rubber Stamp by Pam Bray
Background Grunge Art Rubber Stamp Sheet designed by Pam Bray

(Shop now and save! Use code BPMDtKaren2019 to save %15 off your total order!)

Other Supplies:
ink pad (ombre & black)
ink blending tool
clear mounting block
card base (5x7")
green ribbon
foam tape


The Blank Page Muse- https://blankpagemuse.com/
Facebook Fan Page- https://www.facebook.com/groups/blankpagemuse/
Instagram Shop- https://www.instagram.com/blankpagemuse/
Instagram Blog- https://www.instagram.com/blankpagemuseblog/
Twitter- https://twitter.com/BlankPageMuse
Pinterest- https://www.pinterest.com/blankpagemuse/boards/

To see more projects by our designer Karen, please visit her blog Art & Soul.

Old Fashioned Love

Hello BPM Fans! Mercy here with a blast from the past of sorts.  As a fan of all things vintage, this project really was something that allowed me to use Victorian inspiration (and my stash!) to create a card for Mother's Day.


Supplies:
4 Small Red Roses
Black Pigment Ink
Black Embossing Powder
Page Corner Rounder punch
Alcohol Ink Pens in green, purple, orange, & red
Tim Holtz Alterations Sizzix 3D Impresslits -Scallop
Yellow Dylusions Spray Ink
Red Glossy card stock
Velum with decorative star bursts
Purple A6 Greeting Card blank
White Cardstock postcard (4.5" X 6.5")

Instructions:
1. Stamp the corner curvy flower stamp, centered on the top of the card (right up against the edge) with pigment ink, corner pointing up.  Rotate the card 180 degrees, add a corresponding corner stamp facing the first stamped one like a mirror, placing that one centered up against the edge of the card.


 2. Stamp the "Love" stamp with the pigment ink in the center.


3. Pour black embossing powder across the card and heat emboss.


4. Spray a few spritzes of the Dylusions Yellow ink across the card. Leave some of the white cardstock showing.


5.  On either scrap paper or on other white cardstock, stamp and emboss in black embossing powers a few more "Love" stamps.  Color those in red and one in purple.  Fussy cut each letter out from the scrap ones.


6. Color the rest of the flowers/vines. Glue roses to be just above and below the "Love" stamp in a square (in my case, I ended up spray dying white roses I had to red). Using foam tape, layer the letters over the base "Love" to add more dimension.


7. Using the Tim Holtz 3d Impresslits border, emboss four strips of the glossy red card stock.  Cut those down to wrap around the postcard base. Glue them to create a border around the stamped image.


8. Mount a 5X7 cut of the velum to the card base.  Once that is mounted, use foam tape to glue down to the velum card, centered.  Use a page rounder to trim the edges.


9. Add a note or greeting to the inside of the card. 

This project is definitely themed to fit for a variety of holidays and reasons to create.  Changing out the messaging on the inside of the card is key towards versatility.


More ideas & crafts by Mercy

Want an extra 15% off on your next order? Use this code on your order! Good until June 1, 2019. BPMDtMercy2019

Thursday, May 23, 2019

Vision Art Tag

Our DT Sharon has a quick make tag for you today!
Yes - we know she has a slight obsession with making art tags but she does share lots of ideas for using all of our fabulous range of stamps!

Sharon's tag background was made using chalk paints "finger painted" on and the wording stamp from the "Correspondence" Stamp Set which she embossed with gold powder.

She used one of the fab stamps designed by Rick St Dennis "French Pierrot" as the focal image which was stamped onto kraft card with brown ink and fussy cut.

To finish she added some braid to the top of the tag along with a mask charm and "vision" wording.
We love the soft tones of this tag!

Looking for more Inspiration?
Click the links below!

The Blank Page Muse Shop https://blankpagemuse.com/
FB Fan Page https://www.facebook.com/groups/bla...
Instagram - Shop https://www.instagram.com/blankpage...
Instagram - Blog https://www.instagram.com/blankpage...
Twitter https://twitter.com/BlankPageMuse
Pintrest https://www.pinterest.com/blankpage...


Alcohol Ink Panels

 Hi everyone! Charlotte here, and today I am sharing a card using alcohol ink paneling. My aim was to make a clean and simple design with a slight steampunk feel.


Blank Page Muse products used:
Ribbon Lacing Corset 

(Shop now and save! Use code BPMDtCharlotte2019 to save 15% off your total order!)

Other materials:
White card base
Black card
Alcohol ink card
Alcohol inks in Coral and Sunset Orange
Alcohol blending solution
Air puffer
Gold foil
Paper trimmer
Vellum
Embossing ink
Black embossing powder
Stamp positioned or acrylic block
Heat gun
Liquid glue
Foam tape or squares, preferably black
Scissors


Instructions:

Begin by sprinkling Coral alcohol ink randomly onto the alcohol-ink cardstock. Add drops of Sunset Orange sparingly, and alcohol ink blending solution as required. Use an air puffer to move the ink around as desired. Continue working in layers until the preferred look is achieved.

Allow the ink panel to dry for a moment until there are no wet areas but still some tacky areas. Press a piece of gold foil onto the panel, and gently rub.

Carefully peel up the foil. If any areas appear tacky but have not taken the foil, press it back down and tub into those areas. Once the panel is ready, use a paper trimmer to trim three narrow rectangles from the panel. Keep the remains of the panel for a future project. Mat each of the rectangles onto some black card.

Using embossing ink stamp the ribbon laced corset onto a piece of vellum. Coat with black embossing powder and heat set. Fussy cut the stamped image out. Place very narrow pieces of foam tape behind the embossed areas of the corset.
Use liquid glue to adhere each of the matted alcohol ink panels to the card base, slightly staggering them to create flow across the card. Remove the backing from the foam tape on the corset and pop it up overlapping two panels.

I hope you enjoyed my blog post! Alcohol inks are really fun to create with and can give some really stunning backgrounds, especially when combined with foil. I hope you'll give it a try, and I'd love to see what you make!


Looking for more Inspiration?

Click the links below!


Copyright Text

Blank Page Muse 2018 Sin City Stamps 2013