Showing posts with label under the sea. Show all posts

Friday, March 29, 2019

"Cascadia" the Siren....

Hi Blank Page Muse Stamps Fans!!!
Well another month has nearly gone!!! Hope it has been a creative one for you all!


Today I have another "Under the Sea" themed creation using a fab "Mermaid/Siren" image designed by Rick St Dennis - I'm a big "Rick" fan and love to create with his detailed stamps!

Supplies:
Blank Page Muse Stamp: Cascadia Mermaid designed by Rick St Dennis
Journal or Card
Archival Ink Pad
Old Book Pages eg. encyclopaedia, dictionary, thesaurus
Gesso & Muslin Cloth
Stencil & Texture Paste
Ink Sprays
Embellishments: fishing net, fishing line attachments, charms, string etc.
General Supplies: scissors, spatula, glue, mounting tape

(Shop now and save! Use code BPMDtSharon2019 to save %15 off your total order!)

Instructions:

We will start by creating the background page for our seductive mermaid!


Add a layer of Gesso to your journal page or card if working on a separate item. While the Gesso is still wet use a spatula (or your fingers LOL!!!) to adhere the muslin cloth to the page.


Next step is to stamp the mermaid onto an old book page. It's fun to stamp onto a "related" wording page ie. I stamped on a thesaurus page with "ocean" words - the same works for an encyclopaedia page etc. - it's fun to follow the theme with all the added elements to the page!!!


Tear out some wording from your book pages - used here the "siren" related paragraph from the thesaurus. Edge with the same archival ink you stamped your main mermaid image in.


Use a circle stencil and texture paste to add "bubbles" to your page LOL! Allow to dry.


Use ocean coloured ink sprays over the page. Metallic sprays add some nice shine to your page! Use a paper towel roll to absorb excess ink - a great way to make a multi coloured paper towel background for use on another creation!!!!


Arrange your stamped images and extra embellishments to the page and adhere with glue and mounting tape, allow to dry and your have a fab under the sea themed page! Lots of fab mermaid images available at the store to great pages with!

Thanks for stamping with me today!!! Have a creative week!
Sharon

Be sure to visit us at our fav social media spots!!!!!


The Blank Page Muse- https://blankpagemuse.com/

Thursday, March 28, 2019

Fishing Cards

Hello Crafty Friends,

Marie-Christine with you today with 2 bright cards.
Lets go fishing and pick up some seashells by the sea!


BPM Rubber Stamps used:

Fishing Word Rubber Stamp

(Shop now and save! Use code BPMDtMariaChristine2019 to save %15 off your total order!)

Other Supplies
Printed Cardstock
Watercolor Paper
Watercolor Paints
Stencil
White Modeling Paste
Seashells


First, cut 2 squares of paper to make your cards and apply some white modelling paste with a stencil.


When it is dry, colour with watercolour paints, use different colours and add some water with a spray.


Here, my 2 backgrounds.


Then, stamp your fish and colour them with watercolour. Cut them.


Adhere the seashells and the fish. Put some colors on the seashells if you want. Stamp the title on a printed cardstock and adhere it on the card. When it is dry, adhere your cards on a large printed cardstock with double-sided.


Hope you have enjoyed my tutorial!

Thanks for stopping by today.

Marie-Christine
Inspiration Team Member
Please visit the following for more inspiration!


Sunday, March 17, 2019

Caught in the Net!

Hi Again!!
Can you believe how time is flying??? March already!!!
I hope you have been enjoying the DT creations so far this month - always so inspirational and always so many ideas for using your fabulous Blank Page Muse Stamps!!!


I've followed our "Under the Sea" theme for my step by step today - who can resist mermaids and sea themed inspiration???


Supplies:
Blank Page Muse Stamp: Fantasy Mermaid 1 designed by Rick St Dennis
Blank Page Muse Stamp: Anchor
Blank Page Muse Stamp: Ship's Wheel Helm

(Shop now and save! Use code BPMDtSharon2019 to save %15 off your total order!)

Scrap card for Coin Backing
Gelli Prints in "sea/ocean" colour tones
ATCoin die cut 2.5inches & cutting tool or make a template to cut your own
Kraft paper
Black Archival ink
Embellishments: fishing net, brass fishing "barrels"
General supplies: glue, glue stick, scissors
Instructions:
We will start by making our ATCoin "bases".
Tear strips from your gelli prints and adhere to the backing piece of card using a glue stick. Make sure to overlap so the base doesn't show through - we want to cover the entire area with the coloured strips!


Once the glue has dried use the ATCoin die and your cutting machine to cut 3 coins from the decorated card.


Next stamp your "sea/ocean" themed stamps onto kraft paper or card. Fussy cut the stamped images.
There are soooooo many sea themed stamps on the store that you have and endless range to create with!

Gather your embellishments ie. pieces of fishing net and fishing line attachments.
Have fun at the fishing supplies store - they have some fantastic embellishments for use on your creations!!!


Adhere the kraft stamped images on the ATCoin bases - overhang some of the images as shown below and trim them to the shape of the coin. Then adhere the net and brass barrels with glue.


Finished coins ready to trade or add to your own collection! This idea works with any theme and stamping on the kraft paper is great for those of you who are not "into" colouring images and like something quick and effective!


Don't forget if you are "trading" your ATCoins to grab one of the 3 backing stamps
from  Blank Page Muse to finish off your coins!!


Thanks yet again for joining me today!!
Have fun stamping!!
Sharon
Here's all the links you need to "stalk" us on Social Media!!!!!

The Blank Page Muse- https://blankpagemuse.com/


Saturday, March 9, 2019

Dear Beach!!

Hello!
 I have a bestie that lives in Florida and we talk every day. She loves the beach!
I thought this card would be a great way to say hi to her.
I enjoy making and sending handmade cards.
I do have to say, that as I started out making one card with the white embossing powder and thought for sure that it wasn’t going to work as it would be too light, so I then created the second card with black embossing powder…which one do you like better?


Supplies –
Blank Page Muse Stamps –

(Shop now and save! Use code BPMDtKelly2019 to save %15 off your total order!)

Other supplies used –
Watercolor paper
White card and envelope
Versamark ink
Embossing powder – white and black
Assorted gems
Sponge tool
Assorted inks – peacock feather, tumbled glass, cracked pistachio
Archival ink – coffee
Heat tool
Stamp platform
Paper trimmer

Step 1 – Lay the watercolor paper on the stamp platform and align the Open Weave Fishnet Background stamp over it. Ink the stamp with coffee archival ink and stamp image onto the watercolor paper.  Next move the stamp on the platform and ink a second and then a third time to cover the front of the watercolor paper.


Step 2 – Using the Dear Beach stamp, white embossing powder, and the Versamark ink, stamp the sentiment over the Fishnet Background and heat set the embossing powder.


Step 3 – Using the assorted ink colors and going from lightest to darkest color, sponge on the inks in a circular pattern covering the front of the card.  When you are finished with the ink, lightly wipe any excess off the sentiment.


Step 4 – Take the Bubbles from the Hearty Doodles stamp set and using the Versamark ink, stamp along the edges of the blue cardstock, this creates the illusion of sea bubbles, heat set.

Step 5 – Trim the sentiment piece down to fit on the blue cardstock, glue both pieces to the front of the card with tape runner and then add the assorted gems. 


The Blank Page Muse- https://blankpagemuse.com/


Monday, March 4, 2019

Bubbles Under the Sea Card

Let's create an underwater bubbly paradise. If you are intimidated by creating inky backgrounds, this is the perfect place to start because whatever you create with texture stamps and watercolors or sprays, it will look wonderful. It's great because you can't really mess it up. Let's dive in!

BPM Stamps:
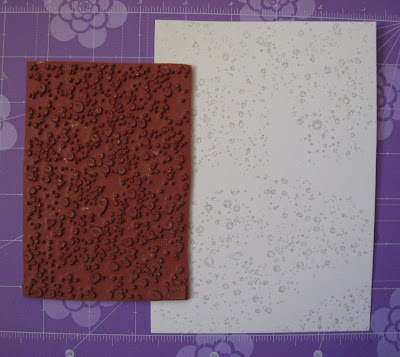
Raindrops Waterdrops Rubber Stamp Sheet Set
3 Assorted Beach Grass Stamps
Open Weave Fishnet Background Stamp

Nautical 2 Stamp Set
Spiral Snail Shell Stamp

(Shop now and save! Use code BPMDtKaren2019 to save %15 off your total order!)

Other Supplies:
water color paper, ink pads (blue, green, pearl, embossing), clear mounting block,
water spray bottle, embossing powder (clear / glitter / blue), seahorse embellishment, heat gun, Glossy Accents Clear Gloss Medium, clear micro beads, card base (5x7")

Directions:
1.  Use embossing ink to stamp the small water droplet image over the background. Apply clear glitter embossing powder, return the excess to the jar, and heat set.


2.  Stamp the medium bubble cluster with pearl ink randomly across the background. Vary the angle of the bubbles and occasionally have some extend off the edge of the paper.  Apply clear gloss medium to a random selection of bubbles. Set aside to thoroughly dry.

3.  Apply numerous shades of blue and green inks directly onto a craft mat. Mist generously with water. Place the watercolor paper face down pressing gently. Continue to press and lift the paper until the desired amount if color is reached. Reapply, ink and water to continue to add more layers of color.
 
(When complete, dab the paper with a tissue to remove
any ink mist that may be clinging to the slick embossed surfaces.)

4. Use an ombre ink pad to add a border of net along the lower edge.


5.  Stamp sea weed grass in the lower corners using blue ink. Mask any bubbles that have clear gloss medium over them in order to protect them from blue ink.


6.  Spray blue mist over the background to add a variety of small splatters. Set aside to dry.

7.  Stamp different size bubbles onto white card stock. Without re-inking, stamp the bubble image again to create a second and third generation impressions. Each new impression will be a lighter shade which will create the appearance of depth within the project. Apply clear gloss medium to each bubble. After thoroughly dry, carefully cut out each bubble.

8.  Adhere the stamped bubbly background to a blue card base leaving a narrow border.

9.  Adhere a chipboard sea horse to the upper left side of the card. Attach the bubbles randomly with foam tape.

10.  Stamp seashells with embossing ink, apply blue embossing powder, and heat set. Cut out the seashells and apply to the lower edge of the card using foam tape.

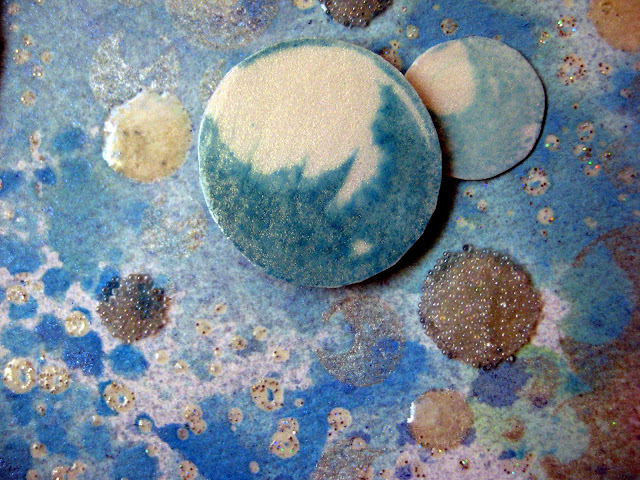
11.  Apply liquid adhesive randomly to some bubbles and add transparent micro beads to the wet adhesive.


A Closer Look:


The Blank Page Muse- https://blankpagemuse.com/
Facebook Fan Page- https://www.facebook.com/groups/blankpagemuse/
Instagram Shop- https://www.instagram.com/blankpagemuse/
Instagram Blog- https://www.instagram.com/blankpagemuseblog/
Twitter- https://twitter.com/BlankPageMuse
Pinterest- https://www.pinterest.com/blankpagemuse/boards/

To see more projects by our designer Karen, please visit her blog Art & Soul.

Copyright Text

Blank Page Muse 2018 Sin City Stamps 2013