Showing posts with label ocean. Show all posts

Sunday, August 8, 2021

Salty Steampunk!

Hi BPM Fans!


We have a "Steampunk" theme this month here at the Blog. 
I always love to have fun creating with this theme in mind - just love the industrial but science fiction feel characters and elements!


Today I've created a card with a focal stamp designed by Dead Sea Toons - I couldn't resist using the "Top Hat Nautilus" from the Midnight Creepy Cute Collection and making my Steampunk "Salty"!!
Wording is also available in the store - Follow Your Heart Sentiment along with the Small Cogs and Gears stamp used on the card background.


You can pop over to my Blog to see how I made this card just CLICK HERE

Looking for more inspiration then click on the links below!

The Blank Page Muse- https://blankpagemuse.com/

Sunday, December 22, 2019

Mermaid Mini Christmas Tree Ornament

Hello!  Susie on the blog today with a mermaid themed mini Christmas tree ornament.

I am a fan of mini Christmas trees and shrink plastic is the perfect way to create homemade ornaments for them!  I also like Christmas trees with themes, and since I grew up near the beach and love scuba diving and the ocean, it really is no surprise that I reached for a mermaid stamp, is it?

Time to play...


Supplies:
The Femmes Mermaid Ocean Scene Large Rubber Stamp
Shrink Plastic
Archival Ink, black
Stamping platform
Sharpie markers
Crop A Dile
Beads
Jute

Directions:
  • Stamp image onto shrink plastic using permanent black ink.
  • Use permanent markers to color on the reverse side of the image. (I used Sharpies - so many colors and you can buy them everywhere!) 
  • Punch holes as desired and then bake according to the manufacturer's instructions. 
  • Add sparkle and texture with beads and a tassel. 

What kind of a themed tree do you want to create?  Your stamps probably reflect your interests - I think I feel a cat ornament coming on...

Thanks for stopping by and I hope you find some time to play today!
Susie

Looking for more inspiration?
Click the links below!

Friday, June 15, 2018

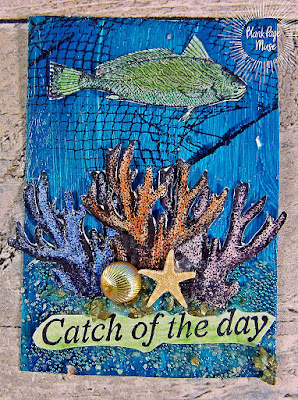
Plenty Of Fish ATC Set

Hello all
Learn how to create this ATC set using stamps by The Blank Page Muse.


Products used
Blue Acrylic Paint
Turquoise Acrylic Paint
Purple Mist Spray 
Micro Bead
Glass Sand
Flat Backs
Heavy Gel Medium
Watercolour Paper
Artist Colouring Pencils


Start off by painting the ATC blanks with acrylic paint. 
Add heavy gel medium to the bottom and then sprinkle with glass sand and micro beads.


Next take the 'net' stamp from the Nautical 2 Set and stamp it across the top. 


Stamp out the images onto watercolor paper and then color them in with watercolor pencils.
 Use water and a brush to blend the colors. Once dry fussy cut them out.


Once the background has dried, glue down the images and then stamp out a few sentiments. 
Color these in before cutting out and gluing them in place.


Finish off each ATC by adding little embellishments like shells and pearls.

 Looking for more Inspiration?
Click the links below.

Looking for more Inspiration? Click the links below! The Blank Page Muse Shop https://blankpagemuse.com/ FB Fan Page https://www.facebook.com/groups/bla... Instagram - Shop https://www.instagram.com/blankpage... Instagram - Blog https://www.instagram.com/blankpage... Twitter https://twitter.com/BlankPageMuse Pintrest https://www.pinterest.com/blankpage...


Monday, April 23, 2018

Seas the Day Sunny Canvas


Hi There! 
     Jenn here today sharing my relaxing beachy themed canvas! 
I just love the difference you can make with stamped images. This canvas without that beautiful Blank Page Muse Sun Stamp just wouldn't have the same personality!! 
For me, the beach is an inspiration. I love the colors, the sounds, the sand.
 Creating beautiful projects inspired by it are some of my favorites!

Tuesday, May 30, 2017

Window to the Sea

Hello Friends,

I am building a card using bits and pieces from multiple stamp sets.  
I have so many stamps that I have wanted to use, I decided to take stamps from different sets to create one card.  
Thus I am able to justify to myself why I needed to buy so many different sets.
  (I know I am not the only one to feel this way. Right?) 
 I think this shows how versatile Sin City Stamps really are!


Supplies:
   Sin City Stamp Set - Mountain & Beaches
   Water Stamp
   Bird Stamp
   Sand Stamp
   Beach Grass Stamp
   Sentiment Stamp
   Brick Stencil
   Texture Paste
   Window Die
   Foam Tape
   Window Sheet
   Ink:  shades of blue, green and brown

Step 1:  Using texture paste, create a brick wall effect on card layer.  This will give texture to the card.
Tip* It helps to use re-positional tape to hold paper in place. 


Step 2:  Stamp water and sand on the layer that should be cut to be slightly larger then the window panes of the die.

Step 3:  Cut the window sheet to be slightly larger then the window pane openings.  Die cut the window out.


Step 4:  Ink blend over the water and sand to fully color the card layer.


Step 5:  Stamp beach grass in green on the sandy beach creating realism.


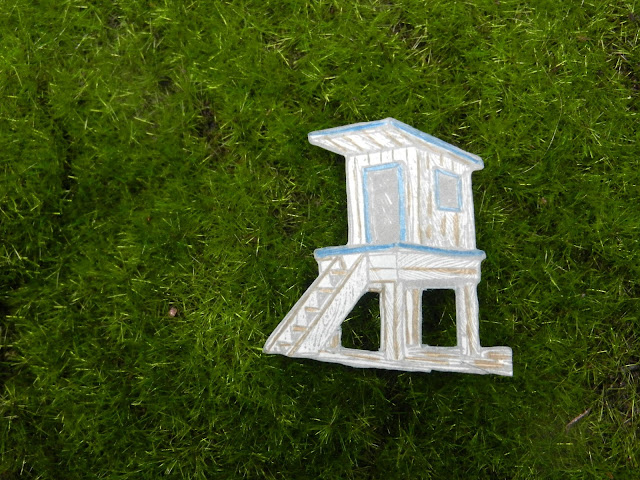
Step 6: Stamp the Sin City Beach Life Guard Stand and cut out.  (I used my electronic cutting machine for this step.)


Step 7:  I cut out the inside of the stand legs using a cutting blade and ruler.


Step 8: Color in the stamped image to make it look weathered.


Step 9:  Stamp a sea bird in black so that it will be seen through the window pane.  Tape the window sheet to the back of the window die cut. Using foam tape affix beach stand to layer.


Step 10: Using a double layer of foam tape to affix the window die over the card layer creating depth and realism to the scene.


Step 11:  Stamp sentiment to a co-coordinating banner and use foam tape to secure under window.

I think this mix and match approach to creating cards has opened many doors to new and exciting possibilities. (Can't wait to buy more Sin City Stamps!)

Share your mix and match projects with us using #SinCityStamps and here on their Fan Page.

X


Copyright Text

Blank Page Muse 2018 Sin City Stamps 2013