Showing posts with label Shaloo Webster Designs. Show all posts

Tuesday, July 16, 2024

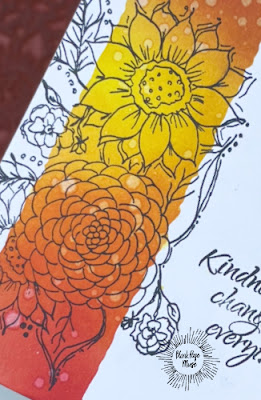
Fun Faux layers with a twist

 Fun Faux layers with a twist


Sue here today to show an old technique with a twist.  I call this Faux layers which I have been doing off, and on for years.

Here's a closer look at the faux layer.  The twist is using a stencil to add fun, and dimension to the technique.  With some simple masking, color blending, and a adding stencil to get this unique effect on your card.

See more at my blog.

stamps/products used:
Blank Page Muse Special day Birthday by Pam Bray
Blank Page Muse Kindness changes everything by Shaloo Webster
I Brake for Stamps Harvest Love stamp sheet
Block pattern stencil

Thank you for stopping by.  Come back soon!

Sunday, July 7, 2024

Happiness Blooms From Within

Good day, fellow crafters. It's Tamara once again, with a new post where I am going be showcasing my latest card created using  I Brake for Stamps and Blank Page Muse products! 


Happiness blooms from within, much like a flower nurtured by the rich soil of self-awareness and personal growth. It isn't something that can be simply acquired or bestowed by external circumstances; rather, it flourishes from our inner resilience, positive mindset, and the choices we make every day. Just as a gardener tends to their plants with care and attention, we must cultivate our inner garden through practices such as gratitude, mindfulness, and self-compassion. 

In my card designs, I embrace this theme of inner happiness. Each handmade card is crafted to inspire joy, reflection, and connection, encouraging us to nurture and celebrate the happiness that comes from within. By sharing these cards, we spread the message that true joy is cultivated internally and blossoms outward, touching the lives of others. 


To create this project, you will need the following:


Stamps

·        Blank Page Muse Floral Spray Sunflowers Chrysanthemum Line Art – Pam Bray Designs

·        Blank Page Muse Happiness Blooms from Within words – ShalooWebster

Inks

·        Black ink pad

·        Watermark ink

Paper

·        Cardstock – black

·        Watercolor paper

·        A2 card base – white (4.25” x 5.5”)

Pigments

·        Watercolor pigment

Adhesive

·        Liquid glue

Tools

·        Paint brushes

·        Paper trimmer

·        Heat Tool

·        Stamping platform

·        Die-cutting machine

·        Tub large enough to fit watercolor paper

·        Anti-static powder pad

·        Label Die

Misc

·        Cherry Kool-Aid – sugar free

·        Water – amount per Kool-Aid directions

·        Cup of water for cleaning paint brushes

·        White Embossing powder


To craft your card, start by creating the background panel, as this is the most time-consuming portion. First, mix the Cherry Kool-Aid per the package instructions, minus the sugar, in a tub or tray. Once it's fully incorporated, place a sheet of watercolor paper into the prepared liquid. Allow the paper to set for a full 24 hours to absorb the color, then let it dry completely. You can use a heat gun to speed up the process, but the color doesn't look as nice in the final product.


Next, stamp your focal images. Using black ink and the Floral Spray Sunflowers Chrysanthemum Line Art stamp, ink and then stamp the image on the area of the watercolor paper where the color looks the most pleasing to your eye. Allow the ink to dry.


Now it's time to add color. For this project, watercolors are suggested, but you can also use quality-colored pencils or alcohol markers if you prefer. The best technique with watercolors is to wet small areas of the image at a time with water, then drop small amounts of watercolor pigments into the wet area. Slowly brush the pigment into the desired areas. If the color is too heavy, use a paper towel to dab up the excess. This technique allows you to slowly build up color and results in a better finish. Once you're done, let the paper dry completely.


Next, cut the background panel and the cover mat to size. Using a paper trimmer, first trim your water-colored background panel to its final dimensions. For this design, the dimensions are smaller than the A2 card base to provide some visual interest. Then, trim the black cardstock to 4.25” x 5.5” to cover the front of the card base. Set these aside.


Now it’s time to create the sentiment. Start with the black cardstock, using either any extra pieces that were trimmed off in the previous step or, as is often done in my studio, the center of the cover mat since it will be covered in the assembly stage. Place your black cardstock in your stamping platform of choice. Align the "Happiness Blooms from Within" words stamp over the area of the card you wish to stamp. Lightly dab the area with an anti-static powder pad where the stamp will land. Using a watermark ink pad, tap the ink pad onto the stamp to get an even coat. Once inked, stamp the image onto the cardstock. Repeat one or two times to ensure a proper image transfer. Cover the freshly stamped image with white embossing powder, then dump off the excess. Heat set this with a heat tool until melted. Lastly, using a label die that fits around the sentiment and a die-cutting machine, cut out the sentiment.


For the final step, assemble your card. Using liquid glue, adhere the black cardstock to the card base. Next, align and adhere the background panel with more glue. Lastly, position the sentiment in the desired location and adhere it to the background panel with liquid glue. As an optional idea, you can use pop-dots or foam tape for the sentiment. With that, your card is complete.

The stamps I used can be found by following the links in the materials list or you can find them with a quick search on www.blankpagemuse.com. Visit our social media sites for more stamping fun!


I Brake For Stamps -https://ibrakeforstamps.com/ 

The Blank Page Muse- https://blankpagemuse.com/

FB Fan Page-  https://www.facebook.com/groups/blankpagemuse/

Instagram Shop-  https://www.instagram.com/blankpagemuse/

Instagram Blog-  https://www.instagram.com/blankpagemuseblog/

Twitter-  https://twitter.com/BlankPageMuse

Pinterest- https://www.pinterest.com/blankpagemuse/boards/


Thursday, December 28, 2023

3 Panel Cards

Sue here today with another card using pattern papers as the focal point for my cards.

Not only are pattern papers good for cards, but also on the flap of envelopes as you can see in photo.
Close up shows the panels, and the banner cut strip for saying.
Check out more information on my blog.

stamps and products used on these cards
Blank Page Muse Special day birthday-hugs clear stamp set by Pam Bray
Blank Page Muse Tattered & Worn paper pack by Pam Bray
Blank Page Muse Kindness Changes stamps by Shaloo Webster
Use the code BPMSue for a 15% discount at Blank Page Muse or I Brake for Stamps

Thanks for stopping by.


Wednesday, November 8, 2023

A Floral Background on Vellum

Hello! Welcome back to the BPM blog. November is the month of Thanksgiving which is one of inspirations in the creation of this card. I did not use colors of the season for a change. 


I stamped the floral image on vellum with embossing ink repeatedly. I don't want the image to be overlapping, and I want to be able to stamp as much image on the panel so I used the old handy dandy tool Stamp A Ma Jig for placement of the image. 

I used a pearl embossing powder for some shimmer. I melted the embossing powder in between stamping. Vellum can be tricky with repeated heating due to its tendency to warp. To prevent this, give the heat gun plenty of time to warm up before melting the embossing powder. Also, continuously move the heat gun while melting the embossing powder. 


The effect of the pearl embossing powder on vellum is very elegant. 

I added a pop of color to the floral background but instead of adding the color directly to the embossed flower, I colored the image on the back of the vellum.

I hope today's project inspires you. 
Please visit my blog, Maria Giselle's Creative Cuts, for card details.

Find more inspiration by visiting the following blogs:


Thank you for visiting. Have a blessed, brilliant and creative day!


Sunday, September 24, 2023

One Stamp, Three Ways

Hello! Welcome back to the BPM blog!
This is my first post here as a DT member. I am so glad to be a part of the team. 

As the title of this post says, today's project is all about using a stamp in different ways.
This is a  great way to stretch out your supplies. 


I used the following BPM stamps on this project:

Floral Spray Sunflowers Chrysanthemum Words Border Art Rubber Stamp Set-The large floral spray from this set is the stamp I used on all three cards.


Beyond the Border Mixed Media Set 1 CLEAR Stamps-I used a border stamp from this set on the monochromatic card.


The three ways I used the floral bundle stamp are:

  • I stamped it on a blended portion of the front panel of the card as seen on the photo above. Great technique for a one layer card. If you are not into coloring, this is one way of using those detailed stamps that looks intimidating to color. 

  • I stamped and colored the image with Copic markers as seen on the card below.

  • I embossed the image on vellum as seen on the bottommost photo. This card has a happy turn out. If you are curious to know it, please visit my blog and you will find out. 

I hope today's project inspires you.
Please visit my blog, Maria Giselle's Creative Cuts, for card details.

Find more inspiration by visiting the following blogs:


Thank you for visiting. Have a blessed, brilliant and creative day!

Friday, March 13, 2020

Sparkly Awesome Texture~Card By Guest Designer Samantha!

Hello, hello! Samantha Ziegenfuss here. I am elated to be back on the Blank Page Muse blog bringing you another guest design.

It seems like I am always in need of birthday cards and I think that a birthday card made with the Henna Floral Motif Decorative Art Rubber Stamp by Shaloo Webster would be the perfect one to give to just about anyone.

To begin I stamped the Floral Motif stamp to a watercolor panel I'd cut to 4" x 5.25" with sticky embossing ink. I stamped it twice, shifting the stamp each time. I heat set the image with gold embossing powder.


Next I used Turquoise watercolor paint to fill in some of the leaves. When that was dry I filled in the remaining leaves with a vivid Hyacinth Violet watercolor paint.


When all the watercolor paint was dry I splattered black acrylic paint across the entire watercolor panel.


I stamped the Happy Birthday Phrase Rubber Stamp onto black cardstock and heat set in white embossing powder. I trimmed it down when I was done.


I layered my watercolored panel onto a piece of black cardstock cut to 4 1/8" x 5 3/8" and then adhered it all to a white A2 sized card base.


I placed my sentiment slightly overhanging the edge of the matted card panel and added a few gold sequins to tie it all together.


Thanks so much for stopping by! Be sure to head on over to the shop to check out these amazing red rubber stamps!

Until next time,
Samantha Ziegenfuss

Saturday, October 5, 2019

Happiness Blooms from Within

Greetings!  Chris here today, and I have been obsessed by watercolors lately as you will see by all my projects this month, as each features watercolors.  I just love that watercolors are a little messy and outside the lines! 


Start by stamping the flower from Heart of Nature Butterflies Bees Art Rubber Stamps designed by Donna Gray repeatedly on watercolor paper. with archival ink.  Stamp butterfly on upper left corner. 


Using a wet watercolor brush pick up distress ink to roughly color your flower petals.
 Repeat with a darker ink color.

 Paint flower centers.

 Paint butterfly with blue and purple inks.  Stamp greeting from Happiness Blooms from Within words & Henna Floral Motif Decorative Art Rubber Stamp designed by Shaloo Webster  and mat to finish card.

 I hope you are inspired to use watercolor inks on your cards! Be sure to follow us


The Blank Page Muse- https://blankpagemuse.com/


Saturday, July 27, 2019

Washi Tape Card & Envelope Gift Set

Hello, hello! Happy July, everyone! Did you know that it is never too early to get started on making your holiday gifts? 
Today I'm going to share a super easy gift idea with you; washi tape cards and coordinating envelopes. You'll be amazed by how quickly it all comes together!

(Remember to use code BPMDtSamantha2019 to save 15% off at checkout!)


You will need:
Let's get started!


Beginning at the top left corner of one of your card bases begin layering your washi tape. Continue until you reach about the half way point.


Trim off excess.


Repeat on remaining three card bases, alternating corners and washi tape.


Mask your card up to the edge of the washi tape.


Using your black pigment ink stamp the floral motif stamp onto the wash tape several times. Heat emboss with clear embossing powder. Repeat for remaining three cards.


Remove your masking paper and stamp your sentiment onto the  white space of your card in an ink that matches your washi tape.  Repeat for all cards.


Stamp the flaps of your envelopes as well.


That's all! I hope that you'll give my idea a try. I cannot wait to see what you make with your Blank Page Muse stamps!

Until next time,
Samantha

Looking for more inspiration?

Click the links below!

The Blank Page Muse Shop

Facebook Fan Page

Instagram- Shop

Instagram- Blog

Twitter

Pinterest


Monday, June 24, 2019

Dragonfly Mini Art Journal Page


Hello Blank Page Muse Fans!  Today, I thought I would share a mini art journal page that was recently added to my Bullet Journal.  This is a 8.2" X 5.5" format size, so the design could be used on an over-sized card as well, or expanded into a full sized 8.5 X 11 page with room to add more stamped dragonflies.


Supplies:
8.2" X 5.5" notebook page
Dragonfly Stamp
Flower border
Happiness Blooms from Within Sentiment Stamp
United Rings Stamp from Hearty Doodles set
Black Pigment Ink
White Pigment Ink
Clear embossing Powder
Distress Crayons [Gelatos or similar water based ink can work, in this case Mermaid Lagoon and Peacock Feathers by Tim Holtz Distress Oxides were used]
Brush [A watercolor brush with it's own reservoir was used in this case]
Water

Instructions:
1. Scribble a mid-range green Distress Crayon across the top of your blank page filling in half of the page.  Taking your blue, scribble from the bottom to the middle of the page. Overlap a bit in the center. 


2. Using your brush and some water, brush across the page, blending the crayons and diluting the colors.  Pull edge to edge, drawing out the color to the paper borders.  It should look like a light wash of color framing the heavier colored center. Once  it's all blended out, allow to dry.


3. Once dry, stamp out corner (upper left) to opposite corner (bottom right) in black pigment ink the flower border and emboss.


4. Stamp Sentiment with black pigment ink centered on page, then embossed.


5. Stamp the dragonfly on the left side, near the text and the flowered border stamp. Emboss with the clear powder.


6. Inking up with white pigment ink, stamp the Linked-Circle stamp a bit randomly, filling in some of the negative space and open areas.  Emboss using the clear embossing powder.


I found this page was super easy and an inspirational way to enjoy the beginning of the summer months.


More ideas & crafts by Mercy

Want an extra 15% off on your next order? Use this code on your order! Good until June 1, 2019. BPMDtMercy2019

Copyright Text

Blank Page Muse 2018 Sin City Stamps 2013