Showing posts with label Jess Madaglia. Show all posts

Wednesday, February 12, 2020

Two Mad Dahlias Guest Designer


Hi Everyone,
I am so happy to be guest posting for Blank Page Muse Stamps.  When I saw these images from A Vintage Girl  I could not wait to create. 
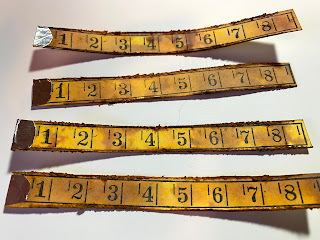
I started by stamping four of the large tape measures in Jet Black Archival ink.  I cut them out and using the edge of my scissors I tattered the edges. 

Then I inked them and let them dry.  Once dry I took a tiny bit of metal tape and made edges just like you find on real cloth measuring tapes. 

For the main panel I stamped the vintage corset in the center, again using jet black archival.  I also stamped a second corset and cut it out to use for a mask.  This was just done on scrap paper.  Always save your masks, you never know when you might use them again. I just pop them in the bag with the stamp. 
I inked the corset using a pale pink and then covered it with the mask to ink the rest of the background. 
The background was inked and then stamped using the small crackle stamp.
To make her sash I used the rolled measuring tape from the Timeless Measurements set.  I used jet black archival on seam binding.  I trimmed the image and colored the seam binding using Dina Wakley scribble sticks.  
I lined up the image on the corset and glued it in place. 
Before I finished up the main panel I flicked on some black and copper paint.  I lined the measuring tapes up along the edge of the card and glued them down. I added the sentiment and edged the words using a black gel pen.  

 I added some small clusters of flowers to the corners and a tiny flower on the sash.  I know the corner flowers covered the metal edges quite a bit, but I really like how they look. The whole panel was mounted on a black card.  

I hope you like this card as much as I liked creating it.  

Jess

Visit Jess on her social media:
Instagram
Two Mad Dahlias Blog

Thanks so much Jess!
We hope you are inspired to play along and come back to shared your hand stamped creations! Our challenge link is right there on the right side and it is open until March 5, 2020.

Monday, November 26, 2018

Quiet, but not blind

Hi Everyone,
Jess here today. I was starting my project with a fall theme in mind and then I stumbled across my quote stamp.  The colors evoke fall, but the sentiment can work year round!


Blank Page Products used:
Oh darling stamp
I was quiet, but I was not blind
Floral Lace
Large Bird Man


Other Products Used:
Distress Inks
Distress Oxides
Distress Crayons
Distress Markers
Cardstock
Micro Glaze
Archival Ink
Clear Texture Paste
3d Embossing Folder
Ribbon
Adhesive
Stencil
Waterbrush

Using Distress Heavy stock blend together several shades of DIstress Ink.  Spritz with water and dry completely.  Take a tiny bit of Distress Micro Glaze cover most of the background.  Stamp the Floral Lace stamp using Distress Oxide Ink and spritz with water.  Using the micro glaze on most of the background keeps the top layer of ink from blending into the background.  It also keeps some of the intricate stamp pattern, but not all of it.  The look is wonderfully aged and tattered.
Take clear texture paste and a stencil to the background.  Don't worry about it looking perfect.  Imperfect looks better! ONce the paste is dry use Distress crayon to scribble over the paste.  Smudge the crayon using your finger and the pattern pops up adding another layer to your background.
Stamp the Large Bird Man on Watercolor cardstock.  Color him in using a waterbrush and Distress Markers.  Once he is dry fussy cut the image.

To finish the background stamp your two sentiments( Oh darling  and I was quiet, but I was not blind) using archival ink.  Back them with black cardstock and play with placement on your background.  Once you're happy with placement you can glue them down.
Run plain black cardstock through your die cutting machine using a 3d embossing folder.  Take a Distress Crayon and highlight the raised areas.  The slight gilded effect is so gorgeous.  Adhere this piece right under the focal background piece you created.
All that's left to do is layer up your background.  On this card the black is attached to a distressed piece of gold cardstock.  The gold is mounted to a sage green card.  A bit of burgundy ribbon was the finishing touch.
Happy Crafting,
Jess


Thanks for coming by!
Please visit the following for more inspiration!


Friday, November 9, 2018

Key to my heart

Hi Everyone,
This time of year is all about family and friends. This is my little homage to having friends that are really family and how lucky I am to have them in my life.


Blank Page Products Used:
Small Crackle Stamp
Floral Medallion

Other Products used:
Distress Inks
Distress Oxides
Distress Markers
Distress Paints
Gel Pens
Archival Inks
Chipboard house shape
Metal Key
Wire
Charms
Chip Quote
Paper Doll
Clear Gesso
Adhesive
Mixed Media Heavystock


Using Mixed Media Heavystock paper blend on several colors of Distress Ink.  Add a bit of distress oxide ink and flick with water.  Allow to air dry to get oxide effects.  Once the paper is completely dry, stamp the Small Crackle Stamp using archival ink.
Using other shades of archival ink stamp your Floral Medallion.  Cut the paper and cover your chipboard shape.Splatter on black and brass paint to add dimension to the background.   Don't forget to paint the edges of your chipboard unless you like the look of raw chipboard.
Cover your paper doll with clear gesso.  Once the gesso is dry color your image.  Stick to the same palette you used for the background.
Glue the family to the chipboard piece and add charms.  Add scribbles all over the front using gel pens.  
Cut up a chip quote and paint the edges.  Glue the quote to the backside of the house. 
There is a pre-drilled hole in the top of this chipboard house.  Thread wire through the hole and wrap around a key that had been distressed to appear aged.  


Thanks for coming by!
Please visit the following for more inspiration!


Friday, October 26, 2018

Son of a Witch!

'Tis the season for witches, but let's not forget the Warlocks! This dapper dude just screams Halloween to me.


Blank Page Muse Products Used:
Steampunk Gentleman
Halloween Bingo Board
Oh, Son-of- a-Witch

Other Products Used:
Distress Inks in Seedless Preserves, Wilted Violet, Shaded Lilac, Twisted Citron, Mowed Lawn Crushed Olive, and Black Soot
Distress Oxide Ink in Hickory Smoke
Distress Markers in Mowed Lawn, Dried Marigold, Hickory Smoke, Antique Linen, Dusty Concord, and Mustard Seed
Archival Ink in Jet Black and Coffee
Sizzix Die Tattered Banners
Cardstock
Adhesive
Waterbrush
Sewing Machine

On your craft mat smoosh on the purple shades of ink and run your paper through so the entire surface is covered. Wipe your ink up( wipe ink up between each layer)  Dry the base layer and smoosh more purple on the craft mat to get splats and dots. Dry this layer.

 Smoosh greens on the craft mat and tap the paper into the ink.  Don't rub or you'll get mud.  Dry the greens.

Smoosh on Hickory Smoke Oxide ink and tap the paper into the ink.  Let this layer air dry.  It's important to let the Oxide air dry to get the oxide effect.  Stamp the Halloween Bingo Board on the background using archival ink.  Edge the paper with black soot ink.  Stitch all around the edge of the cardstock.
Cut out the banner and stamp on the Oh, Son-of- a-Witch stamp.  You can alter your stamps by either not inking the word or snipping the saying apart.  For this card the "oh" wasn't used.  Stamp the saying onto the banner.  Adhere the banner to the bottom of the background. 


Stamp the Steampunk Gentleman on heavy watercolor cardstock.  Color in the gentleman using a waterbrush and Distress Markers.  Cut out the gentleman and then ink all the edges with black soot ink.  Glue the Steampunk Gentleman to the background.


The rest of the card is just layered up with various cardstocks.


Thanks for coming by!
Please visit the following for more inspiration!


Wednesday, October 10, 2018

Spooky bookmarks

Hi Everyone,
Jess here today with a little something to keep your page when your book gets too scary to read at night!


Blank Page Muse Stamps Used:
Ashes of Ex-Lovers Bottle
Mummy Ribs Bottle
Powdered Cobwebs Pot
Halloween Bingo Set
31

Other Products used:
Staz On ink  Gothic Purple
Archival ink in Jet Black, Potting Soil, and Plum
Distress ink in Wilted Violet, Shaded Lilac, Dusty Concord, Carved Pumpkin, Black Soot, and Pumice Stone
Distress Spray ink in Walnut Stain
Dylusions Spray in Fresh Lime
Sizzix Halloween Sideorder and Halloween Script
Sari Ribbon
Ken Oliver Water-media Bookmarks
Card Stock
Adhesive


Stamp your bookmark with your Ashes of Ex-Lovers BottleMummy Ribs Bottle, and Powdered Cobwebs Pot.  Using your permanent ink, stamp each bottle in a different color and at various angles to create interest.

Once the inks are dry use Distress ink to cover the entire bookmark.

 Layer your bookmark onto various colors of cardstock.
Punch a hole in the top of the bookmark.  Add your die cut skeleton images, words, and your sari ribbon.


For the second bookmark the paper layering will be the same.  Using the permanent ink stamp your Oct. 31 and Spider from the Halloween Bingo Set.  Add in the tiny 31 to fill in the gaps.

  Once your ink is dry create your background.  Cover the entire bookmark using Shaded Lilac Distress Ink.  On your craft mat smoosh on the other two purple shades and spritz with water.  After your have sprayed your water tap your bookmark in the color.  Be sure you only tap it in a couple times.  If you just rub it around you won't get speckles and splats.  Look at your bookmark and see if you like the patterns that are appearing.  If you do, stop and dry your layer.  Once the layer is dry then you can go back and tap into the ink again.  Drying between layers makes a huge difference.

Add on your die cut image. 

Spray your sari ribbon and dry it.  Add the ribbon to the top of the bookmark.
I hope you're inspired to create some on your own.  They are easy and fun to make!
Happy Crafting,
Jess


Thanks for coming by!
Please visit the following for more inspiration!


Wednesday, September 26, 2018

Pockets full of inspiration

Hi Everyone,
Jess here today.  I am a huge reader.  I love everything about books.  Remember when you used to have to sign out your books at the library by writing your name on the card in the pocket?  Today I have a project for you using library pockets.


Blank Page Muse Products:

Other Supplies:
Library Pockets
Paper Dolls
Photobooth Photos
Distress Inks
Distress Oxide Ink
Archival Inks
Adhesive
Chipboard Sentiments
Bronze Paint
Vintage Sheet Music
Heavy weight thread
Milk Cap
Die Cuts
Mini flashcard
fabric tape
Frosted Crystal Embossing powder
Cardstock
Paper Distresser

Start by using a piece of silver cardstock. Coat the cardstock using Distress Ink and Oxide Ink.  Once the ink is dry use archival ink to stamp the  Small Crackle stamp.  Using a paper distresser rough up all the edges and cover the front of your library pocket.  
Stamp a piece of vintage sheet music with the postal stamp from the Correspondence  set.  Slide the paper into the pocket and glue it in place.  Add your 3d embossed border to the top of the pocket.  Stitch a small "x" onto your photo and glue it onto the crackled background.  Glue on the milk cap and chipboard sentiment. 
Stamp out the small Butterfly using archival ink.  Add bronze paint to the edges and cut the butterfly in half.  Add the wings to a paper doll and slide her into the pocket. 

This will complete your front cover. 


 Line a second pocket up to the backside of your first pocket.  Using a piece of fabric tape attach the pockets together.  Line the backside of your first pocket with a vintage airmail envelope.  Use postage stamps from the Correspondence  set in various spots.
Using archival ink stamp a Hot Air Balloon.  Color the balloon using various shades of blue distress ink.  Fussy cut your balloon and use the bronze paint to cover your raw edges.
Adhere the balloon to the page.  Add a paper doll, chipboard sentiment, and die cut globe.  Using the smallest  of the Feathers stamp them all around your page.  

   Use patterned scrapbook paper to cover the pocket on your next page.  Add the Pointing Hand and Feathers to the top of the pocket.   

Use the   Small Crackle stamp to add age to a tiny flashcard.  Use bronze paint around the edges. 
Add paper doll with die cut suitcase into the pocket.
Here are the middle pages. 


For the back of the second page(your back cover), stamp on a plain piece of cardstock. Use the script stamp from the Correspondence  set, the  Small Crackle stamp, Sequin Waste, and the  Feathers.  I used various shades of archival inks in browns and reds to create my background.  Glue the paper to your pocket.  Rip a piece of patterned scrapbook paper and add it to the edge.  Stamp out a couple Feathers using archival ink and fussy cut them,  Add the tiniest hint of blue using distress inks to the feathers and edge in bronze paint.  Cut a small slit in your photo and slide the feathers in to make them appear to be wings.  Glue remaining pieces to complete your book.     
I hope you enjoyed this project as much as I enjoyed creating it.


Thanks for coming by!
Please visit the following for more inspiration!


Copyright Text

Blank Page Muse 2018 Sin City Stamps 2013