Showing posts with label Art Journaling with Terri Sproul 2. Show all posts

Sunday, June 11, 2023

Bright Vintage Tags!

 Hi again!

My second post for this month - can you believe we're nearly half way through the year - time flies!


Today I was inspired by some tags I saw on Instagram by @paperiliitin
I loved the bright coloured backgrounds along with the little vintage people which I have so I decided to create some myself using bits & pieces sitting around on my desk!


Backgrounds are painted and stamped and ephemera and main image layered and adhered to tag front.

Stamps links:
Art Journaling 2 Set by Terri Sproul


***Remember to us the code BPMSharon at the store for 15% off ***
So many fab stamps to choose from!
Note: you can use the code at either the IBFS Store OR the BPM Store - why not do an order from each and increase your stash!

And visit our social media sites for more stamping fun!
I Brake For Stamps -https://ibrakeforstamps.com/ 

Thursday, July 25, 2019

Just Us Girls Journaling

Hi Again Blank Page Muse Stampers!
Hope you are all enjoying our colourful month of inspiration!
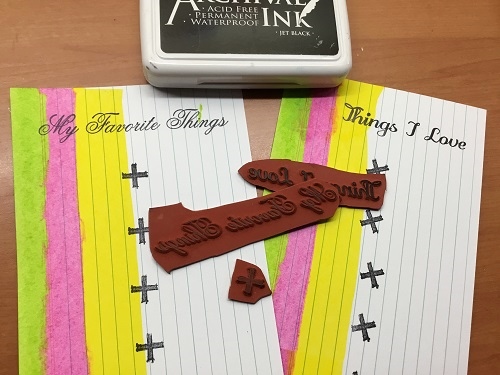
I decided to create some "journaling" cards which are great for making notes and recording your thoughts!
And to make it quick and easy I've made them with only minimal supplies - perfect for those on a budget and also perfect for using up your bits & pieces of left over card and paints!
You can also adapt this style to your bullet pages and journals!
Hope you have fun!
Supplies:
Blank Page Muse Stamp Set: Just Us Girls
Blank Page Muse Stamp Set: Art Journaling #2
Index Cards 6" x 4"
Acrylic Paint 3 colours
Old Gift/Credit Card
Black Card
Embossing Ink and Fine White Embossing Powder
Black Archival Ink
Tools: glue, double sided tape, heat gun, scissors
Instructions:
Gather your index cards, paint and gift card.

Place "blobs" of paint along the left hand side of the card at the top.


Use the old gift card to drag the paint from the top to the bottom. You should have enough paint on the gift card to paint another index card. Allow to dry.


While the paint is drying stamp the "Just Us Girls" onto black card using your embossing pad. heat emboss with fine white embossing powder. Fussy cut the gals!


Using you Black Archival Ink stamp your choice of wording from the Art Journaling #2 stamp set directly into the index cards. Use the little cross to act as "bullet" points for your notes and jottings!


Use double sided tape or glue to adhere your fussy cut gals to the side of the card where they stand out on the bright coloured paint!


Try playing around with other Blank Page Muse Stamps and colour combos and hae fun creating these cards!


Use your journal cards on their own, in your journals or diary - have fun with them!


Happy Stamping
Sharon
Don't forget to check us out at all of our social media "haunts"!!!
The Blank Page Muse- https://blankpagemuse.com/

Wednesday, March 21, 2018

With Sympathy Card

Hello Gals,
I'm glad you stopped by for my second project of the month. I hope you will gain some inspiration to try your own sympathy cards. They are certainly not the easiest thing to make during a difficult time.  I always try to keep a few tucked away so that I don't have to struggle during a stressful time when I may not be feeling particularly creative. In reality, this design is suitable for a variety of sentiments (birthday, thank you etc...) but in this case it seemed to me to require a sympathy sentiment.
These rubber stamp designs are available at the Blank Page Muse.
www.blankpagemuse.com

Blank Page Muse Stamps:
Birds & Clocks Rubber Stamp Set
 http://blankpagemuse.com/birds-clocks-rubber-stamp-set/
http://blankpagemuse.com/art-journaling-2-rubber-stamp-set-by-terri-sproul-sc24/


Background Grunge Art Rubber Stamp Sheet designed by Pam Bray

http://blankpagemuse.com/background-grunge-art-rubber-stamp-sheet-designed-by-pam-bray-scpbr-001/

Other Supplies:
  • Platinum pigment ink pad
  • Pink pigment ink pad
  • White pearl cardstock
  • Watermark ink pad / clear embossing powder / heat gun
  • White gel pen
  • Embossing tool
  • Mini pearls
  • Gold sentiment 
  • Pink card base


Directions:

1. Stamp the flourish image randomly across the card base. Use platinum ink to stamp the background making sure to vary the position by rotating the stamp for each new impression.

2. Stamp the roses onto white pearl cardstock using watermark ink. Then emboss with clear embossing powder and heat set. Rub a pink ink pad lightly over the images and cut out. Next, cut out some simple leaf shapes. For added detail, use an embossing tool to draw the vein down the center of each leaf. Stamp the bird using pink ink, carefully cut out, and set aside.


3. Use a white gel pen to add highlights and detailing to the stamped background image. Select various dots and carefully trace over them to subtly enhance the design.  Adhere the cluster of roses to the lower right corner and the bird to the upper left corner.

4. Finally, embellish the card with a gold sentiment in the upper right corner. Add a pearl for the bird's eye and a small scattering of various gold dot accents.

A Closer Look:


 To purchase the stamps to complete this project, visit www.blankpagemuse.com

For more inspiring paper-craft projects from the Design Team, be sure to visit us at

Follow us on Facebook and
Join the Blank Page Muse Fan Group...HERE


https://blankpagemuse.blogspot.com/p/creative-challenge-rules.html
Come play with us in the NEW Monthly Creative Challenge
  Checkout the Blank Page Muse Creative Challenge.
This month's theme is ATC.
Create a new project following the theme and add it via the Inlinkz linky tool.
There will be a random drawing prize for a Blank Page Muse Gift Certificate.
You can find all the guidelines HERE.

To learn more about our fabulous designer Karen and see more of her projects
visit her blog...Art & Soul.
Thanks for visiting!

Monday, March 14, 2016

Spring Booms Pillow Box


Chris here and today I would like to share with you this beautiful pillow box!
To create this project I started off with some amazing die cuts & stamps from Sin City Stamps.
Sin City Stamps Supplies include
Pillow Box Die Cut
Flower Die Cuts (3D and outline)
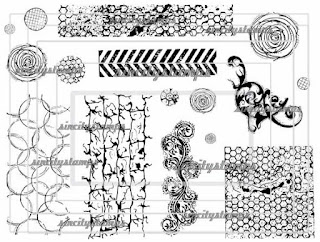
Art Journaling with Terri Sproul 2 Stamps
Sin City Ribbons-Dark purple, white double lace, and light purple
Other supplies used include Tim Holtz Distress Inks-Dusty Concord

I started by stampin my pillow box with the Art Journaling with Terri Sproul 2 Stamps

 I then folded my box and added some die cut flower outlines.


 I then created my 3D flowers by "rolling the up". You can see the flower before I started on the left and the finished flower on the right!

 I then attched my flowers to the pillow box and added the ribbon. You can see how I put the first  two ribbons together here. To complete the ribbons I added another bow in the light purple ribbon.


 And here is the finished project! I hope you enjoyed this project!


Monday, July 20, 2015

Love Anniversary Card


Hi!  Chris here sharing this sweet LOVE card.  I LOVE that this card mixes 3 different stamp sets and yet they all look like they belong together!  So let us get started.

Supplies:
Sin City Stamps: Art Journaling 2 (script, love)
                          Natural Beauty (flower)
                          Classic Spark (diamond background)
Paper: Pacon MultiMedia Paper
          Core'dinations Cardstock
Ink: Ranger -  Archival (Jet Black)
                  - Tim Holtz Distress Ink - Old paper, Spiced Marmalade, Rusty Hinge
                  - Tim Holtz Distress Markers - Shabby Shutters, Black Soot, Tea Dye, Iced Spruce,     Wild Honey
Water Brush
Ribbon -  Ranger Tim Holtz Crinkle Ribbon

To start off I stamped my background piece using the Script stamps from the Art Journaling 2 collection and the Old Paper Distress Ink.  The stamp wasn't quite large enough for my background piece so I just overlapped the stamping on the edges.

I then stamped the script using the Classic Spark Diamond background using my Jet Black Archival Ink.  I then matted the stamped background onto black cardstock and set it aside. (sorry I did not take a picture at this stage)

My next stamp was to stamp this amazing flower from the Natural Beauty collection using Archival Ink.  Make sure you use a waterproof ink at this step since we will be coloring this in with a water brush.

I started by coloring in the leaves using the Shabby Shutters Distress marker (see the picture on the left side) I then added some depth to my coloring by adding a darker marker - the Iced Spruce Marker. I gently brushed over the coloring with a water brush to help bend the inks a bit.

 For the Flower I started by coloring in the center with my Tea Dye marker. I then added  some touches of Wild Honey Marker to the flower.  I then stamped my Spiced Marmalade and Rusty Hinge ink pads onto my Craft sheet.


I used my water brush to pick up those colors and shading to my flower. You can see the shading below.


I then matted my completed flower onto card stock and added it to my background piece. 

To create the matching ribbon I started by adding some water to my leftover ink on my Kraft sheet and mixing it all together. 


I then spritzed my white crinkle ribbon with water and then swirled it around in the ink.


This is what my ribbon looked like after dying!  And since I used the same colors I used for stamping it coordinated perfectly!


To add my sentiment I used the Things I Love stamp from the Art Journaling 2 Collection.  Since I only needed the LOVE portion of the stamp I used my Black Soot Distress marker to ink only that word .  


I then matted my sentiment and attached it and the ribbon to my card!  I hope you enjoyed my project and decide to give at least one of the techniques a try!  


Copyright Text

Blank Page Muse 2018 Sin City Stamps 2013