Showing posts with label bullet journal. Show all posts

Thursday, July 25, 2019

Just Us Girls Journaling

Hi Again Blank Page Muse Stampers!
Hope you are all enjoying our colourful month of inspiration!
I decided to create some "journaling" cards which are great for making notes and recording your thoughts!
And to make it quick and easy I've made them with only minimal supplies - perfect for those on a budget and also perfect for using up your bits & pieces of left over card and paints!
You can also adapt this style to your bullet pages and journals!
Hope you have fun!
Supplies:
Blank Page Muse Stamp Set: Just Us Girls
Blank Page Muse Stamp Set: Art Journaling #2
Index Cards 6" x 4"
Acrylic Paint 3 colours
Old Gift/Credit Card
Black Card
Embossing Ink and Fine White Embossing Powder
Black Archival Ink
Tools: glue, double sided tape, heat gun, scissors
Instructions:
Gather your index cards, paint and gift card.

Place "blobs" of paint along the left hand side of the card at the top.


Use the old gift card to drag the paint from the top to the bottom. You should have enough paint on the gift card to paint another index card. Allow to dry.


While the paint is drying stamp the "Just Us Girls" onto black card using your embossing pad. heat emboss with fine white embossing powder. Fussy cut the gals!


Using you Black Archival Ink stamp your choice of wording from the Art Journaling #2 stamp set directly into the index cards. Use the little cross to act as "bullet" points for your notes and jottings!
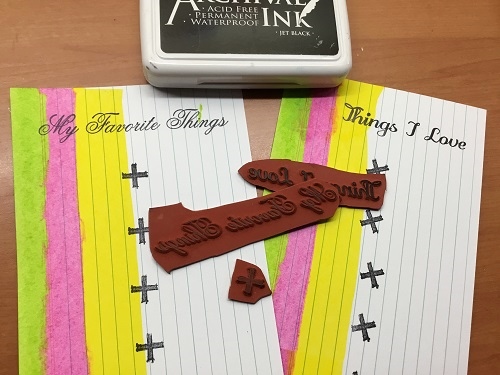


Use double sided tape or glue to adhere your fussy cut gals to the side of the card where they stand out on the bright coloured paint!


Try playing around with other Blank Page Muse Stamps and colour combos and hae fun creating these cards!


Use your journal cards on their own, in your journals or diary - have fun with them!


Happy Stamping
Sharon
Don't forget to check us out at all of our social media "haunts"!!!
The Blank Page Muse- https://blankpagemuse.com/

Monday, May 6, 2019

Calendar Inspiration

Greetings BPM Fans!  One of the resolutions worth following up on is "leading a more organized life." The TV series "Tidying Up" on Netflix hammered this concept home, that if your surroundings are organized, one would lead a less stressed life.  In researching of general organizing, bullet journaling came up as a great way to time manage.  After all, organizing one's life is just as important as keeping your living space tidy.

Google Calendar is amazing, but perhaps these daily-weekly-monthly calendars might be a better approach for scheduling my time better. 


The Bullet Journal was created by Ryder Carroll. In his words, the Bullet Journal is meant “to help you track the past, organize the present, and plan for the future.” It's a very analog (non-digital) way to write everything down with an artistic flair.  As someone that is just learning this technique and approach, this post will be focusing on one of many aspects of the Bullet Journal -- the Monthly Calendar.  

Supplies:
Small Notebook, blank no lines  5.57 x 8.25 inches
Distress Oxides [Mustard Seed, Mowed Lawn, Carved Pumpkin, Broken China, and Blueprint]
Blending Brushes
Alphabet Stencil
Post-it Notes
Archival Black Ink
Ruler
Black Ink Pen [Micron]

Instructions:

1. Since this is a three page spread, organizing the pages is the first step. Pick out your header title page, then on the other side of that page, the two page calendar spread should be saved.

2. Add Post-it notes to mask off 1" of the edges of the paper making a border, leaving a open square of paper.

3. Begin stamping inside the open square using the curved flower stamp, stamping them like a frame within the inside square using the black archival ink.

4. Stamp in the center Flower Bunch so that it is surrounded by the curved flower images.  Allow ink to dry.

5. Color in the stamps with the blender brushes and oxides. Once all blended, remove the Post-it notes.

6. Taking a stencil (or if you prefer, write it in yourself), add the month title above the stamped and blended square.


7. Flip to the blank double page and start measuring your actual calendar.  On this version, the standard Sunday through Saturday, 7 days grid was used, with roughly a 1" border left empty.  Using a ruler, measure out your calendar, using a pencil first.  Once you have the calendar measured out, lay ink across the pencil.  Erase the pencil lines once the ink is dry.


8. Measuring 1" from the right side of the double calendar page, fold over two pages on the edge of paper and cut off. This creates a "Dutch Door" so you can write notes and lists outside of the calendar (on the next pages) without cluttering up the calendar margins, because we're going to be stamping all over that and there won't be room.


9. Flipping pages to the first full page after the Dutch Door, add Post-it notes block out the main page leaving the 1" margin uncovered. Begin stamping using the curved flower stamp.


10. Flipping back to the calendar double page, cover the drawn out calendar, leaving a 1" border on the top and bottom margins. Stamp the flower bunch stamp across the top and across the bottom, making sure not to over stamp over the right margin.


11. Start coloring the stamped borders with the blending brushes and Distress Oxides.


12. Once all blended in, remove the masks. Now your calendar is ready to be filled in with activities and any future planning.


Using the Blank Page Muse stamps to decorate calendars really gives the ability to personalize and add something special to your day. 


More ideas & crafts by Mercy

Want an extra 15% off on your next order? Use this code on your order! Good until June 1, 2019. BPMDtMercy2019

Copyright Text

Blank Page Muse 2018 Sin City Stamps 2013