Showing posts with label acrylic Paints. Show all posts

Sunday, February 18, 2024

Time Flies: It's up to You to Navigate!

 Hi Creative Fans!

Today I am sharing a mixed media journal page using stamps available in store plus collage image and stencil from my stash.


Stamps used:
Dragonfly by Pam Bray Designs
Time Flies Word Stamp


I had a page in my journal that I had painted with excess paint so I decided to finish it off with a Steampunk theme.

I added texture paste through a stencil and once dried I painted over the texture with Lindy's Magicals.
I stamped the little cogs/gears stamp over the background. I added embellishments, bits of washi and book page along with a fab Steampunk college image from my local scrapbook store!


Check out my blog for more inspiration! 

***Remember to us the code BPMSharon at the store for 15% off ***
So many fab stamps to choose from!
Note: you can use the code at either the IBFS Store OR the BPM Store - why not do an order from each and increase your stash!

And visit our social media sites for more stamping fun!
I Brake For Stamps -https://ibrakeforstamps.com/ 

Monday, August 12, 2019

The Scent of a Woman....

Hi BPM Fans!!
I hope you are enjoying this months blog posts with our fantasy and layered techniques themes!
When I think of fantasy, fairies & magic I also think whimsical, fun & imaginative sooooo I've created a quirky character using stamps and collage elements and added her to a mixed media art journal page!
I've also made a layered background which is one of my go to techniques for backgrounds in my journals!
I love that this idea could be used to make a birthday card or postcard or even a bookmark!


With so many new stamps released last month you have such a huge choice to create with!!!!
Make sure you head to the store and grab your favs!!!

Supplies:
Blank Page Muse Stamps: Vintage Scents Perfume Ephemera Set
Journal or Page Insert or Blank Card
Scrap patterned papers, paper doily, tissue paper, picture cut outs, plain pink paper, white card
Acrylic paints
Black Memento Ink
Paper Doll Collage Elements (Art Tea Life Collage Sheet used here)
Embellishments: muslin cloth scraps, computer generated wording, diamantis
Tools: scissors, glue, matt medium, sponge, gel medium, posca pen, colouring pens

Instructions:
Start by stamping one of the perfume bottles onto white card with black ink, colour image - Copic Markers used here - then fussy cut the stamped image.


Choose another of the perfume bottles and stamp on some lightly coloured paper - pale pink textured paper used here - and fussy cut bottles.


Fussy cut paper doll elements from your collage sheet - used here legs, head, sash & bow.


Glue all of your paper doll elements together ready to add to your page background. Computer print your wording and cut out - alternatively you may like to use Blank Page Muse word stamps!


 Next step is create your page background using scrap bits & pieces: plain & patterned tissue paper, paper doily, old book pages, picture cut outs etc. A great way to use your scraps!


Adhere the "bits & pieces" over the page with glue or matt medium - leave some white space around the edge - overlap the pieces - no need to be neat - messy is best! Allow to dry.


Use acrylic paints and a sponge to spread paint over the page - use a thin layer so the paint is translucent and you can still see the patterned papers underneath. Allow to dry.


Arrange your paper doll, perfume bottles, computer generated wording and muslin cloth scraps on the page and adhere. Add a couple of sparkly stick on gems for some bling and you have completed your page!

Thank you for joining me today - I hope you like this fun page!
Have fun stamping & creating!
Sharon


Don't forget to check us out at all of our social media "haunts"!!!
The Blank Page Muse- https://blankpagemuse.com/

Thursday, July 25, 2019

Just Us Girls Journaling

Hi Again Blank Page Muse Stampers!
Hope you are all enjoying our colourful month of inspiration!
I decided to create some "journaling" cards which are great for making notes and recording your thoughts!
And to make it quick and easy I've made them with only minimal supplies - perfect for those on a budget and also perfect for using up your bits & pieces of left over card and paints!
You can also adapt this style to your bullet pages and journals!
Hope you have fun!
Supplies:
Blank Page Muse Stamp Set: Just Us Girls
Blank Page Muse Stamp Set: Art Journaling #2
Index Cards 6" x 4"
Acrylic Paint 3 colours
Old Gift/Credit Card
Black Card
Embossing Ink and Fine White Embossing Powder
Black Archival Ink
Tools: glue, double sided tape, heat gun, scissors
Instructions:
Gather your index cards, paint and gift card.

Place "blobs" of paint along the left hand side of the card at the top.


Use the old gift card to drag the paint from the top to the bottom. You should have enough paint on the gift card to paint another index card. Allow to dry.


While the paint is drying stamp the "Just Us Girls" onto black card using your embossing pad. heat emboss with fine white embossing powder. Fussy cut the gals!


Using you Black Archival Ink stamp your choice of wording from the Art Journaling #2 stamp set directly into the index cards. Use the little cross to act as "bullet" points for your notes and jottings!


Use double sided tape or glue to adhere your fussy cut gals to the side of the card where they stand out on the bright coloured paint!


Try playing around with other Blank Page Muse Stamps and colour combos and hae fun creating these cards!


Use your journal cards on their own, in your journals or diary - have fun with them!


Happy Stamping
Sharon
Don't forget to check us out at all of our social media "haunts"!!!
The Blank Page Muse- https://blankpagemuse.com/

Wednesday, July 3, 2019

Hello Llama!

 Our DT Member Sharon has created these fabulous decorated envelopes which are perfect for you to use in your crafty swaps or regular snail mail letters!
Who doesn't love to receive a colorful stamped envelope in the mail? Especially when envelopes are so quick and easy to "adorn" there is no excuse for sending boring snail mail ever again!
 Sharon used blobs of paint and an old gift card to cover the envelope background then embossing ink and black embossing powder to stamp the images.
She used stamps from the Happy Day Llama Set by Pam Bray on the long envelope and a little flower from the Petals and Flowers Set by Michelle Frae Cummings.
The great thing about decorating envelopes is you can use any of your Blank Page Muse Stamps!!!
We hope you feel inspired to have a go!

Don't forget to check us out at all of our social media "haunts"!!!
The Blank Page Muse- https://blankpagemuse.com/

Thursday, February 14, 2019

"KISS" Keep it Simple Stupid!

Hi Blank Page Muse Stamps Fans!!
How are you all enjoying this months stamping inspiration?
Always lots of wonderful and amazing creations by the DT here at the Blog!
 
Today I am sharing the process for making my altered index card with my "WORD" for the Year!
I've never actually had a "word" for the year but this year I really needed this word so I decided to make a little piece of art with my word to pin up right next to my computer and crafting area!
My word is "KISS" Keep it Simple Stupid - we can over-complicate things and just make life more stressful so this is a reminder to keep it simple and work through things day by day!
Hope you gain some inspiration and maybe share your "word" with us!!
 
Supplies:
Blank Page Muse Stamp: Lips Small
Index Card 6 x 4 or card cut to size
Patterned Tissue Paper
Acrylic Paints
Gesso
Gel Medium
Embossing Pad and Black Embossing Powder
Die Cut Letters
Black Posca Pen
Extras: any embellishments you like, computer generated wording, gemstone, ink sprayed muslin cloth etc
General supplies and tools: heat gun, glue, spatula, scissors, old credit/gift card
Instructions:
Start with your index card, acrylic paint and old credit card and add "dobs" of paint to the top of the card.


Use the credit card to drag the paint down the card, cover the entire card with the paint.
Tip: use the left over paint on the credit card to prepare another index card or journal page for use another day - makes creating quicker!


The pic shows the entire card covered with paint - no need to be neat - it looks better messy! Allow to dry.


Apply a layer of gel medium to the entire card with a spatula or paintbrush and cover with translucent patterned tissue paper - smooth out and make sure it has adhered. Allow to dry and then trim the edges.


Use the spatula to spread a very thin layer of gesso over the card - no need to cover the entire card - it's just to "tone down" the paint colour ready for the next step!


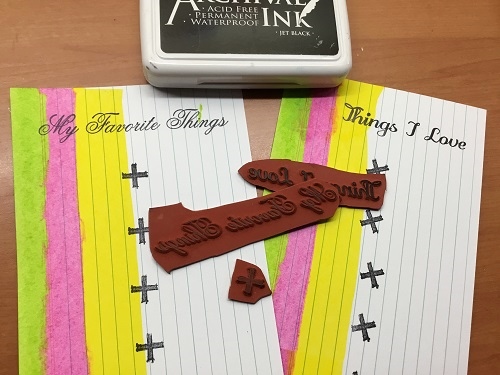
Time to have some fun with the Blank Page Muse "Lips" Stamp! Use your embossing ink pad and randomly stamp the Lips over the card background. Emboss with fine black embossing powder. Use a black Posca pen to edge the card.


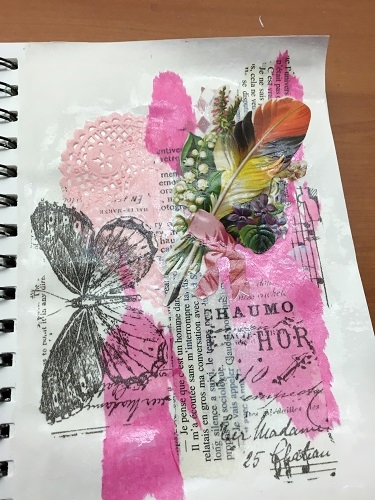
Lastly gather your finishing elements including the die cut letters, computer generated wording, cloth scrap and gemstone. Arrange on your background, adhere and you have your finished inspirational word to display and take note of!!!

The finished creation:
 
Thanks for joining me today - have a great week!
Happy Stamping!
Sharon
 Don't forget to visit us at all of these Social Media Sites for amazing inspiration:

The Blank Page Muse- https://blankpagemuse.com/

Monday, October 8, 2018

Spooky Pineapple Treat Bags???

Hi Again Blank Page Muse Fans!!!
Who's ready for some quick and fun little treat bags????
I've used some tiny plain paper bags and transformed them into treat bags with a couple of Blank Page Muse Stamps and some collage witch's hats!! FUN!!!!
Trick or Treat!!!!!
Supplies:
Instructions:
Stamp the  Pineapple stamp onto white card and color with your favorite coloring medium - Copic Markers used for these samples - and fussy cut - cut off the pineapple "crown"!!!!.
Print the collage witch's hats onto card and fussy cut.


 Adhere the witch's hat to the pineapple and add the wiggle eyes!!


Stamp the "Spooky" word stamp onto Kraft coloured paper and tear out.
Decorate your little paper bags with acrylic paint in colors to match your "pineapple witches" LOL!! Once the paint is dry use your black archival ink pad and stamp with the "crackle" look stamp from the background grunge set - it has a spooky look!!!!
Add the wording, the assembled Halloween Pineapples and a piece of muslin cloth to the paper bags.


Fill your completed bags with treats for the kids!!!

Hope you have some fun using this "Pineapple" stamp for something other than "Fun in the Sun" LOL!!!
A perfect way to have fun with your rubber stamps and get creative with their uses!!
See you again soon!
Happy Halloween!
Sharon
And as always don't forget to visit us at all of these Social Media Sites:

The Blank Page Muse- https://blankpagemuse.com/

Copyright Text

Blank Page Muse 2018 Sin City Stamps 2013