Showing posts with label Heidi Macy. Show all posts

Tuesday, July 18, 2023

Sea Turtle Card

 Hello from design team member, Heidi.  Summer is here and bring on the beachy crafting!  One of my favorite stamp sets for this is I Brake for Stamp’s By the Sea Rubber Sheet.  It has fun images, especially this Turtle, in two sizes.

How I made this card was by first sponging blue ink over the center of my white card.  I used the same ink to stamp several of the little stamps on the back ground. I think I used the shell, the seahorse and the fish.  Then I splattered some water drops over top.


Second, I used a blue cardstock and die-cut it to a rectangle. I sponged the same blue ink around the edges here. I stamped and colored the turtle on white.  I trimmed it out.  I then added my sentiment and put the turtle right front and center.

I like to be able to mail flat cards, so I didn’t add anything else, but this card would look great with some knotted twin.

I hope you are enjoying your summer and summer crafting!

You can also find more inspiration at the links below:

The Blank Page Muse- https://blankpagemuse.com/

FB Fan Page- https://www.facebook.com/groups/blankpagemuse/

Instagram Shop- https://www.instagram.com/blankpagemuse/

Instagram Blog- https://www.instagram.com/blankpagemuseblog/

Twitter- https://twitter.com/BlankPageMuse

Pintrest- https://www.pinterest.com/blankpagemuse/boards/

Sunday, June 18, 2023

Clean & Simple Mask-uline Floral Technique

 Hello from design team member, Heidi.  I have always thought that there is no reason why flowers should not be masculine.  Every guy I know likes flowers.  Anyhow, it is corny but I decided to use a flower and masking and make it sort of a masculine card.  


I used this HUGE Dahlia stamp.  It is such a great stamp, I use this one a lot.  

1) I used a grid to mask a straight section of my card front.  I used Mint Tape, and I didn’t even measure how wide it is.  

2) Stamp right over the tape so that the flower shows up on either side.

3) Using both the tape and a ruler, use a black marker or pen to draw a border on the flower.  I didn’t extend beyond the stamped image, but depending on what length of sentiment you will use, you totally could extend it, even to the edge of the card. 

4) Remove the tape and then stamp your sentiment in between the lines.  

I finished the card by coloring just little parts of the flower with a light grey and a green marker. I then matted the card front with grey cardstock and voila, a clean and simple Thank You card, suitable for any recipient.  Even a guy.

This card uses Quarter Sheet Dahlia stamp set and also the sentiment comes from Fall Rubber Stamp set by Pam Bray Designs.

You can also find more inspiration at the links below:

The Blank Page Muse- https://blankpagemuse.com/

FB Fan Page- https://www.facebook.com/groups/blankpagemuse/

Instagram Shop- https://www.instagram.com/blankpagemuse/

Instagram Blog- https://www.instagram.com/blankpagemuseblog/

Twitter- https://twitter.com/BlankPageMuse

Pintrest- https://www.pinterest.com/blankpagemuse/boards/

Thursday, June 8, 2023

Trellis Hydrangea Card

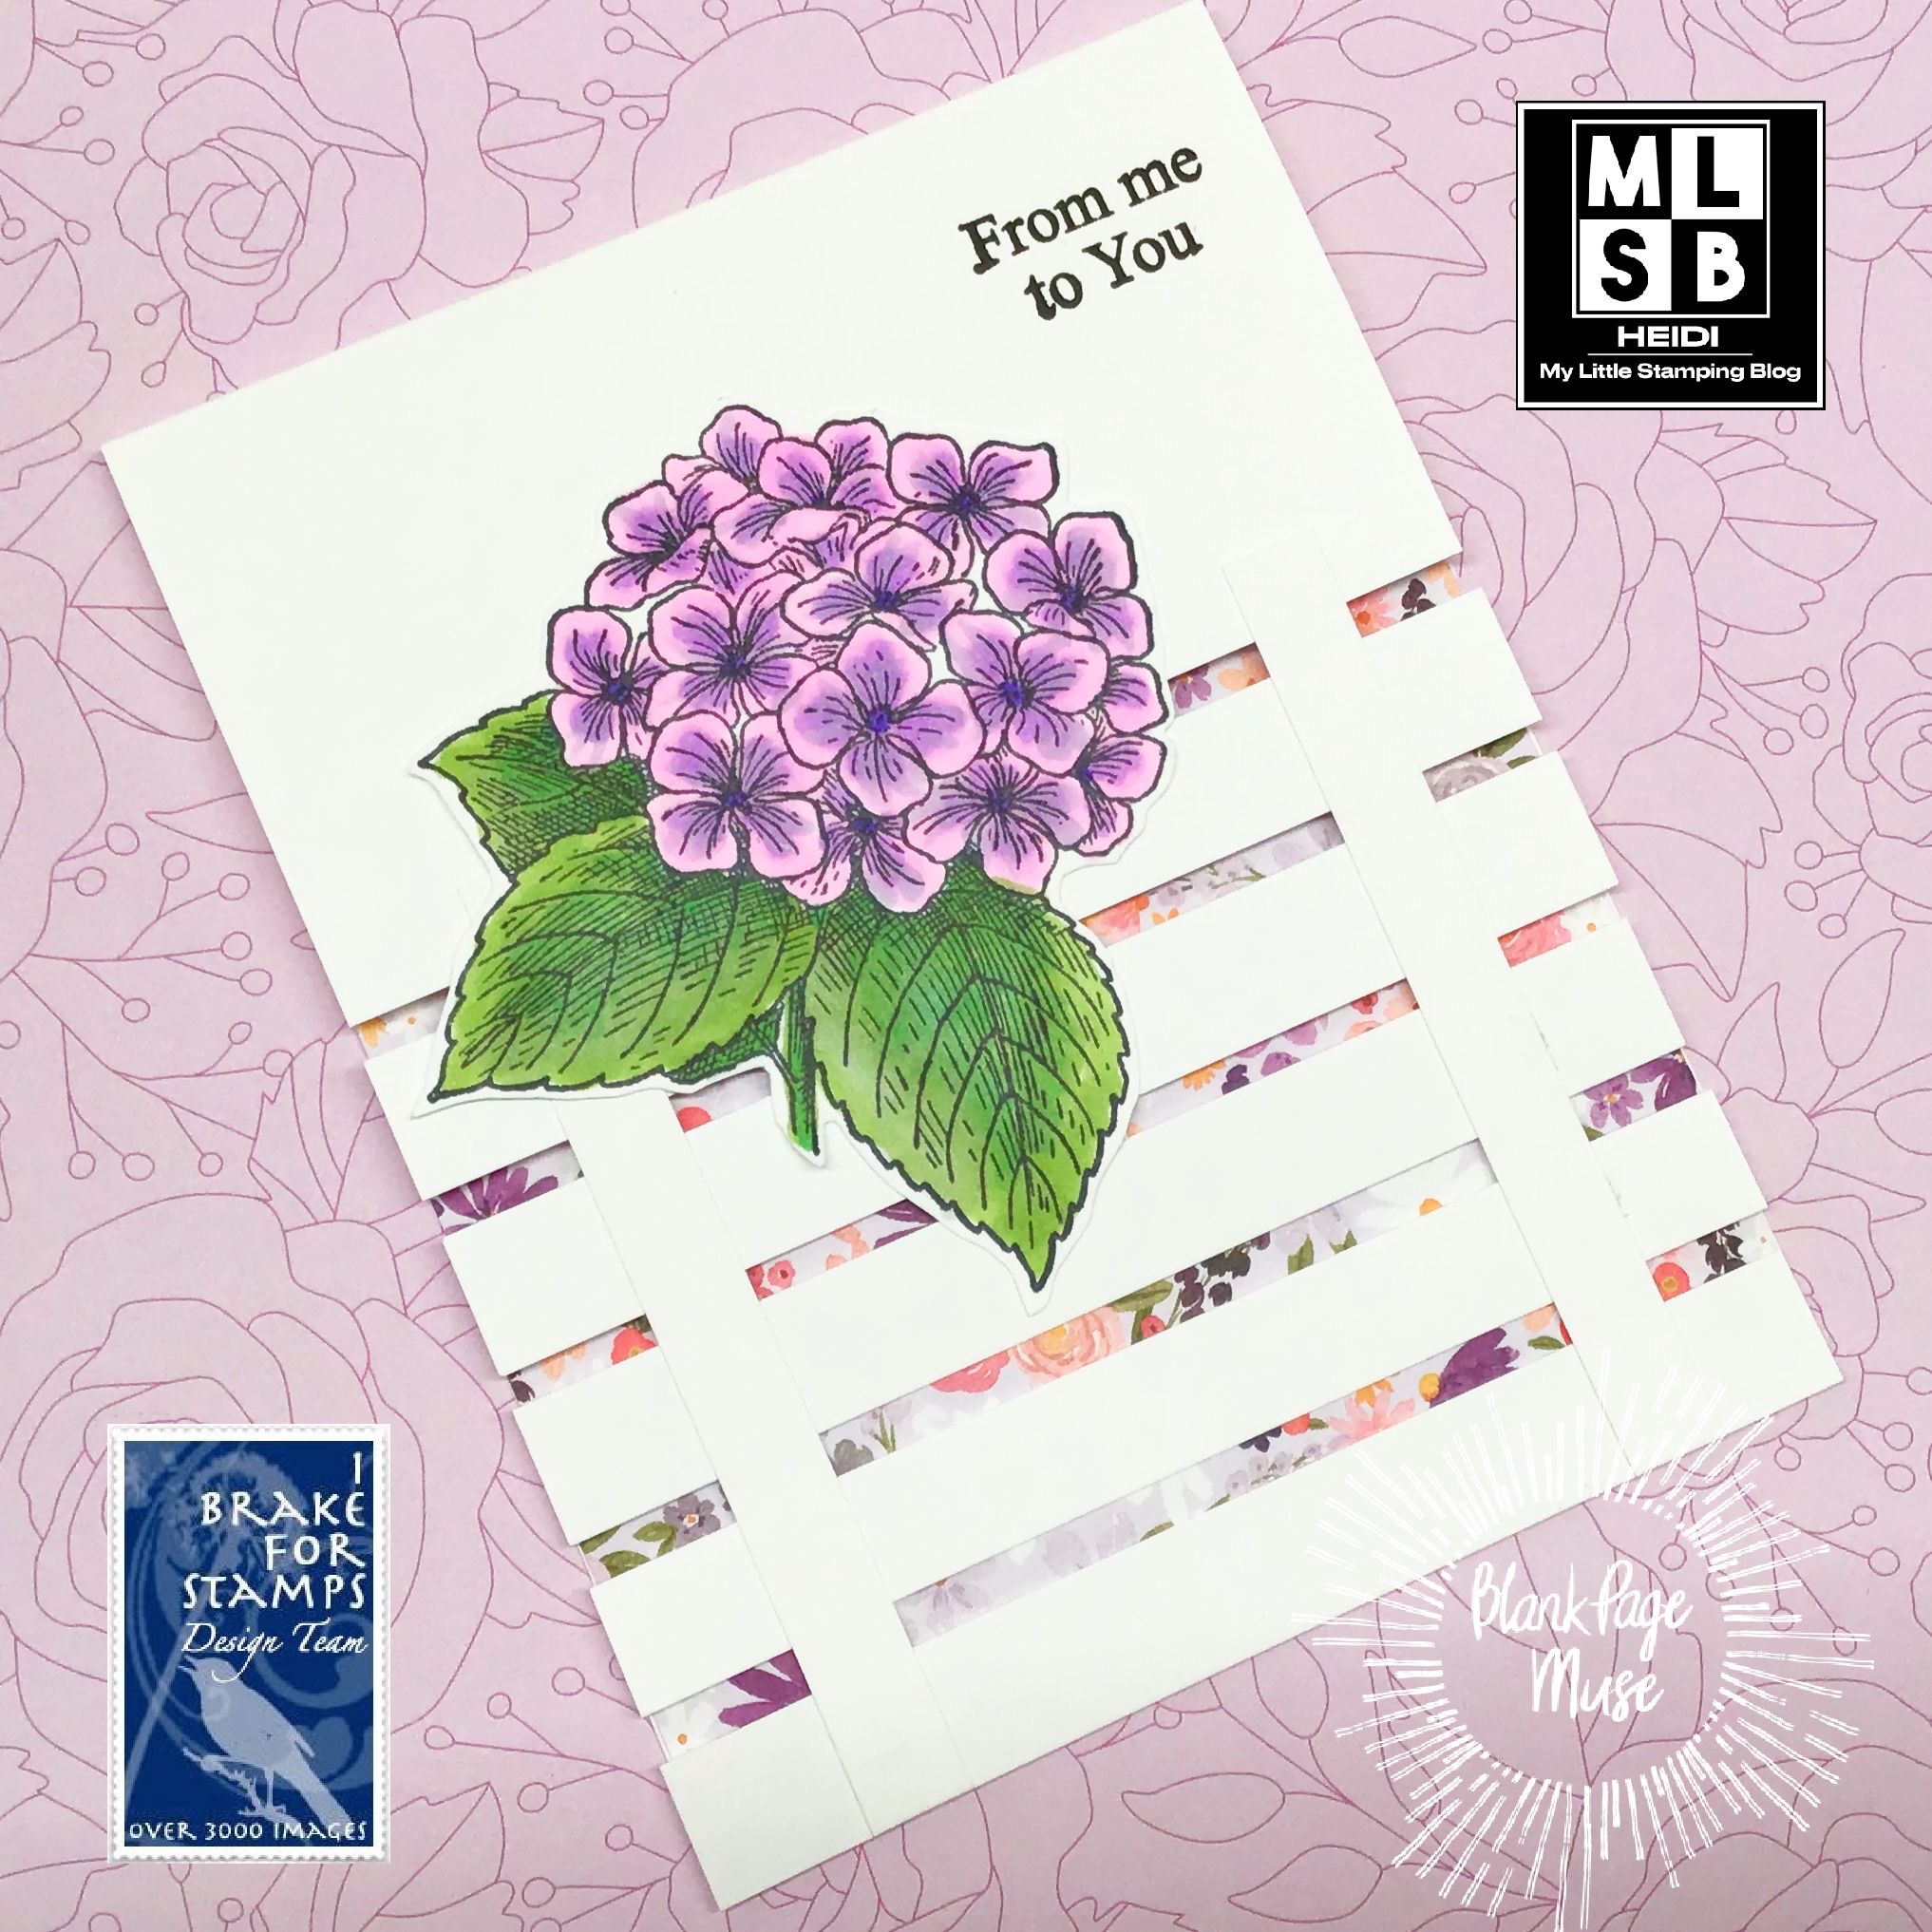
 Hello from design team member, Heidi.  I am going to share with you today a Trellis card.  These are all the rage and they are not difficult!


1) Start by creating a top fold card and folding it.  Cut 3.25 inches off the front flap.  

2) Create your trellis pieces.  You will need 5 pieces for your horizontal slats that are 4.25 x 0.5 inches, and then for the vertical slats, 2 pieces that are 3/8 x 4 inches, and then for the inside vertical slat reinforcement, 2 pieces that are about a 0.25 x 4 inches.  

So that is 9 pieces total.

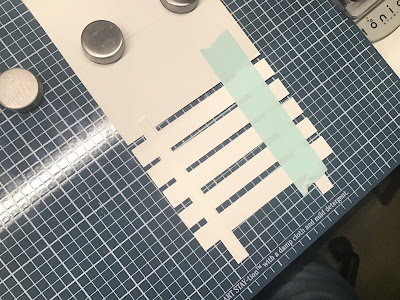
3) Now you want to get some washi or low tack tape, and place it FACE UP on your card front.  You have your card folded, and then just arrange the 5 horizontal slats in place.  Start with the bottom one - line it up at the bottom of the back of the card, and then just eyeball the rest to be mostly even.

DO NOT stress out about exact perfect spacing.  

4) Then put dots of glue in place for your vertical slats and place the wider slats for your card front.  I used magnets to weigh these down, but you could use your stamping blocks.  Note that these pieces are too long!  That is a good thing and we will be trimming them later.

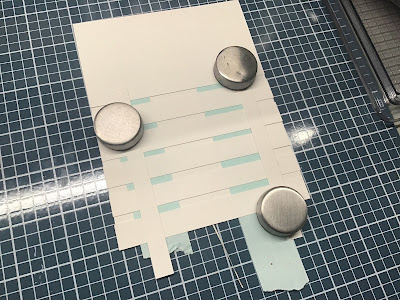
5) After a the front is dry, open up the card, and reinforce the inside with the thinner slats. These pieces also are too long and will be hanging off the bottom of your card.  Once it is fully dry, trim the excess.

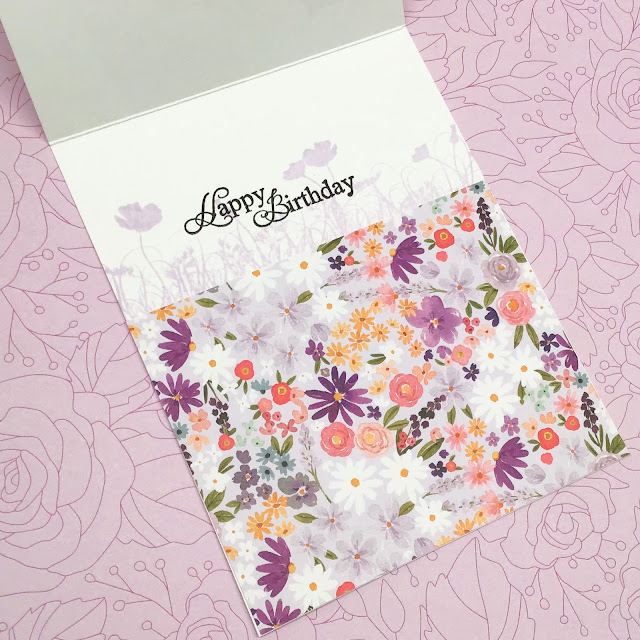
6) Cut a piece of patterned paper to line the inside of your card.  It needs to cover the open areas, so it must be at least 4.25 x 3.25.  Attach this to the inside of your card.

7) Decorate as you wish!

I used a beautiful hydrangea stamp for the outside of my card.  I colored it and fussy cut it out.  

For the inside, I used a floral border stamp from the same stamp set.  I stamped this in light purple ink, and I did the stamping before I added my patterned paper, just to make it easier.  

I then used some sentiments to finish off the outside and the inside and I was done!

The stamps I used for my card can be found in the I Brake for Stamps store.

Half Sheet Hydrangea Stamp Sheet

Sentiments from Florals Sheet Flowers for You

What do you think? Will you try, or have you already tried a trellis card?

You can also find more inspiration at the links below:

The Blank Page Muse- https://blankpagemuse.com/

FB Fan Page- https://www.facebook.com/groups/blankpagemuse/

Instagram Shop- https://www.instagram.com/blankpagemuse/

Instagram Blog- https://www.instagram.com/blankpagemuseblog/

Twitter- https://twitter.com/BlankPageMuse

Pintrest- https://www.pinterest.com/blankpagemuse/boards/


Thursday, May 18, 2023

Clean and Simple with Ephemera

 Hello from design team member, Heidi.  Today I wanted to make another clean and simple card, but this time, using some patterned paper scraps and ephemera.

I punched out three 1.25 inch squares of patterned paper.  I then cut white cardstock at 4 x 5.25 and embossed it.  This is optional, but I then used my paper scoring tool to scores some lines to be my guide for adding the square patterned paper pieces in a straight line.  It also adds a decorative border.  

After that, I just chose something from the coordinating ephemera pack to finish off my card.  Not ever card needs to be difficult!  

The paper pack and Ephemera is from Pam Bray’s Masquerade Line.

You can also find more inspiration at the links below:

The Blank Page Muse- https://blankpagemuse.com/

FB Fan Page- https://www.facebook.com/groups/blankpagemuse/

Instagram Shop- https://www.instagram.com/blankpagemuse/

Instagram Blog- https://www.instagram.com/blankpagemuseblog/

Twitter- https://twitter.com/BlankPageMuse

Pintrest- https://www.pinterest.com/blankpagemuse/boards/


Monday, May 8, 2023

(FOR MAY 8) Clean and Simple Strawberry Get Well Card

 Hello from design team member, Heidi.  I hope you are having a nice springtime.  I was in a clean and simple mood today!

I love this strawberry border stamp and it is so easy to color and cut out.  The I Brake for Stamps store has a good selection of border stamps to choose from!  You can find them here.

I simply added a little border of patterned paper to the bottom, and matted the cardfront in red cardstock.  I think it is going to work great for my friend who recently broke her leg. 

Strawberry Border Stamp

Sentiment from Everyday Phrases

You can also find more inspiration at the links below:

The Blank Page Muse- https://blankpagemuse.com/

FB Fan Page- https://www.facebook.com/groups/blankpagemuse/

Instagram Shop- https://www.instagram.com/blankpagemuse/

Instagram Blog- https://www.instagram.com/blankpagemuseblog/

Twitter- https://twitter.com/BlankPageMuse

Pintrest- https://www.pinterest.com/blankpagemuse/boards/

Tuesday, April 18, 2023

Birthday card with Stencil Butters

Hello from design team member, Heidi. Today I would like to share a card that is primarily stenciling.  I used two colors of stencil butter, which are found in the Blank Page Muse shop.  The ones I used are the pearl ones, and they are just sooooooo pretty!  The photos do not do this justice - it was so hard to capture!


I just randomly applied the two colors stencil butter over the stencil to cover the stencil, and then when I scraped off the excess, they blended and mixed to get a really pretty look.  The base for this was the silver glitter alcohol ink cardstock.  It does hold up well to stencil butter.

I didn’t want to cover up any of the pretty stencil, so I used a fun circle sentiment over top, matted the card in the same color turquoise cardstock, and called the card complete.

If you haven’t had a chance to try these stencil butters, they are really a lot of fun, and easy and smooth to use.

The products I used in this card are:

The Crafters Workship Wave 6x6 stencil

Turquoise Stencil Butter

Denim Stencil Butter

I Brake for Stamps sentiment from Thinking, Happy, Get Well, Thanks set

You can also find more inspiration at the links below:

The Blank Page Muse- https://blankpagemuse.com/

FB Fan Page- https://www.facebook.com/groups/blankpagemuse/

Instagram Shop- https://www.instagram.com/blankpagemuse/

Instagram Blog- https://www.instagram.com/blankpagemuseblog/

Twitter- https://twitter.com/BlankPageMuse

Pintrest- https://www.pinterest.com/blankpagemuse/boards/


Saturday, April 8, 2023

Spring Bunny

Hello from design team member, Heidi.

Today I would like to share this cute spring bunny.  She is peeking out of a spring meadow.  

How I did this card was starting with watercolor paper.  I took 3 shades of Distress inks and sponged them on the side of my panel. I didn’t bother doing any masking or anything, just sponged them on and blended.  The colors are Scattered Straw, Mowed Lawn and Broken China.  I then splattered some clean water on to get texture, and then, I splattered some water colored with the Broken China blue ink to get some colored texture.  


After this dried, I stamped my bunny over top with Versafine Black ink.  I used water based markers to fill in the image and then blended it with a wet brush.  

After adding this sentiment on a green strip and matting with the same color, I finished the card with a few different tiny orange gems.  

I really like the spring look of this card!  I hope it gives you an idea too.

The stamp I used is from the I Brake for Stamps store and it is called Large Rabbit.  It is available both separate and as a part of this great set called MS110 Full Plate.

You can also find more inspiration at the links below:

The Blank Page Muse- https://blankpagemuse.com/

FB Fan Page- https://www.facebook.com/groups/blankpagemuse/

Instagram Shop- https://www.instagram.com/blankpagemuse/

Instagram Blog- https://www.instagram.com/blankpagemuseblog/

Twitter- https://twitter.com/BlankPageMuse

Pintrest- https://www.pinterest.com/blankpagemuse/boards/

Saturday, March 18, 2023

Frilly Flower Notecard

 Hello from design team member, Heidi.  Today, I could use your help. I don’t know what this flower stamp is.  I have a feeling I should know, but I don’t.  I am pretty sure it isn’t an orange flower, but I really wanted it to be orange, and that is the power of stamping, you can really do as you please. 


I stamped three flowers and colored them with alcohol markers. I fussy cut them out, but I really didn’t feel I needed to be too careful with it.  I then added a bunch of glitter glue to the flower.  It looks so pretty when it dries down on the orange.  

I did a simple arrangement for the flowers over an oval die cut and then added a sentiment strip and die cut butterfly to ground the card together.  


This flower stamp is so affordable and so pretty!  

It is called Flower on Stem at the Blank Page Muse shop.

The sentiment was taken from a large sentiment set called Everyday Phrases, and this one is at the I Brake for Stamps shop.

If you know the flower, or think you might, please comment!  It is one of the things that drives me nuts!

Thanks for visiting today!

You can also find more inspiration at the links below:

The Blank Page Muse- https://blankpagemuse.com/

FB Fan Page- https://www.facebook.com/groups/blankpagemuse/

Instagram Shop- https://www.instagram.com/blankpagemuse/

Instagram Blog- https://www.instagram.com/blankpagemuseblog/

Twitter- https://twitter.com/BlankPageMuse

Pintrest- https://www.pinterest.com/blankpagemuse/boards/

Wednesday, March 8, 2023

Rosy Thank You Card

 Hello from design team member, Heidi.  Today I have a pretty thank you card to share.  I like to have a lot of these around because I tend to need a lot at once.


I stamped and colored two of the Rose images and colored them in.  This is such a detailed stamp that it was very easy to color.  I fussy cut them out.

I, then, stamped the Thank You onto some patterned paper.  I also cut an oval window out of white cardstock and embossed it.  

After this all there was left is to assemble the card by using a bit of bright pink cardstock for a mat.  I thought about adding glitter, but in the end left it alone.

The stamps I used are both in the Blank Page Muse shop:

Rose flower with leaves by Terry Sproul

Fancy Thank You stamp (my favorite thank you stamp!)

You can also find more inspiration at the links below:

The Blank Page Muse- https://blankpagemuse.com/

FB Fan Page- https://www.facebook.com/groups/blankpagemuse/

Instagram Shop- https://www.instagram.com/blankpagemuse/

Instagram Blog- https://www.instagram.com/blankpagemuseblog/

Twitter- https://twitter.com/BlankPageMuse

Pintrest- https://www.pinterest.com/blankpagemuse/boards/

Tuesday, February 28, 2023

Quick Valentine LOVE Card Set

 Hello from design team member Heidi!

Today I want to share an idea to quickly make 4 elegant Valentines.  


First choose 5 patterned papers. I chose ones that have subtle patterns, but this would work with bolder patterns, as well.

Then stamp your LOVE stamp on 4 of these.  Cut the other patterned paper into 4 2.5 inch squares. (If you are using a bold patterned paper, you may wish to white or silver heat emboss the stamp instead.)

Cut out all the letters individually, leaving a slight border.  With a black alcohol marker, create a faux matte around each letter.  (This sounds fussy, but it really doesn’t take much time, especially compared to actually cutting and glueing a black mat.). Also use a colored marker to color in each letter.  I used a dusky purple marker.

Mix up the patterns and arrange the letters on each 2.5 inch square of patterned paper. I highly recommend using liquid glue for this part so that you have time to move the letters around evenly!  Also, matte this on a 2 3/8 inch black cardstock. 

I decided to go over the letters with a sakura glitter pen to bring out the letters and make it look more valentiney.

Not just use this as the focal image of your card!  I just embossed some pink cardstock, added some ribbon and some glitter glue to finish this easy cards!  You could finish them in a simpler way or more ornate way, depending on how much time you have!

Here are my finished cards!


This stamp is part of a wedding stamp set in the I Brake for Stamps store:

Wedding Sheet stamp set

The papers are also in both the IBFS and BPM stores!

Pam Bray Designs Sweet Passion 6x6 paper pad

If you would like another idea for this stamp, please see my card posted HERE.

You can also find more inspiration at the links below:

The Blank Page Muse- https://blankpagemuse.com/

FB Fan Page- https://www.facebook.com/groups/blankpagemuse/

Instagram Shop- https://www.instagram.com/blankpagemuse/

Instagram Blog- https://www.instagram.com/blankpagemuseblog/

Twitter- https://twitter.com/BlankPageMuse

Pintrest- https://www.pinterest.com/blankpagemuse/boards/

Saturday, February 18, 2023

Wedding Card

 Hello from design team member, Heidi.  During Valentine season, I think it is also a nice time to make a wedding card or two.  I already have those stamp sets out, and it is good to have several on hand.


This stamp is so pretty and easy to color. I just sort of randomly “dabbed” my alcohol marker over the areas in green and two colors of pink.  I then used some gel pens to emphasize and add shimmer.  

This stamp is from the Wedding Sheet stamp set from I Brake for Stamps.  This is a great set with many images and sentiments to choose from!

You can also find more inspiration at the links below:

The Blank Page Muse- https://blankpagemuse.com/

FB Fan Page- https://www.facebook.com/groups/blankpagemuse/

Instagram Shop- https://www.instagram.com/blankpagemuse/

Instagram Blog- https://www.instagram.com/blankpagemuseblog/

Twitter- https://twitter.com/BlankPageMuse

Pintrest- https://www.pinterest.com/blankpagemuse/boards/


Copyright Text

Blank Page Muse 2018 Sin City Stamps 2013