Showing posts with label Christmas tags. Show all posts

Friday, December 5, 2025

Christmas Gift Tags with Digital Images

 I love the Blank Page Muse digital Christmas Papers.  For those who like to give your gift wrapping a personal touch handmade gift tags are perfect. They can be used to decorate packages or gift bags. I like to have them made ahead of time, so they are ready to attach as I am gift wrapping.  Today I have eleven tags made with the Frosty Night Christmas Printable Papers and the Vintage Gingerbread Christmas Printable Papers.


Supplies from Blank Page Muse:
Frosty Night Christmas Printable Papers
Vintage Gingerbread Christmas Printable Papers (Candy Cane Paper)
Fancy Flourish Stencil

Other supplies
Ribbons
Lace
Gems
Any other embellishments on hand 
Astro Paste Tropical Tango
TCW Butter Paste Champagne Gold
Spatula
Wide tip Gold Sharpie
Crop-o-dile
Corner Chomper

I gathered items to use on my tags, ribbons, lace, gems, and paste that coordinated with the papers.

I first cut the papers the size of tags I desired, as you will see none of the tags are the same size.  The smaller tags were part of the paper collection and in the shape of a tag. The others are all pieces of the digital papers cut to size. I used the Corner Chomper to round the edges at the top of the tag and the Crop-o-dile to punch a hole in each tag.

Next using the Fancy Flourish Stencil add paste to the tags.  I use the Astro Paste Tropical Tango and TCW Butter Paste Champagne Gold. They complimented the paper beautifully. Let the paste dry. Once the paste was dry, I edged the tags that had the gold paste with a wide tip gold sharpie.
Once the paste was dry, I pulled out my lace trimmings and added a bit to the bottom of some of the tags. I had some die cut glitter foam from a previous project that they were perfect for the tags. 
Finally add ribbons to the tags!  

HERE ARE THE FINISHED TAGS!!!
Vintage Gingerbread Christmas Printable Papers, these have lace and red gems on them. 

 The remaining tags were made using the Frosty Night Christmas Printable Papers. The tags above are part of the fussy cut page, each tag has TCW Butter Paste Champagne Gold, with different die cut glitter foam embellishment and gems. The were edged with a wide tip gold Sharpie.

The tags above have Astro Paste Tropical Tango, with different die cut glitter foam embellishment and gems.
I layered a couple of the papers to make this tag, edged it with the wide tip gold Sharpie and added a bit of trim at the bottom and added a few flat back pearls.

The tags above have Astro Paste Tropical Tango. The tag on the left has fussy cut flowers, gems and lace. The tag on the right. Has the paste and gems.


Hope you are inspired to make your own tags this year. 

Thursday, January 5, 2023

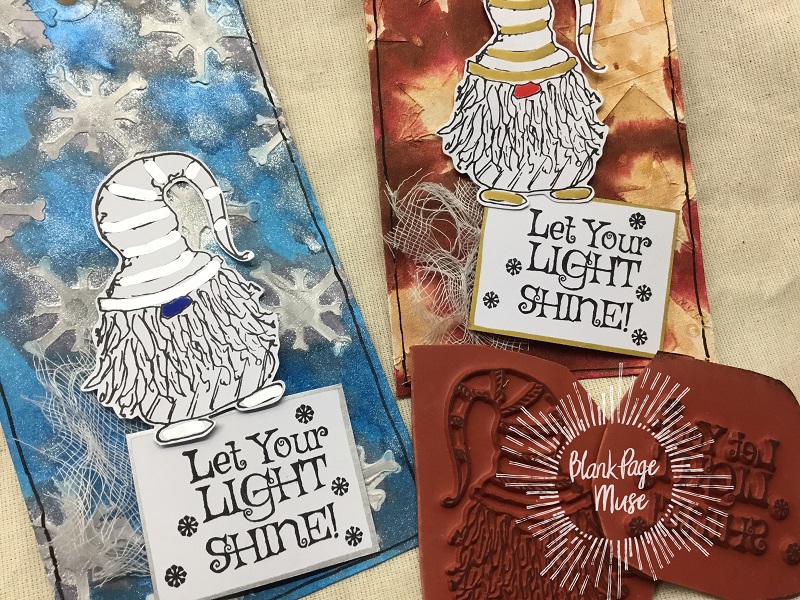
Let Your Light Shine!

 Hi Stamping Fans!

Well Xmas is nearly here - can you believe how quickly the year has gone?


I've whipped up these tags at the last minute using stencils available in store with texture paste and Lindys Gang Magicals for some nice Xmas Sparkle!

The Gnome Stamp Set designed by Pam Bray was perfect for adding a little character and sentiment - quick and easy - just stamped in black and added some metallic pen!


Stencils used: Slimline Stars designed by Pam Bray & Bones Snowflakes designed by DeadSeaToons
Stamp Set: Starbright Gnome


***Remember to us the code BPMSharon at the store for 15% off ***
So many fab stamps to choose from!
Note: you can use the code at either the IBFS Store OR the BPM Store - why not do an order from each and increase your stash!

And visit our social media sites for more stamping fun!
I Brake For Stamps -https://ibrakeforstamps.com/ 

Wednesday, November 6, 2019

Quick Make Sharon Easy Holiday Tags


Our DT Sharon has some quick make Christmas tags to share today using the fab "Wild Berries Background" stamp designed by Pam Bray - a perfect stamp for any occasion but especially the festive season which is fast approaching!
These are quick and easy to make she just used a spatula to swipe white chalk paint over some basic packing tags, once dry she stamped the berries with red ink over the tags and edged with the stamp pad. To finish she used some gold "Smooch" - you could also use gold glitter glue to add some sparkle to the berries. Add some string or ribbon to the tops and the tags are ready to use!


Don't forget to check us out at all of our social media sites
The Blank Page Muse- https://blankpagemuse.com/

Wednesday, December 19, 2018

"Seasons Greetings" Tags

Seasons Greetings to Everyone
Today I have some really quick make tags for you if you are running late with getting organised for Xmas!
If you pop to my Blog Post here from 29th November you can see how the backgrounds were made as I have used the same technique!!
Here's a quick run down for you:
Start with some clothing tags - I've used some nice thick card tags - a perfect size and nice and sturdy! Also grab some paper towel that has been used for "mopping up" ink sprays as per my blog post link above!

Cover the tags with the ink sprayed paper towel and add a piece of kraft paper to the back of each tag - this covers the overlap edges of the paper towel and gives you and area to write you greeting!


Add the gesso with a spatula through your stencil - see the blog post link above. Allow to dry.


I love using non traditional stamps for Xmas themes so yet again I've used the "Llama" by Pam Bray CLICK HERE to find this stamp in store. Stamp with black archival ink onto kraft coloured paper along with the "Seasons Greetings" stamp CLICK HERE for the store link. Fussy cut the Llama and tear out the sentiment.


Add the Llama, some muslin cloth, paper flowers and the sentiment to the tag base along with some string tied through the hole at the top and your tags are finished!


these are great not just for Xmas but for any occasion using any of the fab stamps available at the Blank Page Muse Store!!!

Hope you have enjoyed my quick make post today - be sure to check back through December for more seasonal creations and inspiration!
Happy Stamping!
Sharon
 Don't forget to visit us at all of these Social Media Sites for amazing inspiration:

The Blank Page Muse- https://blankpagemuse.com/

Tuesday, December 4, 2018

Quick and Easy Christmas Tags

Hi all
I have a couple of easy tags to share today using stamps from The Blank Page Muse.


Product list


Stamp the base with a texture stamp using clear ink. Sprinkle over gold embossing powder and apply heat.
Next spray on red ink and leave to dry.
Ink some cheese cloth and dry it out before gluing it to the tag.

Stamp out the Santa head onto card and colour with markers. Cut out and stick to tag.
Finish with a sentiment and glitter balls.


Stamp on a texture and sprinkle with red embossing powder.  
Apply heat 
Spray with ink and dry off tag.
Stamp out three presents and colour them in.
Cut put and layer up on tag.
Finish with a sentiment 


Thank you for visiting 

The Blank Page Muse Shop http://blankpagemuse.com/
That's Crafty  UK And Worldwide here http://www.thatscrafty.co.uk/blank-page-muse.html
FB Fan Page https://www.facebook.com/groups/bla...


Tuesday, November 7, 2017

Sled & Snowflake Tag

Hi Stampers,
Karen here to share today's "Quick Idea".  I need to point out that I tried something new and rather than stamping onto paper, I stamped directly onto a wooden tag. I began by stamping the script background design with black ink and then heat embossed a scattering of white snowflakes.  Next, I sprayed the wooden tag with blue mist so that the wood grain would show through.  I added white crackle paint to add the appearance of snow drifts along the edges.  Finally, I embellished the tag with a wooden snowflake and attached a bow and ribbon for hanging. The tag could be used as a gift topper or be hung as a tree ornament.

Sin City Stamps:

http://sincitystamps.com/art-journaling-2-rubber-stamp-set-by-terri-sproul-sc24/

3. clear acrylic mounting block
4. wooden tag
5. black ink pad
6. blue spray mist
7. white embossing powder
8. heat gun
9. white crackle paint
10. glitter glue
11. chalk
12. wooden snowflake
13. ribbons

A Closer Look:
 
 
To purchase these fun winter stamps, visit www.sincitystamps.com

For more inspiring paper-craft projects from the Design Team, be sure to visit us at the
Sin City Stamps Blog and follow us on Facebook.

Join the Sin City Fan Group
To learn more about our designer Karen, please visit her blog, Art & Soul.
Thanks for visiting!

Thursday, December 18, 2014

Christmas Gift Tags - Penguins on Ice

Hello everyone.  I want to share some really cute Christmas gift tags with you today.  I love this set of stamps from Sin City Stamps, and I could not stop making tags using these cuties!  As we get closer and closer to Christmas, I know that your time is getting shorter.  So, I thought I would share something  you could make several of in an afternoon, and use in many different ways.


Each tag was sized to fit the chosen stamp image used.  All were cut from one piece of ivory card stock.  The tag sizes are as follows:

Blue tag:  2-1/2" x 3-1/2"

Green tag:  2-1/2" x 4-3/4"

Red tag:  3-1/4" x 5-1/2"

Each tag was first stamped and embossed with black embossing powder and colored with Copic markers.

Color each tag with blue, green, or red distress inks, leaving the center uncolored and light.

Stamp tiny snowflakes around the image with white ink.

Add matching trim or ribbon to each, and on the green and blue tags, add holly leaves with a red dew drop from Robin's Nest.  Instead of using a round hole punch on the red tag, I used a ribbon slot punch to thread the ribbon through.  This made it really easy to tie a bow on the front of the red tag, as shown below.


Add small amounts of glitter glue to snow, water, and ornaments.

Stamp "To:" and "From:" on the reverse if you are using them as gift tags.


Here are pics of each tag individually.


Supplies:

Sin City StampsPenguins on Ice rubber stamp set; Pam's Christmas Collection
Other:  tan card stock, red, green, blue distress inks, black pigment ink, black embossing powder, white ink, crystal glitter glue, ribbon and trim, paper holly leaves, red dew drops (Robin's Nest)

Remember, if you don't want to use these as a simple gift tag, they make excellent focal images for a card front, too!  So give them a try and make a bunch.  Be sure to stop by the Sin City Stamps blog for inspiration, and the online store to check out the awesome stamp collections, stencils, and die cuts.

Have a wonderful weekend, and stay crafty, my friends!

Barbara

Copyright Text

Blank Page Muse 2018 Sin City Stamps 2013