Showing posts with label Terri Sproul's Wishes. Show all posts

Monday, September 7, 2015

Creating a Masculine Card with Sin City Stamps


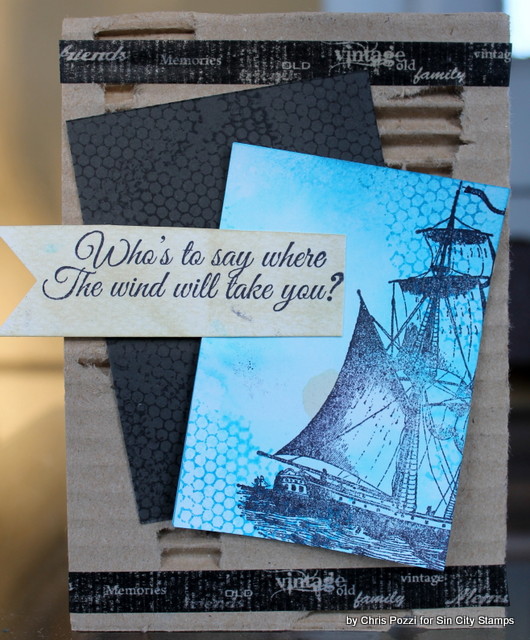
Hi Chris here and today I would like to share with you how to create this stunning masculine card. I was trying to explain to my daughter how easy this card was to make and she said show me.  So with her help, I have my first ever video to share with you! Now being that its my first I will apologize for the shadows in advance.  I am working on correcting that!  But the video does show how simple this card is to create!

Here are the supplies you will need:

Sin City Stamps: Sequence Waste; Ship; Wish
Tim Holtz Tissue Tape
Tim Holtz Distress Inks: Antique Linen, Mermaid Lagoon
Tim Holtz Distress Markers: Wild Honey
Water Brush
Ranger Archival Ink : Jet Black
Corrugated Paper
Altered Trading Card (The Paper Studio)
Black and White Cardstock

And here is the 1st attempt at video!


Sunday, August 30, 2015

How to use your Distress Markers to create watercolor Stamped Images


Hi Chris here today sharing a quick card I created using my Distress markers with Sin City Stamps!

Here is a list of my supplies

Sin City Stamps: Terri Sproul Wishes
Distress Markers (Ranger) - Pine needles, Shaded Lilac,  Pickled Raspberry, Abandoned Coral, Crushed Olive, Peacock Feathers, Black Soot
Watercolor Paper - Strathmore
Patterned Paper- Studio Calico
Punch-Martha Stewart, Close to My Heart
Ranger Archival Ink

I started by coloring on my stamps with my distress markers.


I then spritzed my stamp with water lightly and stamped onto my watercolor paper. I re-stamped the images without re-inking to create the illusion of flowers in the background.


I originally stamped my greeting directly on the card.  I wasn't paying attention and I stamped the image off kilter.


So I re-stamped the greeting onto my watercolor paper and used my scallop circle punch to punch out the greeting.  I matted the greeting onto another scallop punched circle and added to my card.  I matted the card onto the same paper I used for background punched circle.

I then colored the butterfly stamp and stamped onto the watercolor paper WITHOUT spritzing with water.  I actually did spritz with water and first and the Black Soot I used for the body bled all over the rest of the butterfly :(   So you can learn from my mistake.


I then used my Martha Stewart Butterfly punch to punch out the butterfly. I then stamped an additional greeting and butterfly on the inside of my card.

 Hope you enjoyed this project!


Monday, August 17, 2015

How to create an Altered Planner Page


Chris here and today I am sharing the "B" side of my  calendar insert i shared with you on August 3. I created to hold some of my stickers and embellishments for my Create 365 planner (which I am using as my daily inspiration and make me smile planner:D ).  This is what it looks like in my planner.


To create this project I used:

Sin City Stamps:Wish, Love of Butterflies
Distress Inks and Distress Tool- Spiced Marmalade. Mowed lawn, Broken China, Fired Brick
Gesso
Ink- Ranger Archival
American Crafts DIY paper
package insert from Create 365 Calender sticky pads


If you remember I started by gesso-ing my package insert because I wasn't sure what I was going to do on the back side. .I really didn't need to gesso this based on how I ended up finshing the project.


 I then started adding torn strips of the American Crafts papers to  my insert until it was completely covered. 

I then randomly started adding Distress Inks to my page.  


I then stamped my Sin City Stamp Images onto the piece. I restamped some of the Wildflowers from  the Wish collection without re-inking to create some "background" images. 


And here is the Final Project.

Every time I see this page in my planner I smile!

Friday, July 24, 2015

Follow Your Dreams Art Journal Page

Hey everyone!  I hope you are enjoying your weekend.  Today, I am going to continue with adding pages to a mini album/journal I made last month.  You can see more about that with complete directions for making the album by clicking here

I am loving learning more and more about combining my stamps from Sin City Stamps and mixed media, so I wanted to share with you my first page I am going to add to my album.  The pages are made from a nice, thick card stock that is printed on one side only.  So, I will be working on the print side of one and gluing it to the wrong (white) side of the previous page.


Supplies Used:


Sin City Stamps:  Terri Sproul's Wish stamp set; Sparkle Stencil by Terri Sproul

ColourArte:  Twinkling H20s - Sky BlueOrange PeelSweet LavenderSunflower

Prima 12x12 Script Pad

Chocolate ink pad ((Ancient Page)
Texture Paste (Ranger)
Glue n Seal (Ranger)
Liquid Pearls: Platinum, Peacock (Ranger)

Directions:

Trim card stock to 4-1/2" by 8-1/4".  Cover with a very light coat of clear gesso and let dry.  This will help seal the card stock and allow the paint to work much better, but will not obliterate any of the printed images on it.  Round the corners on the left side of the page, because this will be adhered to the back of the inside page in the book.


Spread texture paste through the sparkle stencil, leaving the edges uneven.  Scrape tiny patches of texture paste with a spatula around page for a cool effect.  Let everything dry.


Stamp three butterflies and two sentiments onto a piece of deli paper with the Chocolate ink pad.
Prepare your Twinks by spritzing some water 2-3 times into each pot to activate the colors.  Add all four colors to the background, misting with water and allowing the colors to run and blend.  Let dry.

Tear deli paper close to each stamped image and adhere to the background with a good adhesive medium, like Glue N Seal.  The deli paper disappears into the background, and gives you crisp, stamped images even over the stenciled paste.
Stamp some dandelions in the open spaces at the bottom of the paper with the Chocolate ink pad.
Color the butterflies with the four Twinks colors, mixing them to your liking.
Make bodies for the butterflies with the Peacock Liquid Pearls.
Add dots of Platinum Liquid Pearls to the dandelions.  
This is the book from my previous post.  The inside cover page is what you see extending past the zig zag chipboard cover.  I want to keep that page just as it is because it acts as part of the front of the book.
By working on the first page separately, I was able to keep the printed side of the inside cover page clean.  So, now that my page is completed, I can adhere the two pages together.  This will not only cover the blank white side of the papers, but strengthen the page.  I also rounded the outer corners.
Now that the two are glued together ...
I can punch the binding holes on the side.  
Now it is ready to insert into my book.

I hope you enjoyed my mixed media journal page today, and that I have inspired you to make your own journals with your paper stash and these wonderful Sin City Stamp sets.  And this is the perfect time to buy because you can take advantage of this special deal!  Good until the end of the month.


Thanks so much for stopping by today, and have a wonderful and crafty weekend!


P.S.  This is my last post as a member of the Sin City Stamps design team.  Our term is nearing an end and I want to thank everyone for your friendship and support.  However, you may still see me every now and then with more projects to share.  So, until then, happy stamping, everyone!

Copyright Text

Blank Page Muse 2018 Sin City Stamps 2013