Showing posts with label DIY. Show all posts

Tuesday, December 13, 2022

Lets Make a Snowman Card

 Hi everyone! It's me Tonya and it's been awhile since I've posted here but I'm back with a card I created using the Sparkles Snowman Happy Holidays Slimline Stamp Set.


 I used watercolor paper, several dies and the stamp set to create this fun little card. You can find the how to's to this card HERE

Also if you aren't following Blank Page Muse on any of their social media platforms you can find them on these sites below:


Supplies

Sizzix/Eileen Hull: Skinny Mini Book Box Diecut
Sizzix/Eileen Hull: 3D Crochet Mandala Embossing Folder
Sizzix/Eileen Hull: Wreath and Snowflake Thinlits
Sizzix/Olivia Rose: Doodle Christmas Thinlits
Sizzix/Tim Holtz: 3D Impresslits Snowflake Diecut
Cardstock
Diecut Machine
Foam Pop Dots
Scissors 
MISTI Stamping Tool
Watercolor Paper 
Watercolors
Pastels
Black Ink Stickles
White Diamond Dotz #8002
Gems
Blue Metallic Thread
Paper Cutter
Beacon Adhesives: Zip Dry Adhesive


Thanks for stopping by, hope your day is wonderful and enjoy creating!


Thursday, May 27, 2021

Happy Father's Day Cactus Card

 Hi everyone! It's me Tonya and I'm here to share a quick and easy card I created for Father's Day using the Small Wild Desert Cactus Skull Scene Stamp and Southwestern Desert Cactus Flower and Skull Stamp


Supplies

BPM: Small Wild Desert Cactus Skull Scene Stamp 

BPM:  Southwestern Desert Cactus Flower and Skull Stamp 

MISTI Stamping Tool

Black Waterproof Ink

Watercolor Paper

Paint Brush

Stylus

Paper Cutter

Scissors

Thread

Various Watercolors and Inks

Various Scraps of Patterned Cardstock

Kraft Cardstock

Beacon Adhesive: Zip Dry Adhesive

Printer for Sentiment

Foam Pop Dots 


Place the stamps onto the MISTI Stamping Tool, ink with black waterproof ink and stamp onto a piece of watercolor paper. I stamped the Southwestern stamp twice since I will be using some of the images to create a 3D effect on the card.
Watercolor the stamped images with various shades of green watercolors/inks, pinks, browns and grays. 


Once dry fussy cut all stamped images out. 
The second Southwestern image cut apart the flowers, cactus and foliage.
Use a stylus to shape the larger cactus and flowers and adhered to the other intact Southwestern image. 


Cut three patterned strips of cardstock, 1 1/2"x6", 1 1/8"x6" and 5/8"x6".
Adhere all cardstock strips to the 4 1/4"x6" folded card base.
Glue larger cactus image to base and place foam pop dots to the back of smaller image before placing on card. 
Print Father's Day sentiment from computer, cut out, mat and adhered to card.
Finish with loops of thread placed behind the raised images.
As always if you have questions about this project please let me know.


Also if you aren't following Blank Page Muse on their different social medias you can find them on:

The Blank Page Muse Shop https://blankpagemuse.com/


Thanks for stopping by, hope your day is wonderful and enjoy creating!


Thursday, April 29, 2021

Enough Tag

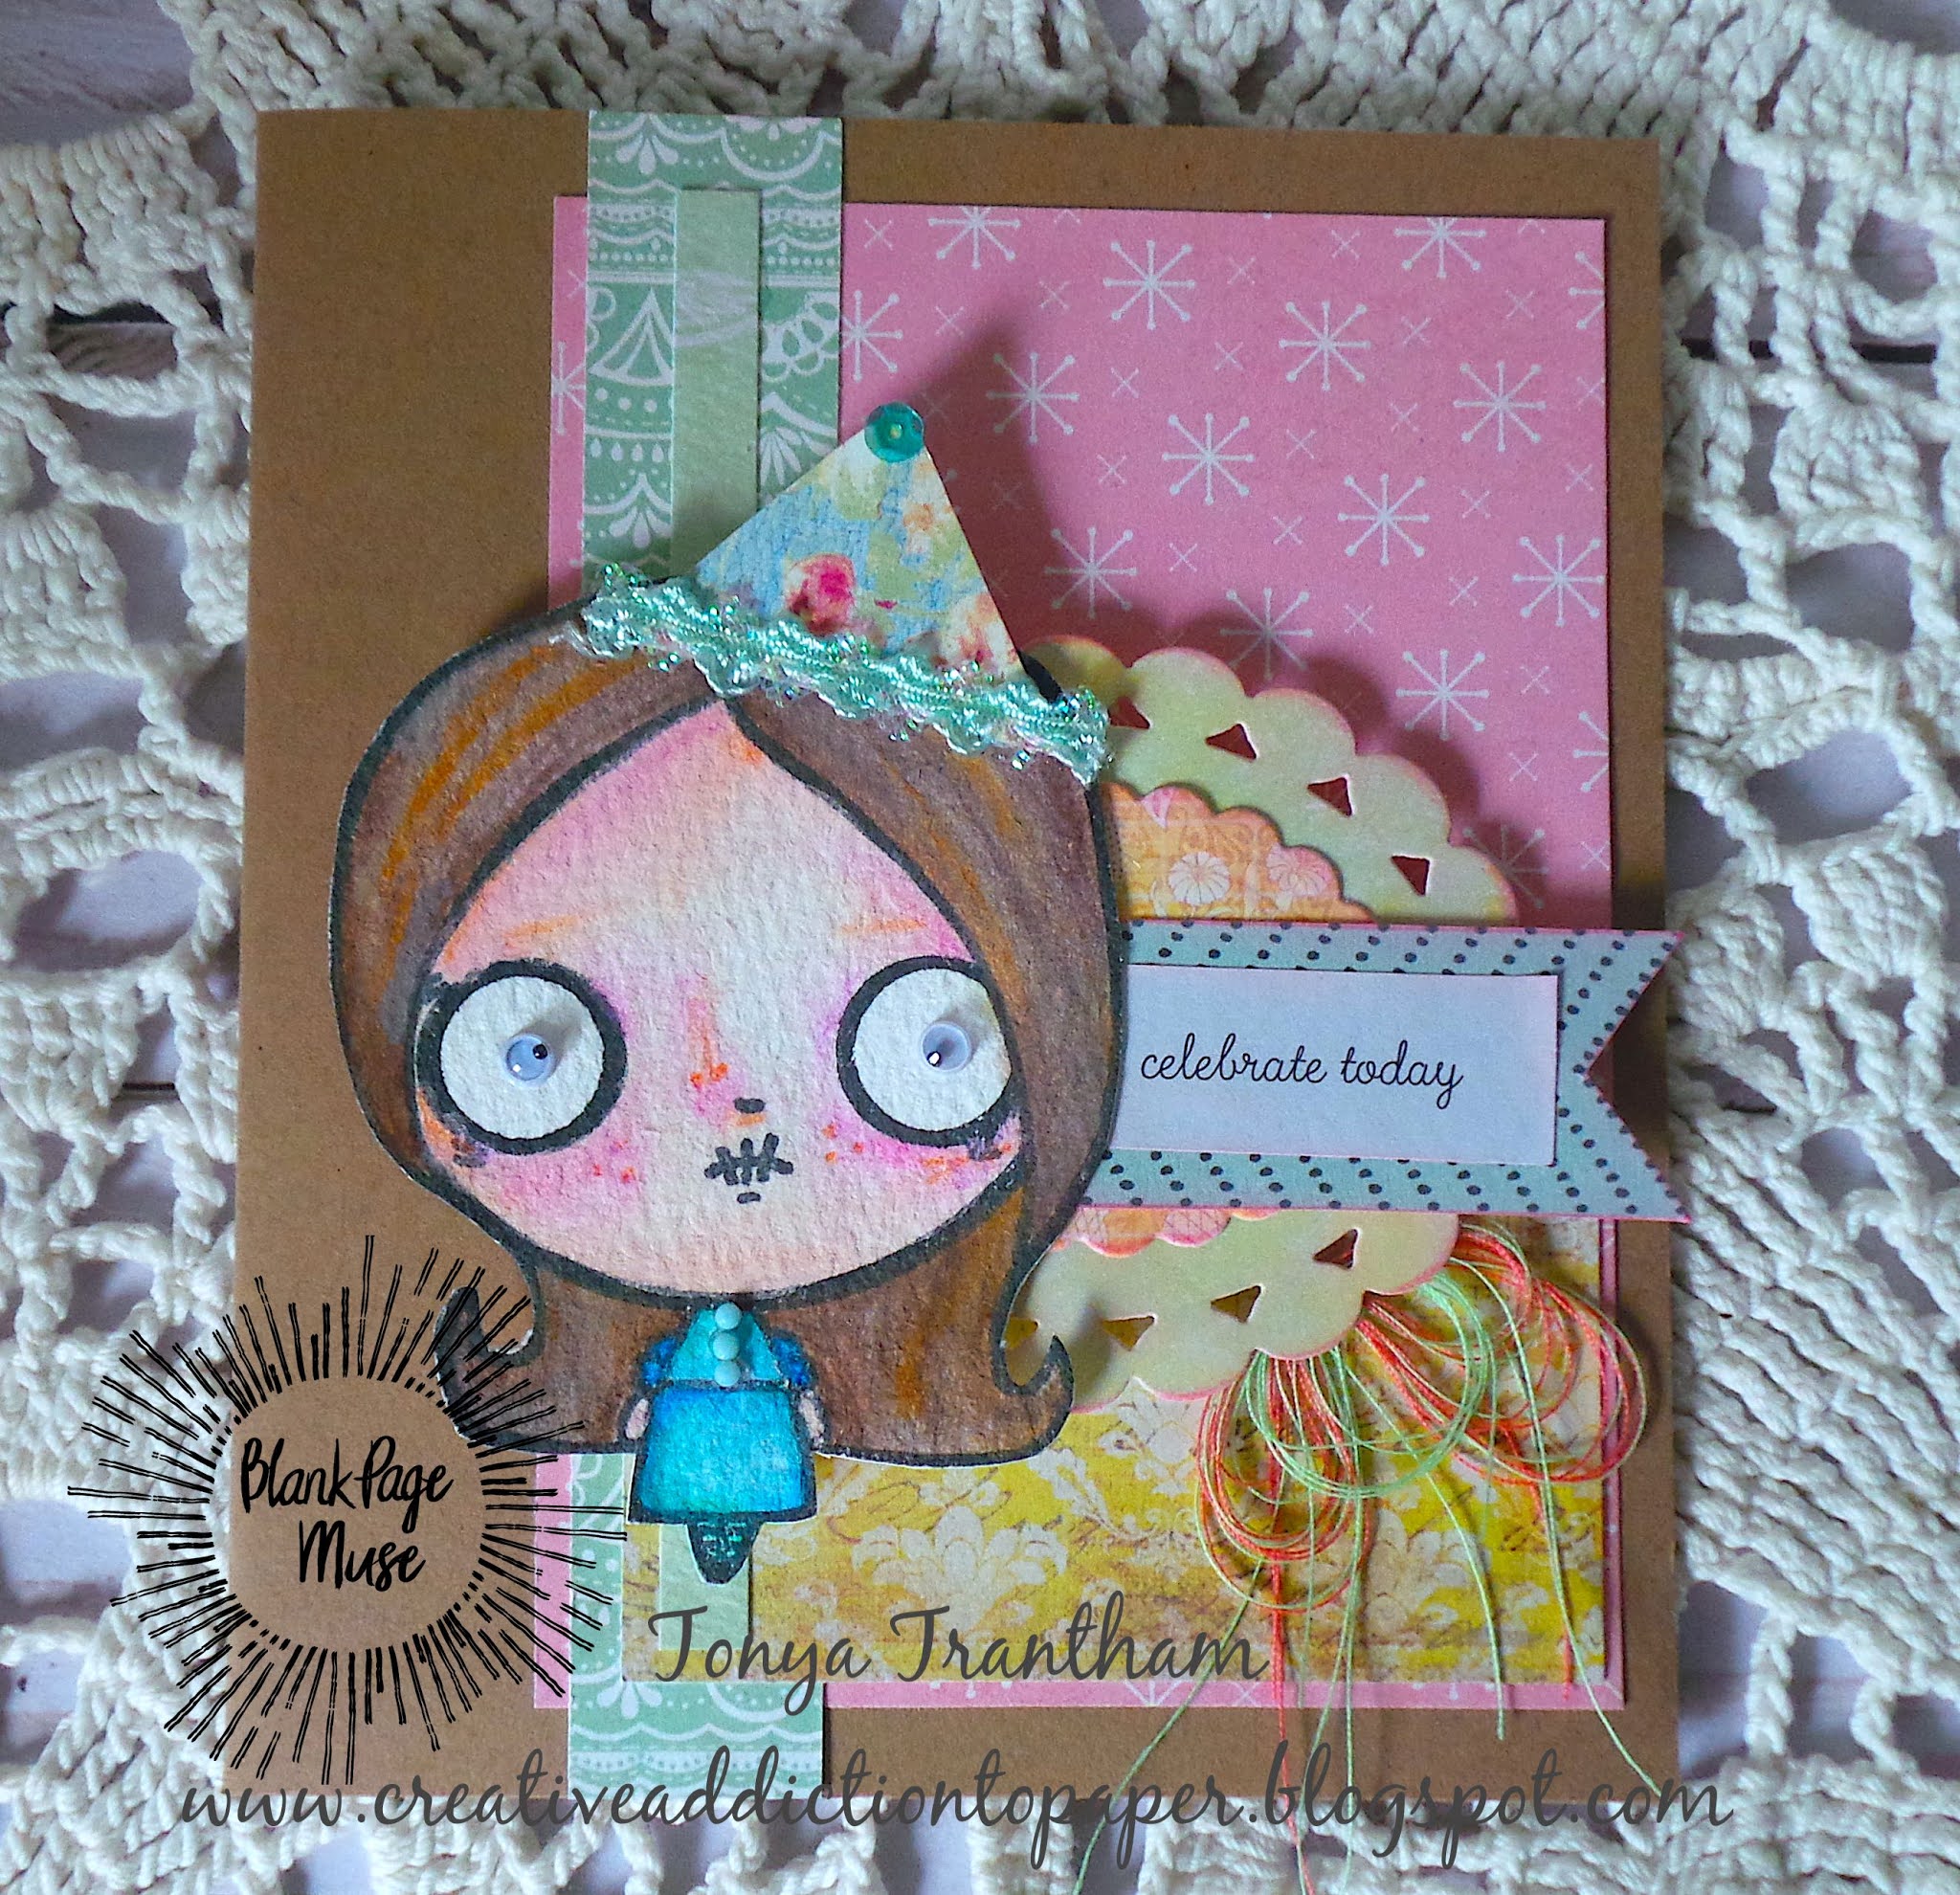
 Hi everyone! It's me, Tonya, and I am back this month with a vintage inspired tag I created using the Photo Booth Woman Portrait Photo Style Art Rubber Stamp and the ornate frame from the Love, Faith and Family Vintage Art Rubber Stamp Full Sheet

Supplies

BPM: Photo Booth Woman Portrait Photo Style Art Rubber Stamp 

BPM: Love, Faith and Family Vintage Art Rubber Stamp Full Sheet

MISTI Stamping Tool

Waterproof Black Ink 

Paper Cutter 

Scissors

Craft Knife 

Watercolor Paper

Watercolor Paints, Chalk Inks and Water Base Inks 

Watercolor Brush

Kraft Cardstock Tag

Various Patterned Cardstock Scraps 

Thread, Cheese Cloth, Cording and Seam Binding  

Diecut Machine

Tim Holtz: Botanical 3D Embossing Folder

Tim Holtz: Tiny Clips

Sequin and Gems

Various Diecuts and Punches

Enough Sentiment (from the computer) 

Foam Pop Dots

Beacon Adhesive: Zip Dry Adhesive 

The first thing I did was cut out a tag, place into the Botanical 3D Embossing Folder, run through the diecut machine and then lightly ink over the raised areas with a couple different colors of blues and light green chalk inks.


Next stamp the Photo Booth Woman Stamp onto the a piece of watercolor paper, cut out and use an assortment of watercolors and inks to paint the image. Lightly ink the edges with a chalk ink to add a "faded look" to the image.


Stamp the ornate frame with the love sentiment in the center onto a piece of watercolor paper. 
Use a craft knife to cut the love sentiment out of the center of the frame and scissors to fussy cut out the excess and the around the frame.
Watercolor the frame a light brown and once dry lightly ink over the edges with a gold ink.


Adhere the ornate frame to the tag, glue a piece of patterned cardstock to "frame" the woman image, a larger piece of patterned cardstock off center and a decorative diecut together before adding foam pop dots and placing onto the tag.


Attach a Tiny Clip to the top of the woman image along with loops of thread.
The bottom corner of the tag adhere loops of thread, cording bow, cheese cloth and a tiny piece of seam binding.
I added a fussy cut butterfly (from a piece of cardstock), flower diecut with a sequin and gem and leaf sprig, a tiny gem to the decorative diecut and the enough sentiment that I printed from my computer and glued toward the top to finish off this tag. 
As always if you have questions about this project please let me know. 


Also if you aren't following Blank Page Muse on their social medias you can find them here.

The Blank Page Muse Shop https://blankpagemuse.com/


Thanks for stopping by, hope your day is wonderful and enjoy creating!


Thursday, March 25, 2021

You are Made of Stardust Card

 Hi everyone! Tonya here this month with my take on the Azalea Creepy Cute Kid Art Rubber Stamp. I know this rubber stamp is suppose to be creepy but I thought wouldn't it be cute to turn the girl into a magical fairy. So lets get started.


Supplies

Blank Page Muse: Azalea Creepy Cute Kid Art Rubber Stamp

MISTI Stamping Tool

Various Plain and Patterned Cardstocks

Butterfly Printable 

Watercolor Paper 

Watercolor Paint Brush

Colored Pencils

Inks and Watercolors

Foam Pop Dots

Diecut Machine

Spellbinders: Wreath Diecuts

Momenta: Stars Diecuts

Stars and Clear Sequins

Metallic Thread

Paper Cutter

Scissors 

Beacon Adhesive: Zip Dry Adhesive


Placed the stamp onto the MISTI Stamping Tool, inking the stamp with a black waterproof ink and stamp onto a piece of watercolor paper.
I used an assortment of watercolors and inks to watercolor the girl image.
Use colored pencils to add highlights to the girl's face and clothing.


Fussy cut a butterfly and add clear glitter glue and let dry.
 I had wanted to use the whole butterfly but it didn't look right so I cut off the bottom half of the wings.


Adhear those to the backside of the girl.


I already had a 4 1/4"x4 7/8" card base folded in my stash so I cutout the Stars and placed a piece of patterned cardstock to go behind the stars diecut.
Adhere all to the front of the card base. 
Cut and matte the wreath diecut.
Next wrap with metallic thread around before gluing to the card base.
Place foam pop dots to the back of the girl, along with stars and clear sequins to finish off the card.
 There you have it! 
As always if you have questions about this project please let me know.


Also if  you aren't following Blank Page Muse on their social medias you can find them on:

The Blank Page Muse Shop https://blankpagemuse.com/


Thanks for stopping by, hope your day is wonderful and enjoy creating!


Friday, January 29, 2021

Vintage Magical Bookmark And Tassel DIY

I just love snuggling up under a fluffy blanket and a good book. I often find myself to comfy and fall asleep while reading.  😊 Which leaves me needing something to save my place.
So today lets make a cute bookmark!


Items used:
  • Imagination
  • Scissors
  • Alcohol markers 
  • ink- Palette, hybrid acid free
  • Sharpie marker
  • Card stock
  • Acrylic paint
  • Cardstock
  • Tissue paper
  • Yarn or thread
  • Glue Stick
  • Rubber Stamps used-


I'm still new to the great world of stamps, so I wanted to push myself and do a more of a layered background. I started with the with the Marigold Flowers in the upper corner. From there I just kept adding. I'm really pleased with this background. 


I just love the look of tassels and stamps together. You can easily make your own using yarn or thread.

  1. Wrap the yarn around cardboard or your fingers. The more you wrap the more fuller your tassel will become. I wrapped mine about 20 times.
  2. I just used a long piece of yarn and tied a double knot on the top, then slipped it off my cardboard. You could also use a jump ring between the loop. This will be used to attach your tassel to your finished piece.
  3. Next cut off a piece of yarn to tie near the top of your tassel. Tie a double knot, then wrap the yarn around a few times. Giving the tassel a more finished look tie another double knot.
  4. Cut the bottom loops. I used crappy scissors, so I needed to trim the ends a bit to make my tassel pretty.


Hope you enjoyed this Vintage Magical bookmark and Tassel DIY. If you have any questions feel free to message Lasheet and if you choose to make your bookmark tag her and Blank Page Muse. Thank you, happy crafting!! ♥


Looking for more Inspiration? Click the links below!
The Blank Page Muse Shop https://blankpagemuse.com/


Friday, September 18, 2020

Celebrate Today Card

Hi everyone! It's me, Tonya and I am here to share a quick and easy card I create using the Aster Creepy Cute Kid and Life is Short Rubber Stamps and leftover scraps from previous projects. 
I started by cutting and folding a piece of kraft cardstock, 4 1/4"x5" to create the base for the card. I layered and adhered scraps of patterned cardstock to the base. From my stash of diecuts I glued on top of each other added Foam Pop Dots to the back before placing on the card.


I printed from my computer the "celebrate today" sentiment. I cut out a banner, adhered the sentiment on top and added to the card.  I stamped the Aster Creepy Cute Kid and Life is Short Rubber Stamps onto a piece of watercolor paper. I watercolored, used colored pencils on the girl and fussy cut the girl out. I cut a party hat from a piece of scrap cardstock, adhered to the stamped image along with trim and a sequin to the hat. I also added googly eyes and mini gems to the eyes and the dress before adding foam pop dots and placing on the card.


I finished the card by gluing several thread bows to the underside of the diecut. As always if you have any questions about this project please let me know. If you aren't following Blank Page Muse on their social medias you can find them at the links below.


Watercolor Paper
Watercolors
Paint Brush
Black Ink
Colored Pencils
MISTI Stamping Tool
Kraft Cardstock
Paper Cutter
Scissors
Gems
Beacon Adhesive: Zip Dry Adhesive
Googlie Eyes, Trim, Sequin, Thread
Various Patterned Cardstocks
Foam Pop Dots
Printed Sentiment from Computer


Thanks for stopping by, hope your Friday is wonderful and enjoy creating!


Thursday, May 7, 2020

Dream BIG Art Journal Page

Hi everyone! It's me, Tonya and I am here to share my art journal page I created using the Clara and Dream Big StampsHeart Stencil and the feather stamp from the Flower and Bird Sketches Stamp Set.


I started by watering down blue ink, adding a wash of color to the page and letting dry.  I placed the Heart Stencil on top of the page and taped it down with washi tape to hold it in place. Next I inked up several Art Daubers in different shades of blue and inking over the stencil.


I placed the Clara stamp onto the MISTI Stamping Tool, inked and stamped onto a Watercolor Paper Rectangle Diecut.


I used an assortment of inks that I watered down to watercolor the stamped image and once dry I went back over it with Colored Pencils.


I stamped two feathers from the Flower and Bird Sketches Stamp Set, watercolored and once dry fussy cut both out. I cut a slit on both sides of the image, added a little adhesive and placed the stamped feathers into the slits. 


I adhered the Clara image to the journal page and I placed the "dream BIG" stamp onto the MISTI Stamping Tool and stamped onto the upper journal of the page.  


I finished off the page by adding washi tape under the sentiment and on the Clara diecut. Be sure to stop by Balnk Page Muse to pick up these stamps and stencils which can be found HERE. As always if you have questions about this project please let me know.
Also if you aren't following Blank Page Muse on their other social medias you can find them on: Facebook , Instagram  and Pinterest .


Supplies

Blank Page Muse: Clara and Dream Big Stamps
Blank Page Muse: Heart Stencil
Blank Page Muse: Flower and Bird Sketches Stamp Set
Various Inks
Watercolor Brushes
Colored Pencils
Art Daubers
Watercolor Paper
Art Journal
MISTI Stamping Tool
Beacon Adhesive: Zip Dry Adhesive
Diecut Machine
Nested Borders Rectangles Diecut
Scissors
Washi Tape


Thanks for stopping by, hope your day is wonderful and enjoy creating!


Thursday, March 12, 2020

You are Blooming Marvelous Art Journal Pages

Hi everyone! Tonya here today and I am here to share my art journal pages that I created using the rubber stamps Mr G Whimsical Giraffe with Wings and Sentiment and the Arrows Stencil.


I added a light wash of Watercolors over both pages and once dry I placed the Arrows Stencil on top of both pages and inked with an Art Dauber.


I placed the sentiment from the Mr G Whimsical Giraffe with Wings and Sentiment onto the MISTI Stamp Tool and stamped the journal page. I fussy cut flowers out from patterned cardstock and from my stash I added the an leftover diecut over and around the stamped sentiment.


I stamped the giraffe onto a piece of Watercolor Paper and watercolored and fussy cut out. From my stash I stenciled a scalloped diecut before adhering to the page. I added more fussy cut flowers, vine diecuts and banners cut from cardstock along with the giraffe image to the page.


 I finished by adding sequins and googlie eyes to the giraffe and bits of washi tape to both pages.  As always if you have questions about this project please let me know. If you aren't following Blank Page Muse on their other social medias you can find them on: Facebook Instagram and Pinterest. 
Also the BPM website can be found HERE and you can get 15% off your purchase by using BPMuseTonya.


Supplies

Blank Page Muse: Arrows Stencil
Paper Cutter 
Scissors
Beacon Adhesive: Zip Adhesive
Washi Tape
Googlie Eyes
Sequins
Various Scraps of Patterned Cardstock
Watercolors
Watercolor Paper
MISTI Stamp Tool
Journal 
Paint Brush
Art Daubers
Various Diecuts
(Products listed above are Affiliated Links for your convenience)


 Thanks for stopping by, hope your day is wonderful and enjoy creating!


Copyright Text

Blank Page Muse 2018 Sin City Stamps 2013