Showing posts with label Beacon Adhesive. Show all posts

Thursday, April 14, 2022

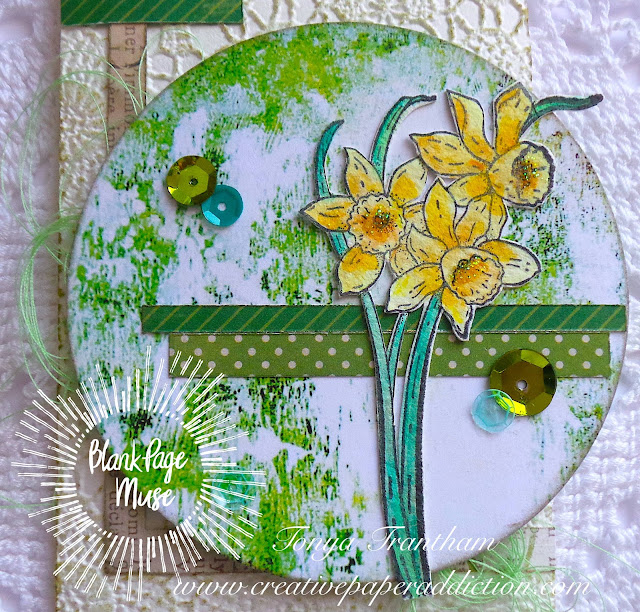
Everything is Coming Up Daffodils Tag

 Hi everyone! I know it has been awhile but it's me, Tonya and I'm back with a spring inspired tag I would like to share using the daffodil stamp from the Flowers and Birds Stitches Art Rubber Stamp Set and the Cyan Consortium Paper Pack byPam Bray. 


You can find the complete blog post with the how to's HERE

Also if you aren't following Blank Page Muse on their social medias you can find them on:


Thanks for stopping by, hope your day is great and enjoy creating!


Thursday, June 24, 2021

Happy 4th of July Greetings Card

 Hi everyone! It's me, Tonya, 4th of July is right around the corner so I'm using the happy sentiment and the scroll stamps from the Sunshine Cherub Sun Flowers Art Rubber Stamp Sheet and the Stars Slim Sized Mixed Media Stencil to create this patriotic card. 


Supplies 

BPM: Sunshine Cherub Sun Flowers Art Rubber Stamp Sheet

BPM: Stars Slim Sized Mixed Media Stencil

Patterned and Plain Cardstocks

Watercolor Paper

Various 4th of July Images or Printables 

Extra Heavy Gel

Spatula 

Blue, White, Gray, Tan Inks

Ink Dauber

Black Waterproof Ink

Washi Tape

Scissors

Paper Cutter

Brush

Glass Tray

MISTI Stamping Tool

Thread and Gauze

Foam Pop Dots

Beacon Adhesive: Zip Dry Adhesive 


Place Stars Slim Sized Mixed Media Stencil on top of a piece of watercolor paper and secure with a couple of pieces of washi tape. Apply Extra Heavy Gel with a spatula over the stencil.


Remove and let dry.


Cut stenciled image 3"x6" and lightly ink area in two different shades of blue inks. Apply white and gray inks to a glass tray, add water to each color and load a brush with each color (separately) and add splatters to stenciled area. 


Place scroll stamp onto the MISTI Stamping Tool, ink with black ink and stamp onto a piece of watercolor paper. Now center and place "happy" sentiment onto the stamped scroll image before inking and stamping onto the stamped image. Ink lightly over stamped area with a tan ink. Once dry fussy cut image out.


Fold a piece of 8"x8" cardstock in half to create the base for the card. Adhere a piece of solid colored cardstock to stenciled image before gluing to card base. Fussy cut several patriotic images out, layer along with the stamped happy scroll image and add foam pop dots to the back before placing on card. To finish off add loops of thread and gauze under images.
As always if you have any questions about this project please let me know.


Also if you aren't following Blank Page Muse on their other social medias you can find them on:

The Blank Page Muse Shop https://blankpagemuse.com/


Thanks for stopping by, hope your day is awesome and enjoy creating! 


Thursday, May 27, 2021

Happy Father's Day Cactus Card

 Hi everyone! It's me Tonya and I'm here to share a quick and easy card I created for Father's Day using the Small Wild Desert Cactus Skull Scene Stamp and Southwestern Desert Cactus Flower and Skull Stamp


Supplies

BPM: Small Wild Desert Cactus Skull Scene Stamp 

BPM:  Southwestern Desert Cactus Flower and Skull Stamp 

MISTI Stamping Tool

Black Waterproof Ink

Watercolor Paper

Paint Brush

Stylus

Paper Cutter

Scissors

Thread

Various Watercolors and Inks

Various Scraps of Patterned Cardstock

Kraft Cardstock

Beacon Adhesive: Zip Dry Adhesive

Printer for Sentiment

Foam Pop Dots 


Place the stamps onto the MISTI Stamping Tool, ink with black waterproof ink and stamp onto a piece of watercolor paper. I stamped the Southwestern stamp twice since I will be using some of the images to create a 3D effect on the card.
Watercolor the stamped images with various shades of green watercolors/inks, pinks, browns and grays. 


Once dry fussy cut all stamped images out. 
The second Southwestern image cut apart the flowers, cactus and foliage.
Use a stylus to shape the larger cactus and flowers and adhered to the other intact Southwestern image. 


Cut three patterned strips of cardstock, 1 1/2"x6", 1 1/8"x6" and 5/8"x6".
Adhere all cardstock strips to the 4 1/4"x6" folded card base.
Glue larger cactus image to base and place foam pop dots to the back of smaller image before placing on card. 
Print Father's Day sentiment from computer, cut out, mat and adhered to card.
Finish with loops of thread placed behind the raised images.
As always if you have questions about this project please let me know.


Also if you aren't following Blank Page Muse on their different social medias you can find them on:

The Blank Page Muse Shop https://blankpagemuse.com/


Thanks for stopping by, hope your day is wonderful and enjoy creating!


Thursday, April 29, 2021

Enough Tag

 Hi everyone! It's me, Tonya, and I am back this month with a vintage inspired tag I created using the Photo Booth Woman Portrait Photo Style Art Rubber Stamp and the ornate frame from the Love, Faith and Family Vintage Art Rubber Stamp Full Sheet

Supplies

BPM: Photo Booth Woman Portrait Photo Style Art Rubber Stamp 

BPM: Love, Faith and Family Vintage Art Rubber Stamp Full Sheet

MISTI Stamping Tool

Waterproof Black Ink 

Paper Cutter 

Scissors

Craft Knife 

Watercolor Paper

Watercolor Paints, Chalk Inks and Water Base Inks 

Watercolor Brush

Kraft Cardstock Tag

Various Patterned Cardstock Scraps 

Thread, Cheese Cloth, Cording and Seam Binding  

Diecut Machine

Tim Holtz: Botanical 3D Embossing Folder

Tim Holtz: Tiny Clips

Sequin and Gems

Various Diecuts and Punches

Enough Sentiment (from the computer) 

Foam Pop Dots

Beacon Adhesive: Zip Dry Adhesive 

The first thing I did was cut out a tag, place into the Botanical 3D Embossing Folder, run through the diecut machine and then lightly ink over the raised areas with a couple different colors of blues and light green chalk inks.


Next stamp the Photo Booth Woman Stamp onto the a piece of watercolor paper, cut out and use an assortment of watercolors and inks to paint the image. Lightly ink the edges with a chalk ink to add a "faded look" to the image.


Stamp the ornate frame with the love sentiment in the center onto a piece of watercolor paper. 
Use a craft knife to cut the love sentiment out of the center of the frame and scissors to fussy cut out the excess and the around the frame.
Watercolor the frame a light brown and once dry lightly ink over the edges with a gold ink.


Adhere the ornate frame to the tag, glue a piece of patterned cardstock to "frame" the woman image, a larger piece of patterned cardstock off center and a decorative diecut together before adding foam pop dots and placing onto the tag.


Attach a Tiny Clip to the top of the woman image along with loops of thread.
The bottom corner of the tag adhere loops of thread, cording bow, cheese cloth and a tiny piece of seam binding.
I added a fussy cut butterfly (from a piece of cardstock), flower diecut with a sequin and gem and leaf sprig, a tiny gem to the decorative diecut and the enough sentiment that I printed from my computer and glued toward the top to finish off this tag. 
As always if you have questions about this project please let me know. 


Also if you aren't following Blank Page Muse on their social medias you can find them here.

The Blank Page Muse Shop https://blankpagemuse.com/


Thanks for stopping by, hope your day is wonderful and enjoy creating!


Thursday, March 25, 2021

You are Made of Stardust Card

 Hi everyone! Tonya here this month with my take on the Azalea Creepy Cute Kid Art Rubber Stamp. I know this rubber stamp is suppose to be creepy but I thought wouldn't it be cute to turn the girl into a magical fairy. So lets get started.


Supplies

Blank Page Muse: Azalea Creepy Cute Kid Art Rubber Stamp

MISTI Stamping Tool

Various Plain and Patterned Cardstocks

Butterfly Printable 

Watercolor Paper 

Watercolor Paint Brush

Colored Pencils

Inks and Watercolors

Foam Pop Dots

Diecut Machine

Spellbinders: Wreath Diecuts

Momenta: Stars Diecuts

Stars and Clear Sequins

Metallic Thread

Paper Cutter

Scissors 

Beacon Adhesive: Zip Dry Adhesive


Placed the stamp onto the MISTI Stamping Tool, inking the stamp with a black waterproof ink and stamp onto a piece of watercolor paper.
I used an assortment of watercolors and inks to watercolor the girl image.
Use colored pencils to add highlights to the girl's face and clothing.


Fussy cut a butterfly and add clear glitter glue and let dry.
 I had wanted to use the whole butterfly but it didn't look right so I cut off the bottom half of the wings.


Adhear those to the backside of the girl.


I already had a 4 1/4"x4 7/8" card base folded in my stash so I cutout the Stars and placed a piece of patterned cardstock to go behind the stars diecut.
Adhere all to the front of the card base. 
Cut and matte the wreath diecut.
Next wrap with metallic thread around before gluing to the card base.
Place foam pop dots to the back of the girl, along with stars and clear sequins to finish off the card.
 There you have it! 
As always if you have questions about this project please let me know.


Also if  you aren't following Blank Page Muse on their social medias you can find them on:

The Blank Page Muse Shop https://blankpagemuse.com/


Thanks for stopping by, hope your day is wonderful and enjoy creating!


Copyright Text

Blank Page Muse 2018 Sin City Stamps 2013