Welcome to the Blank Page Muse Blog! We hope you love these amazing projects created by our fabulous Creative Stamping Team. At Blank Page Muse, we are proud to offer red rubber stamps, clear stamps and stencils. I Brake for Stamps rubber stamps are available online in the same shop. Art rubber stamps are pressed to order in the USA. We are here to help break that blank page! Visit our sister shop IBRAKEFORSTAMPS.com
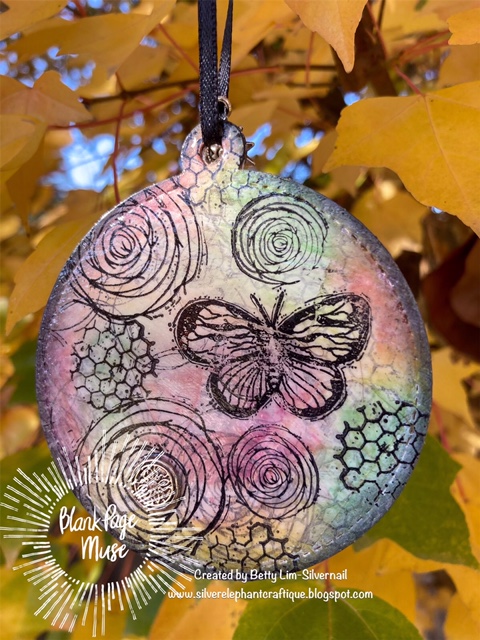
Hi BPM Fans! Betty here with a bright and colorful Ornament.
I hope you are having fun seeing all the amazing ornaments the Blank Page Muse Team has created for the holidays! The ornament I created can be used on your Christmas tree or can be used all year round to hang wherever you please. The double-sided ornament is made from chipboard, stamped, and sealed with Glossy Accents so they will last for many many years. They make great stocking stuffers and gifts. Plus they are fun to make! I hope you will give them a try and enter it into our monthly challenge. The theme is Celebrate and it can be any holiday.
Ornament die or circle die, minimum size 3". I used Lawn Fawn's Stitched Circle Tags Dies
Black solvent ink, such as Staz-On
Acrylic stamping block
Washi tape
White gesso
Washi tape - this is for texture. Use any pattern.
Distress ink or Distress Oxide: Squeezed Lemonade, Spiced Marmalade, Peacock Feathers, Seedless Preserves, Black Soot
Distress ink applicator
Distress Collage Medium or Mod Podge (matte or glossy)
Strong white glue
Glossy Accents or Diamond Glaze
Paint brush
Black 1/4" wide ribbon - approximately 9"
Optional items: Charms
Instructions:
Using an ornament or circle die, cut 2 die cuts with chipboard
Using a paint brush, apply a thin layer of Gesso on one side of each of the die cuts. You will only need to do one side since we will be gluing these two pieces together. Let dry completely.
Adhere the washi tape in various areas
Apply another thin coat of Gesso and let it dry
Using the black ink pad and background stamps, stamp a few of the background images. When stamping chipboard, I find it easier to place the chipboard on top of the larger stamps and rub it.
Apply another thin coat of Gesso, making sure you can still see the stamps through the Gesso. Let it dry.
Now stamp your focal stamps. Design your ornament how you like it! Let the ink dry.
Apply the colorful distress inks in various places. Apply the Black Soot in on the edges of the ornament.
Using a paint brush, apply a coat of the Distress Collage Medium or Mod Podge. Let it dry.
Using a paint brush, apply a generous coat of Glossy Accents. Add the charm while it is still wet. Add a little extra Glossy Accents to make sure the charm is secure. Let it dry. NOTE: If you have charms that have the ring on top, break it off with two jewelry pliers. Hold the charm with one pliers and twist off the ring with the other pliers.
Using strong white glue, adhere the two back sides together to form the ornament.
Insert a charm in the ribbon and tie the ribbon onto the ornament. If you used a circle die, you will need to punch a hole and thread your ribbon through. Your masterpiece is done!
I hope you give this ornament a try. Check out the Blank Page Muse Art Rubber Stamps store for a large collection of amazing red rubber stamps, stencils, paper and more!
I had so much fun making these ornaments that I just had to make a steampunk Santa ornament with the same background stamps I used above, along with two stamps from the Steampunk'd Christmas Holiday set.
Thank you for stopping by and I hope you have a wonderful holiday season!
I'm honored to be posting as a new member of the Design Team for Blank Page Muse!
Check out this cute Gnome ornament using recycled cereal box cardboard!
Non-traditional colors were calling me for this double sided ornament. I started with the Star Bright Gnome Wintery Tree and Star Stencil set for this fun project! I stamped the first tree with Distress Evergreen Bough ink.
I stamped the gnome twice, once backwards in order to have mirror images for both sides. This was accomplished by stamping the image on a rubber gasket from the hardware store. A silicone mat would work just as well! You need to be ready to cover the image with white cardstock as quickly as possible after stamping. Rub over the cardstock and pick up vertically. Copics were used to create the color and textures.
I trimmed the first tree and glued onto a piece of cereal box. I am the Queen of recycled cereal boxes! They are the perfect weight for ornaments and journal covers. I glued blank white cardstock to the back and trimmed to the shape of the stamped tree. Once this was done, I stamped the second tree on the blank side. My trees needed some snow and ornaments, so I patted Distress Mat Medium on the trees and sprinkled Mike Flakes from Ranger on top. Once dry, I added purple Nuvo Drops as ornaments. (one side at a time due to drying time. The final step was to add the cute gnome!
I cannot wait to add this cutie to our tree!
I hope you are inspired by this fun holiday post!
Thanks so much for stopping by
today!
Looking for more Inspiration? Click the links below!
Finished size 4" L x 3 1/2" w If your ornament is bigger then mine your tension is looser then mine just go down a hook size.
Step 1: Start by stamping your stamps on the shirk film the ink will need time to dry before coloring.
Step 2: Once the ink is dry color in the stamps with color pencils. Then cut them out carefully.
Step 3: Follow the instructions on your Shirk film to shirk them. Once cooled you will want to use your Mod Podge to seal in the color pencils.
Step 4: Crochet the fishbowl while you wait for the Mod Podge to dry. Fishbowl pattern below is provided by LaSheet. Follow her on Instagram for more crochet and stamp ideals.
Step 5: Assembling it all together! Once you've crochet your fishbowl and the Mod Podge is dry. It's time to heat up the hot glue gun and glue down all your pretty pieces. Take a piece of yarn about 8" long to make a a big loop to hang on your tree. I used the lark's head knot in the top middle part of the fishbowl, then tied a basic knot on the top making the loop.
Skill level beginner friendly. You will need to know how to work in rounds and how to work a chain stitch, slip stitch, single crochet, and half double crochet.
Abbrerviations:
ch - chain stitch
ss - slip stitch
sc - single crochet
hdc - half double crochet
* - work everything in the stars into the next stitch.
Note: This pattern made in round. Do not join rounds unless told to. Use a stitch marker to mark the start of the round. A small piece of yarn in a different color works great. If you don't have a stitch marker. I personally like to start my round with a magic ring method, but you can also use other trusted methods like: ch 2, work 6 sc into the first ch. whichever you use make sure you have 6 sc in a circle, with no holes in the first row.
Row 1: magic ring. (6) or ch 2, work 6 sc into first ch, to form
the ring.(6) Row 2: 2 sc
in each stitch around. (12) Row 3: *2 sc in next stitch, sc in next stitch*
repeat 6 times. (18) Row 4: *2 sc
in next stitch, sc in the next 2
stitches* repeat 6 times. (24) Row 5: *2 sc
in next stitch, sc in the next 3
stitches* repeat 6 times. (30) Row 6: *2 sc
in next stitch, sc in the next 4
stitches* repeat 6 times. (36) Row 7: *2 sc
in next stitch, sc in the next 5
stitches* repeat 6 times. (42) Row 8: Change to white. Sc in each stitch around. (42) Row 9: ch 2, hdc om the 2nd loop from the hook, 7 hdc across, ch 2 hdc in the 2nd loop from the hook working backwards then ss into the crochet making it look like the other side. This is the "lip" part of the fishbowl. tie off and weave in the ends.
Hope you enjoyed this mix medium fishbowl ornament. If you have any questions feel free to message LaSheet and if you choose to make your fishbowl ornament tag her and Blank Page Muse. Thank you, happy crafting!! ♥
For December all Blank Page Muse DT members are making Christmas ornaments. Because we are all busy in December I thought to make a quick and simple ornament, that does not require a lot of supplies to make. The process can be watched in the video below. This idea can be used with any symmetrical stamp, e.g. butterflies, flowers or whatever theme you want your Christmas decorations to be.
If you want to make a lot of ornaments, it is easy to set up you own assembly line, first stamp out all the images you want to turn into ornaments, next color them, emboss, cut the images out and add the hanger. A fun activity to do together with kids.
Here another picture, it's hard to capture the glitter in a photograph.
I hope you enjoyed watching the video and will have fun making your own ornaments. For more ideas check in on the blog regularly, there will be lots of fun projects made by the team this month.
Looking for more Inspiration? Click the links below!
Greetings BPM Fans! Did you know that gnomes are a symbol of good luck? Farmers still use them today to watch over livestock and crops. They place gnomes in the rafters of the barn or put them in their gardens. I just think they are so cute. Just check out this adorable one from Blank Page Muse called StarBright Gnome Wintery Tree Let Your Light Shine by Pam Bray. This stamp set comes with a 5" tree and the sentiment, Let Your Light Shine. I colored him in red and green colors for a winter card, but you can color him any color and add leaves on the trees for any occasion card or project.
I hope this card inspires you to enter the Blank Page Muse December Challenge, "Celebrate!" You can turn this card into one for any festive occasion. This is a really fun card to make! Visit the BPM Blog for details.
I made this 6"x 6" card using distress inks for the background and added stars using the Stars template available at Blank Page Muse. To add the stars, I added glitter to texture paste, mixed it well, then used the stencil to add the stars. All the supplies and instructions to make this card are listed below. Give it a try!
Supplies:
Blank Page Muse stamps: Gnome Starbright set
Blank Page Muse stencil: Stars
White cardstock cut to 12"W x 6"H, scored at 6", folded in half. This is the base card.
Black cardstock cut to 5-7/8"W x 5-7/8"H for the mat.
White bristol or watercolor paper cut to 5-3/4"W x 5-3/4"H.
White cardstock for the sentiment
Black cardstock to mat the sentiment
Distress ink: Tumbled Glass, Stormy Sky, Faded Jeans, Black Soot
Ink blending tools
Water & paint brush or water spritzer
Art Masking tape. I use Eclipse Art Masking Tape.
Black ink pad
White gel pen
Coloring medium of choice. I used Copic markers.
Transparent texture paste. I used Ranger Texture Paste/Transparent Gloss.
Silver glitter - fine or extra fine
Palette knife to apply texture paste
Paper trimmer
Scissors
Instructions:
Using the bristol or watercolor paper, stamp the gnome toward the bottom of the paper.
The gnome will need to be masked so that when the tree is stamped, a few of the branches will appear to be behind the gnome. Place a small piece of masking paper onto bond paper and stamp the gnome. Using scissors, cut out the gnome.
For this card, a snow scene will be created so a mask needs to be created. Using a 6"W x 3"H piece of masking tape, place it on a piece of bond paper. Draw the snow across the masking tape then cut using scissors.
Color the gnome with your favorite coloring medium
After coloring the gnome, adhere the gnome and snow masks
Using your blending tool and distress inks, ink blend the sky. use the lighter colors towards the gnome and darker colors towards the edges and corners.
Spritz water onto the sky area making sure there are some "stars" of different sizes.
Remove the snow mask, but leave the one on the gnome in tact.
Stamp the tree close to the left edge. It's ok to have branches off the page.
To add the big silver stars in the sky, first mix the glitter into the texture paste.
Tape the stencil onto the card then use the palette knife to spread a thin layer of texture paste. Lift off the stencil carefully. Let dry until before adding the big star.
After adding the texture paste for the big star, ensure it is dry before moving onto the next step. A hair dry or heat gun can be used to speed up the drying process.
Remove the mask from the gnome.
Using your coloring medium of choice, draw and color some snow drifts.
Stamp the sentiment, trim to size. Cut a mat using black cardstock.
Adhere the mat and sentiment to the card front.
Adhere the card front to the black mat.
Adhere the black mat onto the base card.
Using a white gel pen, add a few snowflakes in the sky and on the tree. the card is complete!
This would make a cute Christmas card by adding some ornaments on the tree too, but I kept it a winter card for a friend.
I hope you give this card a try! I appreciate you stopping by today. If you have any questions or comments, please leave them below. ~Betty~
Looking for more Inspiration? Click the links below!