Hi everyone, Steph Ackerman here!
Welcome to the Blank Page Muse Blog! We hope you love these amazing projects created by our fabulous Creative Stamping Team. At Blank Page Muse, we are proud to offer red rubber stamps, clear stamps and stencils. I Brake for Stamps rubber stamps are available online in the same shop. Art rubber stamps are pressed to order in the USA. We are here to help break that blank page! Visit our sister shop IBRAKEFORSTAMPS.com
Thursday, November 3, 2022
Peace and Hope with Winter Guardian
Saturday, January 2, 2021
Snow Globe Ornament
Looking for more decorations or a last minute gift? This project is so fast I found the snow globe pattern here. Only I don't have any craft buttons. So I made my own using these adorable penguin stamps.
Tuesday, December 22, 2020
Snowman Snow Globe Ornament
Be sure to follow us at
The Blank Page Muse Shop https://blankpagemuse.com/ FB Fan Page https://www.facebook.com/groups/bla... Instagram - Shop https://www.instagram.com/blankpage... Instagram - Blog https://www.instagram.com/blankpage... Twitter https://twitter.com/BlankPageMuse Pintrest https://www.pinterest.com/blankpage..
Wednesday, December 16, 2020
Holiday Ornament by Sharon Rogers
Decorate your tree or holiday gifts with this festive ornament by Sharon Rogers!
Be sure to follow us at
The Blank Page Muse Shop https://blankpagemuse.com/ FB Fan Page https://www.facebook.com/groups/bla... Instagram - Shop https://www.instagram.com/blankpage... Instagram - Blog https://www.instagram.com/blankpage... Twitter https://twitter.com/BlankPageMuse Pintrest https://www.pinterest.com/blankpage..
Saturday, December 12, 2020
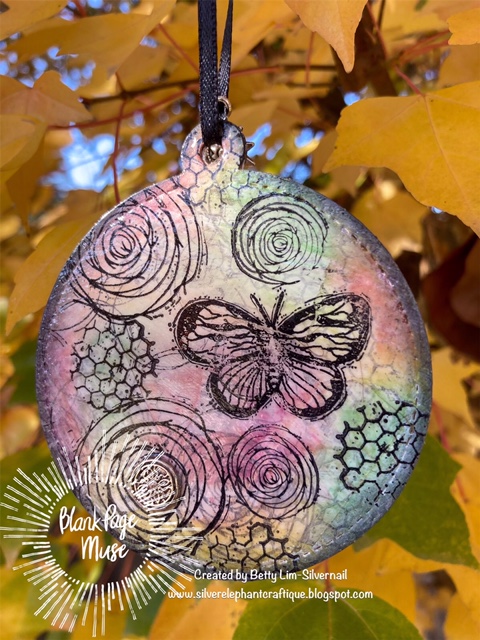
Bright and Colorful Ornaments
Hi BPM Fans! Betty here with a bright and colorful Ornament.
I hope you are having fun seeing all the amazing ornaments the Blank Page Muse Team has created for the holidays! The ornament I created can be used on your Christmas tree or can be used all year round to hang wherever you please. The double-sided ornament is made from chipboard, stamped, and sealed with Glossy Accents so they will last for many many years. They make great stocking stuffers and gifts. Plus they are fun to make!
I hope you will give them a try and enter it into our monthly challenge. The theme is Celebrate and it can be any holiday.
- Blank Page Muse Stamps: Background Grunge Stamp Sheet by Pam Bray and Small Butterfly by Pam Bray
- Chipboard - either 30pt or 22pt
- Ornament die or circle die, minimum size 3". I used Lawn Fawn's Stitched Circle Tags Dies
- Black solvent ink, such as Staz-On
- Acrylic stamping block
- Washi tape
- White gesso
- Washi tape - this is for texture. Use any pattern.
- Distress ink or Distress Oxide: Squeezed Lemonade, Spiced Marmalade, Peacock Feathers, Seedless Preserves, Black Soot
- Distress ink applicator
- Distress Collage Medium or Mod Podge (matte or glossy)
- Strong white glue
- Glossy Accents or Diamond Glaze
- Paint brush
- Black 1/4" wide ribbon - approximately 9"
- Optional items: Charms
- Using an ornament or circle die, cut 2 die cuts with chipboard
- Using a paint brush, apply a thin layer of Gesso on one side of each of the die cuts. You will only need to do one side since we will be gluing these two pieces together. Let dry completely.
- Adhere the washi tape in various areas
- Apply another thin coat of Gesso and let it dry
- Using the black ink pad and background stamps, stamp a few of the background images. When stamping chipboard, I find it easier to place the chipboard on top of the larger stamps and rub it.
- Apply another thin coat of Gesso, making sure you can still see the stamps through the Gesso. Let it dry.
- Now stamp your focal stamps. Design your ornament how you like it! Let the ink dry.
- Apply the colorful distress inks in various places. Apply the Black Soot in on the edges of the ornament.
- Using a paint brush, apply a coat of the Distress Collage Medium or Mod Podge. Let it dry.
- Using a paint brush, apply a generous coat of Glossy Accents. Add the charm while it is still wet. Add a little extra Glossy Accents to make sure the charm is secure. Let it dry. NOTE: If you have charms that have the ring on top, break it off with two jewelry pliers. Hold the charm with one pliers and twist off the ring with the other pliers.
- Using strong white glue, adhere the two back sides together to form the ornament.
- Insert a charm in the ribbon and tie the ribbon onto the ornament. If you used a circle die, you will need to punch a hole and thread your ribbon through. Your masterpiece is done!
Be sure to follow us at:
The Blank Page Muse Shop https://blankpagemuse.com/ FB Fan Page https://www.facebook.com/groups/bla... Instagram - Shop https://www.instagram.com/blankpage... Instagram - Blog https://www.instagram.com/blankpage... Twitter https://twitter.com/BlankPageMuse Pintrest https://www.pinterest.com/blankpage..
Wednesday, December 9, 2020
Fishbowl Ornament
It's that time of year again. Where we are all looking for the perfect gift item. How about something handmade? Here is a mix medium ornament for you.
- ch - chain stitch
- ss - slip stitch
- sc - single crochet
- hdc - half double crochet
- * - work everything in the stars into the next stitch.
Row 1: magic ring. (6) or ch 2, work 6 sc into first ch, to form
the ring.(6)
Row 2: 2 sc
in each stitch around. (12)
Row 3: *2 sc in next stitch, sc in next stitch*
repeat 6 times. (18)
Row 4: *2 sc
in next stitch, sc in the next 2
stitches* repeat 6 times. (24)
Row 5: *2 sc
in next stitch, sc in the next 3
stitches* repeat 6 times. (30)
Row 6: *2 sc
in next stitch, sc in the next 4
stitches* repeat 6 times. (36)
Row 7: *2 sc
in next stitch, sc in the next 5
stitches* repeat 6 times. (42)
Row 8: Change to white. Sc in each stitch around. (42)
Row 9: ch 2, hdc om the 2nd loop from the hook, 7 hdc across, ch 2 hdc in the 2nd loop from the hook working backwards then ss into the crochet making it look like the other side. This is the "lip" part of the fishbowl. tie off and weave in the ends.
Monday, December 7, 2020
Angel Wings Chrismas Ornament
For December all Blank Page Muse DT members are making Christmas ornaments. Because we are all busy in December I thought to make a quick and simple ornament, that does not require a lot of supplies to make. The process can be watched in the video below. This idea can be used with any symmetrical stamp, e.g. butterflies, flowers or whatever theme you want your Christmas decorations to be.
If you want to make a lot of ornaments, it is easy to set up you own assembly line, first stamp out all the images you want to turn into ornaments, next color them, emboss, cut the images out and add the hanger. A fun activity to do together with kids.
List of materials used:
Rubber Stamp "Angel Feathered Wings Heart shaped" by Blank Page Muse, (this stamp can also be found on the "Wings"stamp set.)
White cardstock
Waterproof stamp ink in black
Embossing ink pad
Silver Holographic embossing powder
Colored pencils
Wire, ribbon, or twine
Scissors
Heat gun
Glue
For detailed instructions, see video:
Looking for more Inspiration? Click the links below!
Saturday, December 5, 2020
Sugar Skull Poinsettia Snowman
It's beginning to look a lot like Christmas... Glitter is everywhere. Take a look at my studio, glistening, with Blank Page Muse, Red & Green, and Copics! Ok, maybe I do need to just stick with creating art. I am so excited to be here today and apart of the Ornament Showcase featuring Blank Page Muse Stamps.
I would like you to meet the newest ornament for my tree... My Sugar Skull Poinsettia Snowman!
I hand drew the hat, colored, and cut out as well.
Next start to put the Sugar Skull Snowman together. Cut apart one Poinsettia and use pop dots to add a little dimension to the Snowman's hat.
Click the links below for more inspiration and to connect with the Blank Page Muse Community!
The Blank Page Muse- https://blankpagemuse.com/
FB Fan Page- https://www.facebook.com/groups/blankpagemuse/
Instagram Shop- https://www.instagram.com/blankpagemuse/
Instagram Blog- https://www.instagram.com/blankpagemuseblog/
Twitter- https://twitter.com/BlankPageMuse