Monday, January 11, 2021

Unicorn Wishes for a New Year

  Hi everyone, it's 2021 and I'm sending unicorn wishes for a better 2021.


Supplies:

Blank Page Muse Stamp:  Unicorn Wishes
Blank Page Muse Stencil: Pebbled Path
White and Pink cardstock
Coloring Medium:  Copics, Liquid Pearls


Cut some white cardstock to fit card front.
Using the stencil, create the background using Distress Oxide Ink in Tattered Rose.


Create a second layer using  Speckled Egg, moving the stencil around the panel.


Stamp the unicorn in black ink on the stenciled panel.
Color with Copic Markers.
Ink around the panel, then mat with cardstock.
Stamp the coordinating phrase, ink the panel and also mat with cardstock.


Adhere the panel to a card.
Use Liquid Pearls to add dimension about the unicorn as well as dotting the "i"s in the phrase.


Looking for more Inspiration? Click the links below!
The Blank Page Muse Shop https://blankpagemuse.com/

Saturday, January 9, 2021

Vintage Inspired Altered Notebook

Hi everyone, Monique here, with an easy to make gift idea.

 I love notebooks, you can never have enough notebooks. Not sure what it is what I like about them, , but mostly it is the feel of the book when you hold it in your hands or it's just a nice looking cover, but they always make me happy.

That is why even in the digital age a notebook is a great gift, and if you personalize the covers to the receivers taste, it is usually a highly appreciated gift. Everyone needs notebooks in their life, even if you don't use them to write in them, they are just nice to look at :-).

This one started out as a kraft covered small notebook, the perfect size to carry with you in your purse or pocket, and it fits in an envelope so easy to send as happy mail!


Supply list:
the following Blank Page Muse stampsets;

a notebook with blank cover, I used one with a kraftpaper cover
Lace
Cardstock in white and turquoise
Distress ink in blues, greens and browns
Waterproof stamp ink in black, grey and blue
A die cut, scissors or punch with a scallop motive
Patterened paper or book paper


For detailed instructions, see video:


I hope you enjoyed the video and I can't wait to see your makes, please check in here for inspiration by the Blank Page Muse team regularly.


The Blank Page Muse Shop https://blankpagemuse.com/ FB Fan Page https://www.facebook.com/groups/bla... Instagram - Shop https://www.instagram.com/blankpage... Instagram - Blog https://www.instagram.com/blankpage... Twitter https://twitter.com/BlankPageMuse Pintrest https://www.pinterest.com/blankpage..

Thursday, January 7, 2021

Winter White Card

 Winter Greetings! Chris here and this month I was inspired to create and all white card!  The effect created a bright but still wintery card for this cold January Month! Perfect to send for any occasion. 


Start by gathering your supplies

Blank Page Muse Pine Tree Branch Art Rubber Stamp by Terri Sproul

Blank Page Muse Penguins on Ice Winter Holiday Rubber Stamp

Other Supplies - white Card Base, White Card stock, embossing ink, white embossing powder, white dimensional paint, white paper flower, white ribbon, white ink, wood pine cone, glitter


Start by cutting a piece of white card stock slightly smaller than your card base.  Stamp the Blank Page Muse Pine Tree Branch Art Rubber Stamp by Terri Sproul repeatedly onto your card stock with embossing ink and add white embossing powder. 

Heat emboss your images. Just look at the details of this stamp. 

Stamp sentiment from the Blank Page Muse Penguins on Ice Winter Holiday Rubber Stamp and emboss in white.

Apply ink to your wood pinecone.  Sprinkle various areas with glitter and white embossing powder and het emboss. 


Add snow to your card using dimensional paint. 

Adhere your pine cone and a white bow to your card. 


Here is a close up of the finished card.  


I hope you are inspired to get creative with your Blank Page Muse Supplies! 


Be sure to follow us at 

The Blank Page Muse- https://blankpagemuse.com/


FB Fan Page-  https://www.facebook.com/groups/blankpagemuse/


Instagram Shop-  https://www.instagram.com/blankpagemuse/


Instagram Blog-  https://www.instagram.com/blankpagemuseblog/


Twitter-  https://twitter.com/BlankPageMuse


Pintrest- https://www.pinterest.com/blankpagemuse/boards/


Wednesday, January 6, 2021

Vintage Corset Card

Happy New Year! I can hardly believe 2021 is here... 2020 has definitely been... a year. December was a particularly hard month and when I sat down to create I felt so discouraged. 

There is something so exciting about having a blank canvas in front of you.... 

So I started with just a blank piece of cardstock that was cut down to 4" x 5.25" and one of my go to products: Distress Ink. From there I let go of the stress and got lost in the creating. . .


Begin by inking a embossing plate before running it through.


It embosses the ink into the paper to create a beautiful background: 


Now, time for the stamping! 

Stamps Used: 


The Vintage Corset is one of my favorite stamps. The detail is beautiful. 
Try stamped it using Archival Ink onto Kraft cardstock. 

Then using Distress Ink Pine Needles, stamp the leaves. Fussy cut them all out and and use Copic Atyou Spica markers to add a little sparkle.

Using the Pine Needles Distress Ink and oval stencil, create a oval shape on the background. Adhere the corset and leaves using glue and some pop dots for dimension. 


Supplies Used: 


I love all thing vintage and really enjoyed working with the Vintage Corset Stamp!
What Vintage things have you made? 

Happy New Year! 

Christine

Click the links below for more inspiration and to connect with the Blank Page Muse Community!

The Blank Page Muse- https://blankpagemuse.com/


FB Fan Page-  https://www.facebook.com/groups/blankpagemuse/


Instagram Shop-  https://www.instagram.com/blankpagemuse/


Instagram Blog-  https://www.instagram.com/blankpagemuseblog/


Twitter-  https://twitter.com/BlankPageMuse


Pintrest- https://www.pinterest.com/blankpagemuse/boards/

Tuesday, January 5, 2021

Let Your Dreams Take Flight

Happy New Year BPM Fans! Betty here to share a vintage/classic card. You have probably heard of the saying, "Let Your Dreams Take Flight." What does this really mean? What I think it means is that you can still achieve your dreams and goals even if you have come across many challenges. As we enter 2021 with renewed hope and inspiration, it's time to achieve some of these dreams and goals. I made this card to inspire a special person in my life who has had some recent challenges in his life. 

I used two Blank Page Muse stamps. One is called World Map Hot Air Balloon Steampunk and the sentiment, Let Your Dreams Take Flight, is from the Vintage Transportation Steampunk set. These are the perfect stamps to use for entering a project in the Blank Page Muse January challenge, “Vintage/Classic.” 


Supplies:
  • Blank Page Muse Art Rubber Stamps:  World Map Hot Air Balloon Steampunk and Let Your Dreams Take Flight sentiment from the Vintage Transportation Steampunk set.
  • White cardstock (base card) - 12"H x 6"W folded in half 
  • White cardstock (card front) - 4-1/4"H x 5-1/2"W
  • White cardstock (to stamp balloons) - 4-1/4"H x 5-1/2"W
  • Gray cardstock (card mat) - 5-7/8"H x 5-7/8" W
  • Newsprint Patterned paper - 5-3/4"H x 5-3/4"W. I used paper from Pink Paislee called Indigo Blue. Substitute with any matching paper.
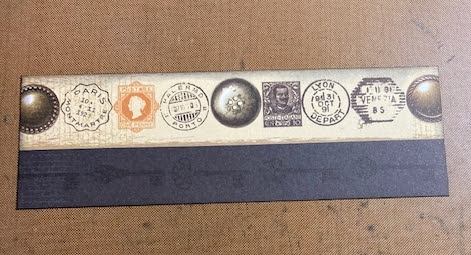
  • Postage meter patterned paper (cut 2)- 1-7/8"H x 5-3/4"W. I used Kaisercraft, Miss Empire Collection, Steampunk. Substitute with any matching paper. I also used this paper to cut out 2 tags.
  • White cardstock (sentiment) - sentiment trimmed to 3/4"H x 2-5/8"W
  • Vintage postage stamps - I used real ones, but you can also use clip-art.
  • 3-1/2"H x 4-1/2"W rectangular die (I used an edge that looked like a stamp, but you can use any style)
  • Waterproof Black ink pad - I used StazOn
  • Distress ink: Black Soot
  • Distress ink: Stormy Sky
  • Distress ink applicator
  • Distress Collage Medium - vintage
  • Paint brush to apply collage medium
  • Glue stick
  • Favorite adhesive
  • Scissors
  • Paper trimmer
Optional items for the tags:
  • 2 brads
  • 2 eyelets
  • Crop-a-dile or hole punch and eyelet fastener
  • 2 pieces of brown twine - 5" each
Instructions:
  • Cut all the cardstock as indicated in the supplies list
  • Using a 3-1/2"H x 4-1/2"W die, use a pencil and trace the inside of the die to mark a guide for placement of stamps onto the card front (white cardstock). If you don't have a die, use a ruler and mark the dimensions as stated.

  • Using a glue stick, put a layer of glue onto the white cardstock. Add some glue outside of the lines as well.
  • Arrange the stamps on the cardstock, making sure each piece has glue. Make sure the stamps go over the edges of the guide lines.
  • Apply a thin later of Distress Collage Medium (vintage color) over the top of the stamps. Let this completely dry.
  • Use the die and cut out the stamps. If you don't have a die, use a paper trimmer to trim where the guide lines are.
  • Using a waterproof black ink pad, such as StazOn, stamp 2 balloon images and the sentiment on white cardstock (the picture only shows one balloon. I decided to add two balloons at the end of the project)
  • Using Distress Ink Stormy Sky, ink your balloons and sentiment. Fussy cut the balloons and use a paper trimmer to trim the sentiment. 
  • Using Distress Ink Black Soot, ink the edges of the balloons, sentiment, card front, mat, and base card.
  • Using the Kaisercraft, Miss Empire Collection, Steampunk paper or paper of choice, cut off the strip that has the postage meter stamp and adjoining border. One piece will be for the outside of the card and the other will be for the inside. Distress the edges with Black Soot.


  • Cut two small tags using the Kaisercraft, Miss Empire Collection, Steampunk paper. If you don't have a die, use a paper trimmer. Distress the edges with Black Soot. Punch a hole and add an eyelet and twine to each tag.

  • Add brads and foam tape to the back to the sentiment. 
  • Time to assemble your card:
    • Adhere the gray cardstock onto the base card
    • Adhere the newsprint patterned paper on top the gray cardstock
    • Adhere the postage meter patterned paper to the bottom of the card, but leave the top edge unglued so the stamps and tags can be added. Adhere the extra strip to the inside of the card.
    • Adhere the card front with the stamps to the card. Slip the bottom corner behind the bottom strip.
    • Using double-sided adhesive foam tape, adhere the balloons and sentiment
    • The tags are NOT adhered, instead, they are to be slipped underneath the strip. This way, the recipient can remove them to see the vintage stamps.


Thank you for stopping by today. I hope you give this card a try. If you have any questions or comments, please leave them below. ~Betty~

 Looking for more Inspiration? Click the links below!

Sunday, January 3, 2021

Just Quickly Before We Say Goodbye to the Festive Season..........

 Hi BPM Fans!

Well another silly season is over with! And Welcome to the New Year - 2021 - can you believe it?

It is very unusual for me to be creating something in advance of Xmas for this year BUT this is just a super quick idea for you to be able to recycle some of the Xmas cards you received and save adding them to landfill or if you had leftover store bought cards! This is a great way to "jazz up" store bought cards!


Supplies:

Blank Page Muse Stamps: Joyful Gnome Set designed by Pam Bray
Store Bought Xmas Cards/Recycled Xmas Cards Received!
Black Ink Pad & Scrap Card plus Colouring Mediums
Base Cards if using Recycled Card Fronts - Not Required if you have left over Store Bought Cards
General: tape, glue, scissors, colouring mediums, washi tape 

Instructions:

If recycling received cards cut off the card front and adhere to a card base. If you are using unused store bought cards you are ready to decorate!


Stamp your images onto white card with black ink, colour and fussy cut.


Add some strips of washi tape to the card front.


Add your stamped images along with any embellishments to the card front and adhere.


Such a quick way to make multiple cards ready for the end of this year!

Thanks so much for joining me for the first time in 2021!!!

Happy stamping!

Sharon

Don't forget to check us out at all of our social media sites
The Blank Page Muse- https://blankpagemuse.com/

Saturday, January 2, 2021

Snow Globe Ornament

Looking for more decorations or a last minute gift? This project is so fast I found the snow globe pattern here. Only I don't have any craft buttons. So I made my own using these adorable penguin stamps.


Rubber stamps used:
1. Penguins on ice, holiday sheet. This sheet is so awesome I also used the snowflakes from it.
2. By Pam Bray Classic Christmas set I love this little reindeer.

Additional items needed:
Imagination
A pair of good scissors
Shirk Film
Ink - StazOn
Color pencils- Faber-Castell
Hot glue gun and sticks
Mod Podge Dimensional Magic

Step 1: Start by stamping your stamps on the shirk film the ink will need time to dry before coloring.
Step 2: Once the ink is dry color in the stamps with color pencils. Then cut them out carefully.


Step 3: Follow the instructions on your Shirk film to shirk them. Once cooled you will want to use your Mod Podge to seal in the color pencils.


Step 4: Crochet the snow globe, pattern can be found here.
Step 5: Assembling it all together! Once you've crochet your snow globe and the Mod Podge is dry. It's time to heat up the hot glue gun and glue down all your pretty pieces. Take a piece of yarn about 8" long to make a a big loop to hang on your tree. I used the lark's head knot in the top middle part of the fishbowl, then tied a basic knot on the top making the loop. 


Pro tip: Tweezers are you best friend when you have to hot glue tiny pieces like this. I may or may not have learned this the hard way. ♥


Hope you enjoyed this mix medium snow globe ornament. If you have any questions feel free to message Lasheet and if you choose to make your snow globe ornament tag her and Blank Page Muse. Thank you, happy crafting!! ♥


Looking for more Inspiration? Click the links below!
The Blank Page Muse Shop https://blankpagemuse.com/


Copyright Text

Blank Page Muse 2018 Sin City Stamps 2013