Monday, August 12, 2019

The Scent of a Woman....

Hi BPM Fans!!
I hope you are enjoying this months blog posts with our fantasy and layered techniques themes!
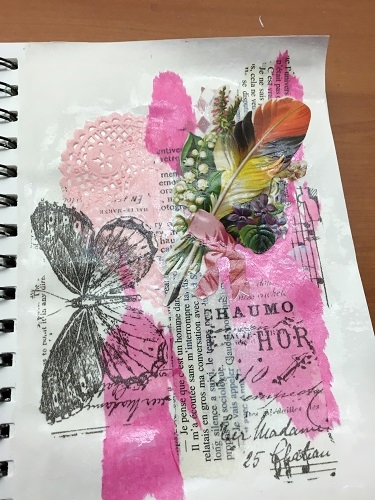
When I think of fantasy, fairies & magic I also think whimsical, fun & imaginative sooooo I've created a quirky character using stamps and collage elements and added her to a mixed media art journal page!
I've also made a layered background which is one of my go to techniques for backgrounds in my journals!
I love that this idea could be used to make a birthday card or postcard or even a bookmark!


With so many new stamps released last month you have such a huge choice to create with!!!!
Make sure you head to the store and grab your favs!!!

Supplies:
Blank Page Muse Stamps: Vintage Scents Perfume Ephemera Set
Journal or Page Insert or Blank Card
Scrap patterned papers, paper doily, tissue paper, picture cut outs, plain pink paper, white card
Acrylic paints
Black Memento Ink
Paper Doll Collage Elements (Art Tea Life Collage Sheet used here)
Embellishments: muslin cloth scraps, computer generated wording, diamantis
Tools: scissors, glue, matt medium, sponge, gel medium, posca pen, colouring pens

Instructions:
Start by stamping one of the perfume bottles onto white card with black ink, colour image - Copic Markers used here - then fussy cut the stamped image.


Choose another of the perfume bottles and stamp on some lightly coloured paper - pale pink textured paper used here - and fussy cut bottles.


Fussy cut paper doll elements from your collage sheet - used here legs, head, sash & bow.


Glue all of your paper doll elements together ready to add to your page background. Computer print your wording and cut out - alternatively you may like to use Blank Page Muse word stamps!


 Next step is create your page background using scrap bits & pieces: plain & patterned tissue paper, paper doily, old book pages, picture cut outs etc. A great way to use your scraps!


Adhere the "bits & pieces" over the page with glue or matt medium - leave some white space around the edge - overlap the pieces - no need to be neat - messy is best! Allow to dry.


Use acrylic paints and a sponge to spread paint over the page - use a thin layer so the paint is translucent and you can still see the patterned papers underneath. Allow to dry.


Arrange your paper doll, perfume bottles, computer generated wording and muslin cloth scraps on the page and adhere. Add a couple of sparkly stick on gems for some bling and you have completed your page!

Thank you for joining me today - I hope you like this fun page!
Have fun stamping & creating!
Sharon


Don't forget to check us out at all of our social media "haunts"!!!
The Blank Page Muse- https://blankpagemuse.com/

Sunday, August 11, 2019

Send in the Clowns

Festive greetings.  I know a lot of people are not a fan of clowns thanks to several horror movies featuring evil clowns!   I love clowns! Maybe because my dad used to be a Shrine Clown and ride around on those little motorcycles in parades!  So I wanted to create cheery clown cards.


Supplies needed
White and colored card stock
Alcohol Markers
Ink

Start by stamping your images onto card stock. Color As Desired.  For the First image I punch around where I was stamping my image to create a "frame" 


Mat on card stock (I chose Lime Green). Add Sentiments. Here are close ups of the finished cards. 


I hope you are inspired to get stamping! Be sure to follow us
The Blank Page Muse- https://blankpagemuse.com/


Saturday, August 10, 2019

Peek-a-Boo Owl Note Cards

Hi everyone! Michelle here with a super cute card I actually made up quite by accident! 
I was playing around with a flower-frame stamp and started reminiscing of a old TV game show I used to watch called Hollywood Squares. Remember that show?
 With all our favorite celebrities too! Funny right?
Well that's how this'peek-a-boo' card came about, so I hope you will enjoy my tutorial. :)


Supplies used:
Blank Card
White card stock scrap
Stamping ink pad
Colored markers
Scissors

1.  Ink and stamp this stamp (from the Petals and Flowers-set)  all over the front of your card.

2.  Stamp onto the scrap paper and cut out just the center of the design. This will create a 'mask'.

3.  Align the mask over each of the flowers, then stamp your "owl" every which way and that. 
Lift 'mask' to reveal your peek-a-boo-owl!


 4.  Upside down, right side up,side ways, ears first, feet first... Have fun with it!


 5.  Color in as shown. Add some dots to the background if desired.


I'm pretty sure once you get started, you wont be able to stop making some of these
'Peek-a-Boo' Owl Note Cards!
They are just so dang cute!

Looking for more Inspiration? Click the links below!

The Blank Page Muse- https://blankpagemuse.com/

Friday, August 9, 2019

August 9th for Fan Art Friday

Welcome to Fan Art Friday! Here are some ideas to help get your creative juices flowing!
Do you want to be featured in future Fan Art Fridays? 
Please join our Face Book Fan Page.
If you share the blog post that features your card, 
(on Facebook or Instagram)
We will enter you in to win a grab bag stash of stamps for that month! 


Thanks so Much 
By Pam Bray
BPM Stamps used:  Grunge and Tropical Dreams


Shine
By Samantha Read
BPM stamps used: Unicorn Wishes Moon & Stars


Hello Sunshine
By Pam Bray
BPM stamps used:
Tropical Dreams 
Blank Page Muse Tall Pineapple
 Hello Sunshine 

That's all for now, Please join our Face Book Fan Page. to share your creations!

Thursday, August 8, 2019

ATCs using Food Packaging

Hello! I have a quick idea when you need ATCs to trade in a hurry! I don't know about you but I like trading art and Artist Trading Cards (ATC) are a great way to trade small works of art with people all over the world. There are quite a few FaceBook groups out there to trade ATCs, go check them out!


For this set of ATCs, using recycled cereal boxes, paint, stamp, emboss, whatever you want to do to the base of the card then cut the box into the standard 2 1/2" x 3 1/2" card size. You can then embellish further with more images, words, and other small items.

Blank Page Muse stamps used -
Kai Lana and Friends by Stephanie Eaton
Background Grunge by Pam Bray
Colored pencils
Gamsol
Acrylic paint
Tim Holtz Words
Small gems made from plastic beads

These cards were started with old book pages torn into small pieces and glued onto the cereal box, then painted with acrylic paint, stamped with several stamps and colors of ink, the images were stamped on white cardstock and colored with Prisma colored pencils and blended with gamsol. They were then fussy cut and glued in place on the ATC. The gems were added with art glitter glue.


The quick tip is to use items you would normally toss in the trash, any type of cardboard can used to make art! go be creative!!

Looking for more Inspiration? Click the links below!

The Blank Page Muse- https://blankpagemuse.com/

Wednesday, August 7, 2019

Live Love Laugh Mixed Media Tag

Hello all
I have a tag to share with you using the new stamps from The Blank Page Muse!


Take a blank tag and apply acrylic paint to the tag base with a makeup sponge
Use texture stamps to add a few extra layers to the base.
Stamp out the flowers and color them in with watercolor paints. 
Cut them out and cluster them together on the tag.
Use 3D foam pads to raise them up a bit so that they layer together easier.
Add a sentiment to the center
Decorate with lace and ribbon to finish


Stamps used


Check out the links below for all of your red rubber stamp needs at Blank Page Muse and follow us for lots of very cool projects!

The Blank Page Muse Stamps - https://blankpagemuse.com/

Tuesday, August 6, 2019

Shrink Plastic Embellishments

Hello!  Susie here with a quick idea to add a little dimension to your crafting - literally!

Not all card makers or scrapbookers like to add dimension to their projects, but I do.  I also like to get the most out of my craft supplies so when I find a way to do both using my rubber stamps you can bet I am going to go for it!

Time to play...


Supplies:
Blank Page Muse: Anime Fairies and Baby Dragons Fantasy Art Rubber Stamp Sheet Set
Archival Black Ink
Stamping platform
Shrink plastic
Scissors
Hole Punch
Markers
Misc beads and findings

Directions:
Begin by stamping fairies and dragons onto shrink plastic using Archival black ink. When the ink is dry, trim out the shapes and punch holes as desired.


Color images on the reverse side of the shrink plastic with markers or colored pencils - follow directions provided with your shrink plastic.


Bake according to directions.


If desired, string together with beads to create fun dangles for craft projects or to wear as jewelry.


I find it so relaxing to make these charms. It is perfect to do while sitting in front of the TV.  I stamp out lots of images and then take my time coloring and trimming them out.  I bake them up when I have a big batch.  I love having them at my fingertips when I am looking for a little accent piece!

Thanks for stopping by and I hope you find some time to play today!
Susie


Looking for more inspiration?
Click the links below!


Sunday, August 4, 2019

Romance Candle...

We have a great romantic creation to share today made by our DT member Sharon - a fun altered candle which is so quick and  easy but makes a perfect gift for any occasion.
Sharon has used one of the flower stamps from one of the new stamp sets by Pam Bray Designs "Scribble Hearts & Elements".

This technique is so easy with limited supplies required.
All you need is a plain colored candle, tissue paper stamped with colored ink and a heat tool!


Simple stamp the images you want to use, tear out from the tissue paper, place over the candle and use the heat tool to "melt" the tissue into the candle.
Finish off by tying a bow of sheer ribbon around the candle and you have a lovely gift!

Looking for more inspiration?
Click the links below!


Saturday, August 3, 2019

Creating a Mermaid Shadow Box Card

Greetings from the magical world of the sea!
  Today I am swimming by to share this card I created for this months Fantasy/Magical/Faerie theme!
 I just love this mermaid and decided to add her to the front of my shadow box card.


Supplies needed
Patterned Papers
Shadow Box Die 
Glitter Card stock
Archival Ink
Distress Markers other or water based markers
Water Brush
Sticker sentiment 

Start by cutting and assembling your card pieces (following the die cut instructions.
Use a strong adhesive for assembling the glitter card stock.

Stamp your Blank Page Muse Mermaids & Flower Fairy Art Rubber Stamp set designed by Rick St Dennis onto water color paper and fussy cut the image. (Note i use watercolor paper because of adding the watercolor base markers and because it is sturdier for fussy cutting.)


Color stamped image as desired. 


 I hope you are inspired to get stamping. Be Sure to follow us

The Blank Page Muse- https://blankpagemuse.com/


Friday, August 2, 2019

August 2nd for Fan Art Friday

Welcome to Fan Art Friday! Here are some ideas to help get your creative juices flowing!
Do you want to be featured in future Fan Art Fridays? 
Please join our Face Book Fan Page.
If you share the blog post that features your card, 
(on Facebook or Instagram)
We will enter you in to win a grab bag stash of stamps for that month! 


 Dragonfly tag 
BPM stamp used:


This Mermaid ATC 
BPM stamps used:
Scribble Daisy


Make it Count 
By Donna Gray
 BPM stamps used:

That's all for now, Please join our Face Book Fan Page. to share your creations!

Thursday, August 1, 2019

What to expect this month with Blank Page Muse!


Hi! Welcome to the Blank Page Muse blog!
So happy you can join us!

The theme this month is " Fantasy, Faeries and Magic!". 
Our Inspiration Team have come up with some amazingly creative idea's.

Here are some sneak peeks of this months projects....


Don't forget to visit your Summer Blog Hop and Giveaway!
Ends August 10th, see details here. 

Lastly.....
Did you know that every Friday, we will be showcasing past and present art created by YOU, 
 our Blank Page Muse fans!
To have your art featured here on the blog, you'll need to join our Facebook Fan Group.

There you can share as many projects as you want using Blank Page Muse stamps only.
Sounds fun right? 
Even better....if you "share" your projects on social media- 
Facebook, your blog (not required to have one), twitter, or Instagram....
We will enter you in a drawing for a "grab bag" of Blank Page Muse rubber stamps! 
Winners will be posted here on the 1st of each month. 
( Yes, there may be more than one winner, depends on how many Fan's join in on the fun!)

* * * 


Copyright Text

Blank Page Muse 2018 Sin City Stamps 2013