Showing posts with label steampunk cards. Show all posts

Tuesday, September 9, 2025

Steampunk Garden Card

Hi, friends!  It's Walter on the blog today with a card with a touch of whimsy.  This month's design team theme is steampunk, which is a category that I have only dabbled in a bit.  For my first design, I knew that I wanted to have a floral element with it and thought that a garden would be fun.  I then thought that a hummingbird is perfect to go with a garden . . . and it just so happens that Blank Page Muse has a steampunk hummingbird stamp!  I built my design around it . . . let's jump into my creative process!


Here's what I used to make it:

Here's how I made it:

I started by ink blending a light amount of Iceberg ink onto the white card panel to create a very light blue sky.  I knew it was safe to cover the panel with this color since it's a very light shade of blue and I would easily be able to cover it up when I colored my florals.  I then stamped the flower and leaf branch from the You Make me Happy Hummingbird stamp set in black ink.

I envisioned a whimsical sky for my steampunk world and thought it would be fun to have lightly stamped shapes and designs throughout it.  I chose some fun detail stamps from Art Doll stamps sets and randomly stamped them around the background using the Iceberg and Mist Gray inks.  I stamped the stamps using Iceberg twice to make a darker shade of it than was blended on the background.  Both of these combined create a very fantastical sky!


I then used another detail element of a long block pattern with Shadow Creek ink to stamp along the bottom edge of the panel to create a grass-like look.  I didn't want it to look like real grass since this is a steampunk card and thought that the blocks would be a nice substitute.  Next up was coloring the flower and leaf elements, which I did using various shades of red and green alcohol markers.  I added a little detail to the flower using a white gel pen.  Satisfied with the flowers, I then choose the words from the Art Dolls stamp sets that I wanted to use and stamped each in a different color ink.


The final step was to create my steampunk hummingbird, and it could not have been easier!  I stamped the image with copper metallic pigment ink to create a more industrial feel.  I finished it by coloring the cogs with silver and gold gel pens.  I was very happy with how it looked, so fussy cut it, put double sided foam tape behind it, and adhered it down to my card.


That's it - the card was complete!  I think it has a nice blend of whimsy, fantasy, and nature.  It's a perfect card to send to someone who needs a little inspiration or encouragement.

Thanks for spending some time with me here on the blog.  I'll see you again next week for more stamping fun.  Until then . . . be well!


Be sure to visit our social media sites for more stamping fun!


Sunday, May 19, 2019

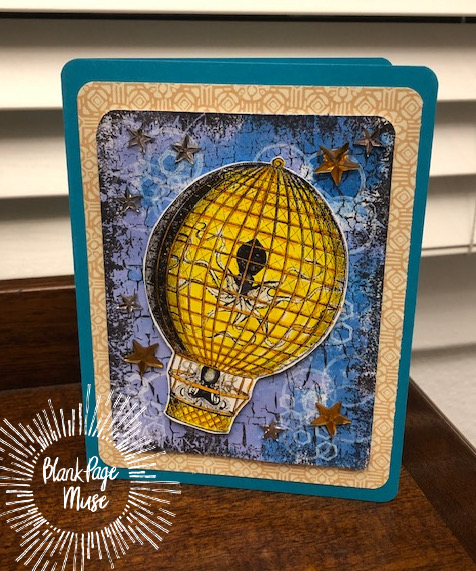
Octopus AWAY!


 Are you looking for a fun, masculine card to create for a special someone?  This easy Steampunk themed greeting card is great for Father's Day or any day you want to surprise someone, or warn them of the impending octopus apocalypse (just kidding!).


Supplies:
Crackle Background Stamp
Small Cluster GeoMetric Stamp and Interlocking Circles from this set
Octopus Airship Stamp from this set
Black archival ink
White Pigment Ink
Various Scrap pieces of cardstock in white, purple-blue, blue-green,and yellow decorative patterned paper (in the example it was a Graphic45.
Adhesive
Foam Double-sided Tape
Small Star Embellishments
Scissors

Instructions:

Create the card base from the blue green paper.  This one is a standard 5X7 sized card.  Cut the decorative paper about 1/8" smaller than 5"X7" and cut the purple-blue card stock another 1/8th" smaller than that one.  Using the black archival ink, stamp the crackle background first, then stamp the joined circles and the geometric cluster stamps randomly using the white pigment ink.


Stamp the Octopus Airship on the white card stock with the archival black ink.  Allow to dry and color in with your choice of medium (watercolor pens, oxides, pencils, etc).  Fussy cut out.


Layer the cards, adhering the patterned paper to the base card, then glue the decorative stamped blue card to the patterned paper (all should be centered).  Attach the fussy cut image using foam tape at a slight angle.  Add some star embellishments and you are done.

All ready to float away into an envelope.


More ideas & crafts by Mercy

Want an extra 15% off on your next order? Use this code on your order! Good until June 1, 2019. BPMDtMercy2019


Friday, August 18, 2017

Ships Siren Tag Card


Hi Chris here and today I am excited to share this card I created using shipping tags and Sin City Stamps!

Supplies Needed:
Sin City Stamps Octopus Time! Steampunk Art Rubber Stamps
Sin City Stamps Tall Ship with Sails Rubber Stamps
Tags
Spray Mist inks - 2 different shades of blue
Star Stencil
Multi-media Gloss
Washi Tape
Cardstock
Black Archival Ink
Letter Stickers
Fibers


Step 1: Lay Star stencil over top of tags and paint Multi-media Gloss over some of the stars, Repeat for all 3 tags. Let dry.


Step 2: Tear a piece a scrap paper to mask off sea area.  Spray with blue ink mist. Wipe ink off of stars.


Step 3 : Mask bottom of sky and spray bottom of tag with other blue spray mist. Let Dry.


 Step 4: Stamp Octopus Lady from Sin City Stamps Octopus Time! Steampunk Art Rubber Stamps onto right half of first tag, slightly overlapping second tag.

Step 5: Stamp Sin City Stamps Tall Ship with Sails Rubber Stamps over third tag slightly overlapping onto right side of second tag. Add Greeting Stickers.

Step 6: Mat tags onto cardstock and add fibers.  On back side of matted tags use washi tape to create "hinges" for tags.
Trim top of tags to finish.


Be sure to Join and share your Sin City Stamps creations on our Facebook Fan Page!


Monday, June 12, 2017

Steampunk & Lace Card


Hi Gals,

Ok...so it's confession time.  This card is one of my first real attempts at the style known as Steampunk.  I especially enjoyed all the embellishing and had lots of fun making it.
I hope you enjoy my super feminine Steampunk card full of lace, gems, candles, & gears!

Supplies:
1. Dress Forms Steampunk Rubber Stamp Set (Sin City Stamps)
2. black cardstock
3. watermark ink pad
4. purple ink & permanent purple pen
5. silver embossing powder & heat gun
6. gear embellishments
7. acetate & permanent black ink pad
8. chipboard frame
9. silver acrylic paint & silver gel pen
10. black & silver rhinestones
11. black lace, black tulle, & silver cord
12. orange glitter glue

Directions:
1. Stamp the dress form image using watermark ink onto black paper.  Apply silver embossing powder and heat set. Stamp the corset again, emboss, and fussy cut. Use a permanent marker to color just the corset purple and attach with dimensional foam tape over the complete image.


2. Apply silver acrylic paint to a chipboard frame and set aside to dry.

3.  Stamp the corset ribbon image randomly over the background paper using purple ink and set aside to dry. Adhere black lace to the back of the frame and then add a layer of white cardstock to contrast against the lace.  Adhere the frame to the background paper.

 4.  Use a silver permanent marker to add decorative details to the corset and also draw on the lacing.  Next, adhere the dress form to the lower right corner of the frame.  Embellish with a rhinestone and a faux bow of black tulle. 

5. Use permanent black ink to stamp the chandelier onto a piece of acetate.  When the image is dry carefully trim it.  Embellish the chandelier with silver rhinestones.  Then apply orange glitter glue to the flames of the candles and set aside to dry.


6.  Attach a piece of silver cord to the back of the chandelier so that it will hang freely.  Place the cord along the top left corner so that the chandelier hangs slightly overlapping the frame.  Next, adhere the cord to the backside.  Finally, embellish the card with rhinestones, feathers, and a cluster of gears.  Adhere the finished design to a purple card base leaving a narrow border.


7.  To accentuate the lacing design on the background paper and make it stand out, use a silver gel pen to draw the eyelets around the ribbon lacing.


A Closer Look:


To purchase this wonderful dress form image, visit  www.sincitystamps.com

For more inspiring paper-craft projects from the Design Team, be sure to visit us at
the Sin City Blog and follow us on Facebook.
To share your creations, join our Sin City Stamps Fan Page HERE.
To learn more about our designer Karen, please visit her blog, Art & Soul.

Thanks for visiting!

Thursday, March 6, 2014

Steampunk Style Cards

Hello everyone.  Barbara here, and today I am going to share a couple of cards I made using Sin City Stamps and a really fun product  called Composi•mold reusable mold making material.  Okay, I was not sure about this product, but after I got over my fears, I jumped right in and I have to tell you, this stuff is sheer FUN!  It is easy to use, and absolutely mistake-proof because, if you don't like what you made, you can start over just by reheating the product.


I love making 3D embellishments and have always wished I had a way to make my stamped images come to life and more dimensional.  Well, here's the answer.  I was able to make molds of my Sin City Stamps, which allowed me to use whatever materials I choose to make these images 3D. I chose to use Creative Paperclay®.   I love it!

I found a wonderful video tutorial here which explains how easy it is to use.


Supplies:

Composi•mold reusable mold making material

Creative Paperclay® air-dry modeling material

Mix'd Media ink (Leather) (Altered Pages)

Metallic Rub on creams (Altered Pages)

Regent Street paper collection (Recollections)

Black acrylic paint

Metal Gears (Tim Holtz)


Directions for Composi•mold:


Follow Composi•mold directions to mold your stamp images.  It is so simple, even a caveman can do it.

Next, choose a microwave safe plate that you will never use for food again and mist with either mold release or Pam cooking spray, which is what I had on hand.
Heat Composi•mold per package directions and pour contents over stamp image (face up) to about a ½" depth or slightly less.  It may seem like you are using a lot of product, but remember, this stuff is reusable, so there is no waste here.

After the Composi•mold has cooled, it will be ready to remove from the pan.  You can then remove your stamp by flexing the Composi•mold and carefully removing it.

I made my second mold at the same time using this image.

Now, to make your Creative Paperclay® stamped images, all you need to do is push the clay into the mold and let it dry a bit before removing it.  You do this the same way as you removed the stamp, but perhaps a bit more carefully as not to disturb the clay too much.  I always turn my mold over and, while using pressure, make sure the clay is really into the mold, and at the same time, making the back smooth and nice for layering.  Here is what it looks like through the Composi•mold.

The really cool thing about this being see through is that you can check your clay to see if you have gotten it into all those little nooks and crannies, unlike any other push molds.  After the clay is dry, you can trim off any excess clay around your image, and even sand if smooth, if necessary.


Now that my Paperclay® is dry, sanded, and trimmed, I can begin the next step.

I first painted each piece with black acrylic paint, making sure to cover all of the white clay.
To bring out all of the details of the Sin City Stamps, which are etched so well and worked fabulously for this project, I simply used my go-to-tool (my finger) and picked up various colors from these cool little metallic rub-on creams.

I used two and three colors to give it some interest, and in the closeups below, I think you will see what I mean about how well-etched the Sin City Stamps are, because the detail is just awesome.


For my first card, I cut my print paper to just less than 5" x 7" so that a tiny border on my card base would show.  I stamped the small swirl from the Art Journaling with Terri Sproul 2 plate in Leather ink along the top portion.  I also stamped STEAM from the A Wing Above the Rest plate in the same color ink.  Then I adhered that to my kraft card base.
Next, I die cut three gears from another print paper and because it had a design in resist, I again added some gold metallic rub-on cream over each gear.  It was subtle, but effective.  The gear on the right has not been colored yet.  
I added the gears, the now dimensional stamp image, and some metal gears to the card front.

For my second card, I cut my plaid print paper to just less than 5" x 7" so that a tiny border on my card base would show.  Then I stamped the script from Art Journaling with Terri Sproul 2

and the bricks from Art Journaling with Terri Sproul 2 over the print, as shown.  I am not real fond of plaids, so this made me much happier and I think added to the overall look.  I then edged the paper and layered onto my kraft card base.

I cut out some ephemera from one of the print papers, edged both with Leather ink, stamped Remember When from the Art Journaling with Terri Sproul 2 plate onto one, and adhered both to my card.  I used foam pop dots for the ticket.  I also added some metal gears for fun.


I hope you enjoyed my steampunk style cards today.  They would make wonderful masculine cards for all those men in our lives.


Thanks for stopping by, and be sure to check out the Sin City Stamps online store for all your stamping needs.  And while you are at it, hop on over to Composi•mold and check out their fun products as well.   I will be back in a couple of weeks with another fun project using this awesome material with Sin City's fabulous stamps!  And please visit me at my place, http://blackholeartstudio.blogspot.com


In the meantime, thanks for stopping by and have a wonderful, creative weekend.


Barbara


Copyright Text

Blank Page Muse 2018 Sin City Stamps 2013