Showing posts with label A Vintage Girl. Show all posts

Friday, February 25, 2022

Creating an Art Journal in 2022 - A Creative Start

Today I am excited to share the start of my 2022 Art Journal!  Art journaling was something I played around with in 2021 and loved the freedom it gave me to just create! To try new techniques. To try new stamps, new textures and USE my papers and scraps! 


I know that I will not love all my creations and some won't even ever be seen!  But this is by me and for me so that's ok!   No Rules! No Limits (except for paper size!


For this year's journal, I choose a travel journal I had picked up off of amazon that I loved and had hope to use as a scrapbook of sorts but felt the pages were too thin. But I couldn't let it go to waste so it will be my Art Journal!  And I love the size.  Roughly 4 1/8  x 6 3/4 inches.  Big enough to get creative but not so big that it would get overwhelming. You Can find the exact journal on Amazon  if you want to try the same one, but any 3 to 6 ring binder will do! and in Any size.

Supplies needed to recreate Your Title Page

Blank Page Muse Alphabet Letter Set Sheet Art Rubber Stamp by Terri Sproul

Blank Page Muse "Flitter" Butterfly against a Honeycomb Background Art Rubber Stamp

Blank Page Muse Chicken Wire Mesh Background Texture Art Rubber Stamp by Pam Bray Designs


Other Supplies 

Paper (Cardstock weight), Archival Ink, Planner Die (if desired) , Tiny type alphabets stickers, chipboard sentiment. 


Start by die cutting or cutting your Page to size using printed paper. I chose a patterned paper that  already had lots of "activity" going on!


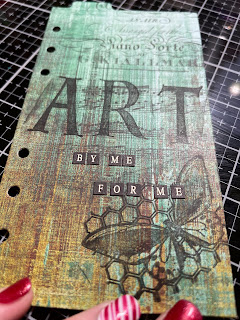
Stamp your title and Flitter using Blank Page Muse Alphabet Letter Set Sheet Art Rubber Stamp by Terri Sproul and Blank Page Muse "Flitter" Butterfly against a Honeycomb Background Art Rubber Stamp. 

Blank Page Muse Chicken Wire Mesh Background Texture Art Rubber Stamp by Pam Bray Designs


Add your Tiny Alphabet stickers.

Stamp Blank Page Muse Chicken Wire Mesh Background Texture Art Rubber Stamp by Pam Bray Designs onto background as desired and add chipboard sentiment to finish off your title page. 
I hope you are inspired to get creative and try Art Journaling with me this year!  ~Chris 
 You can also find more inspiration at the links below:


The Blank Page Muse- https://blankpagemuse.com/

FB Fan Page- https://www.facebook.com/groups/blankpagemuse/

Instagram Shop- https://www.instagram.com/blankpagemuse/

Instagram Blog- https://www.instagram.com/blankpagemuseblog/

Twitter- https://twitter.com/BlankPageMuse

Pintrest- https://www.pinterest.com/blankpagemuse/boards/

Sunday, February 6, 2022

How to Create a Texture Filled Art Journal Page

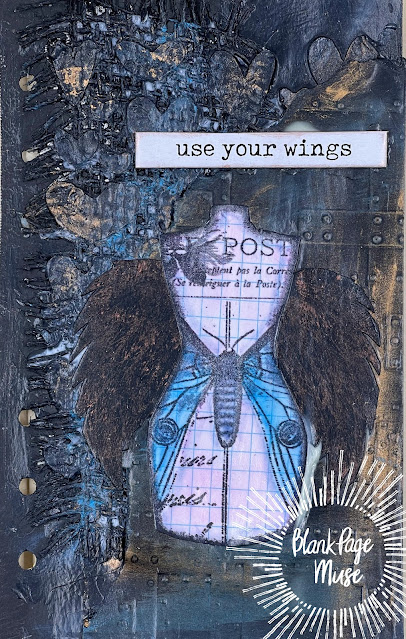
Greetings!  Chris Here and today I am excited to share this newest addition to my 2022 art journal! This page was so fun to create and has so many fun textures! 


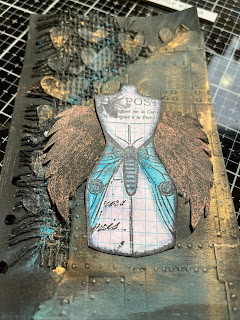
My Inspiration title for this page is USE YOUR WINGS!  To remind ME that it's OK to step outside my comfort zone and just play!    For more information on my journal you can check out other posts on  my blog. 

Blank Page Muse Supplies 

Hearts Stencil designed by Magda Polakow

Vintage Mannequin Dress Form Lace Fan Butterfly Pattern Tags Rubber Stamp Set


Other Supplies

Embossing Folder, Black Card Stock, graph grid paper or note card, Loose weave burlap trim, Light modeling paste, black paint, wax-blue patina, bronze, black ink, copper ink, mod podge, Sentiment chipboard, Mixed media paper, water color markers


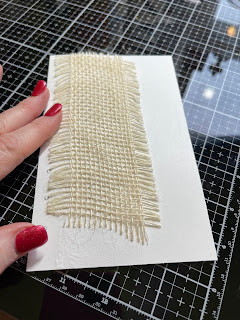
Start by cutting your mixed media paper to fit your journal.  Adhere your loose weave burlap to the left side of your page. 

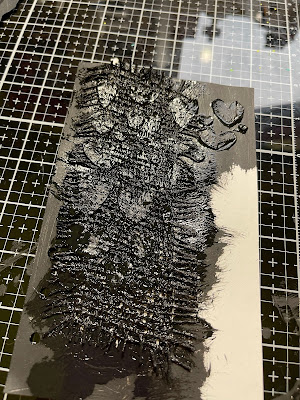
Using your Hearts Stencil designed by Magda Polakow and light modeling paste.  Just look at that texture!!!!   Let dry.  You can speed up the process with a heat gun.  THe modeling paste has to be just dry enough you can't see your finger impressions in it. 


Paint your page with black paint.  I love that the black paint seemed to "re-activate" my my modeling paste and the hearts picked up the burlap texture too! 


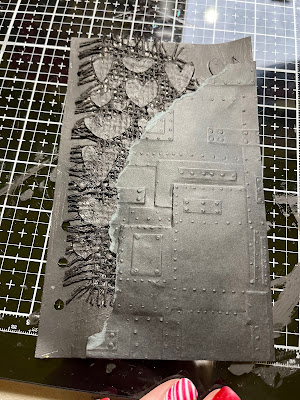
Emboss a scrap piece of black card stock.  Tear your edges and adhere to your page. 


Add waxes to your page as desired.  Waxes are fun but a little messy!  But they are awesome for highlighting textures! 


Stamp your Vintage Mannequin Dress Form Lace Fan Butterfly Pattern Tags Rubber Stamp Set onto graph paper or use graph ruled note cards like I did!


Color your image with watercolor markers. Cut out your Mannequin. 

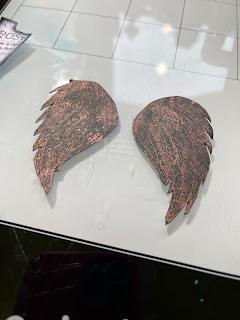
Stamp Classic Spark Rubber Stamp set onto black card stock with copper ink.  Cut out your wings. 


Add Mannequin and wings to your page and finish off with your Chipboard Inspirational quote. 


 I hope you are inspired to create your own art journaling page!  You can also find more inspiration at the links below:

Tuesday, March 16, 2021

Grateful Heart Stamped Card

Today I am excited to share this quick and easy cute card I created using some of my favorite Blank Page Muse supplies.  So often I get so worried about coloring the perfect image. For this card I wanted the images to speak for themselves. 


Gather your  supplies

Floral Patterned Paper
coordinating card stock
border punch. 
Black Ink
Embossing Ink
Clear Embossing Powder
tiny heart punch
Sticker greeting


Restamp your image onto a post it note or masking paper to create a mask.  Trim and place over your stamped image.  
Stamp Blank Page Muse Windows of Time Vintage Window & Shutters Art Rubber Stamps Set designed by A Vintage Girl 


Leave your mask over your character and add a mask over the stamped window. 


Lay the Blank Page Muse Hearts Stencil designed by Magda Polakow onto your patterned paper and ink through the stencil with embossing ink. 
Sprinkle clear embossing powder over paper and heat emboss.  You can see the clear hearts on my paper  below. 
Mat  your stamped patterned onto card stock trimmed with a border punch.  Add your sentiment  and a tiny heart to finish your card. 

I hope you are inspired to get creative with your Blank Page Muse Stamps and Stencils! 

Thursday, March 26, 2020

Button Up!!!

Hello BPM Fans!!

How are you enjoying all the DT makes so far this month?
There have been some great "anything but a card" ideas using the fab range of stamps available at the BPM Store!


I have a fun "non card" make to share today - some fun fabric buttons!

Supplies:
Blank Page Muse Stamps: Flitter Butterfly designed by A Vintage Girl
Button Making Kit
Black Ink Pad
Calico fabric
Coloured pencils

Instructions:


Start by cutting your fabric according to the template size included in the button kit.


Use the black ink pad to stamp onto the fabric. Colour the image with pencils.


Use the "tool" provided in the button making kit to assemble the fabric over the button front and press the backing into place.


A great way to add some fun decoration to a winter coat - replace the boring buttons with bright and colourful buttons created by you!!

Thank you for joining me today!

You still have time to play along with our challenge so make sure you link your "non card" creations!

Happy Stamping!

Sharon


Don't forget to check us out at all of our social media sites
The Blank Page Muse- https://blankpagemuse.com/

Thursday, February 27, 2020

Multiple Stamps in Monochrome!


Hi BPM Fans!!

Have you been enjoying this month's DT inspiration?
Hope you have had time to play along with our "multiple" stamps challenge?
I love combining stamps and getting multiple uses from my stamp stash!


Today I am sharing a card using several BPM stamps and it's also a card that can be used for multiple purposes just by changing the sentiment which is another great way to get lots of uses from your stamps!

Hope you enjoy and have some time to get some stamping done yourself!

Remember to share your creations at the Facebook Group - we love to see how you use your stamps!

Supplies:
Blank Page Muse Stamps:
Buttons and Bows Dress Form designed by Rick St Dennis
Dandelion Wishes with Butterflies sentiment "creativity" designed by Terry Sproul
Timeless Measurement Set designed by A Vintage Girl
Black Base Card
Card Front in Kraft Colour
Gesso, Stencil & Ink Spray
Kraft Card Extra & Brown Ink Pad
Embellishments of Choice
General supplies: scissors, glue, spatula, water spritzer

Instructions:


Use your stencil and apply Gesso to the card front, no need to cover the entire piece. Allow to dry and then use a brown coloured ink spray and water spritzer to add some colour. Set aside to dry while you stamp your images.


Stamp your chosen main images and sentiment onto Kraft card using a dark brown ink pad and fussy cut. You can either cut or tear around your sentiment.


Adhere the card front to the card base and arrange your elements onto the card front. Add any embellishments you like. As this is a "sewing" themed card I used haberdashery embellies! Once you are happy with the placement adhere all the elements.


You can adapt this card to any colour theme you like and any occasion you want!


Hope you enjoyed our inspiration for this month!
Be sure to pop back again for a new challenge and theme in March and lots more inspiration from the DT!

Happy stamping!

Sharon

Don't forget to check us out at all of our social media sites
The Blank Page Muse- https://blankpagemuse.com/

Monday, February 24, 2020

A Vintage Girl Tag


Tag you are it! I found this Tim Holtz paper that I thought would be perfect for the A Vintage Girl Stamps and for this month's challenge of using multiple stamps on your project!


Supplies Used
Tim Holtz Collage papers
Archival Ink
twine
tag

Lay your stamps out on your background papers and stamp with archival ink.  Add additional stamps as desired.


Add twine as desired onto your tag to finish.


Be sure to follow us and to play along with this month's challenge 

The Blank Page Muse- https://blankpagemuse.com/

Monday, February 17, 2020

Vintage Birthday Greetings

In our house the month's of January through March are jam packed with birthdays!   So I always try to stock up on my stamped birthday greetings!   Today I am sharing this easy stamped card using 3 different Blank Page Muse Stamps.


Supplies Used
Water Color Paper
lace Stencil
Blank Page  Muse "Flitter" Butterfly against a Honeycomb Background Art Rubber Stamp
Blank Page  Muse Windows of Time Vintage Window & Shutters Art Rubber Stamps Set designed by A Vintage Girl 
Blank Page  Muse Happy Birthday! Word Rubber Stamp by Pam Bray Designs
Distress Ink
Archival Inks


Start by ink your stencil with distress inks on water color paper.


 Stamp Blank Page  Muse Windows of Time Vintage Window & Shutters Art Rubber Stamps Set designed by A Vintage Girl  with archival ink.


 Stamp butterfly from Blank Page  Muse "Flitter" Butterfly against a Honeycomb Background Art Rubber Stamp with archival ink.


 Stamp Blank Page  Muse Happy Birthday! Word Rubber Stamp by Pam Bray Designs with distress ink matching your stenciled pattern.


To Finish, mat your stamped pieces on card stock and add to card base.

I hope you decide to join us for this month's challenge!

Be sure to follow us and to play along with this month's challenge 

The Blank Page Muse- https://blankpagemuse.com/


Wednesday, February 12, 2020

Two Mad Dahlias Guest Designer


Hi Everyone,
I am so happy to be guest posting for Blank Page Muse Stamps.  When I saw these images from A Vintage Girl  I could not wait to create. 
I started by stamping four of the large tape measures in Jet Black Archival ink.  I cut them out and using the edge of my scissors I tattered the edges. 

Then I inked them and let them dry.  Once dry I took a tiny bit of metal tape and made edges just like you find on real cloth measuring tapes. 

For the main panel I stamped the vintage corset in the center, again using jet black archival.  I also stamped a second corset and cut it out to use for a mask.  This was just done on scrap paper.  Always save your masks, you never know when you might use them again. I just pop them in the bag with the stamp. 
I inked the corset using a pale pink and then covered it with the mask to ink the rest of the background. 
The background was inked and then stamped using the small crackle stamp.
To make her sash I used the rolled measuring tape from the Timeless Measurements set.  I used jet black archival on seam binding.  I trimmed the image and colored the seam binding using Dina Wakley scribble sticks.  
I lined up the image on the corset and glued it in place. 
Before I finished up the main panel I flicked on some black and copper paint.  I lined the measuring tapes up along the edge of the card and glued them down. I added the sentiment and edged the words using a black gel pen.  

 I added some small clusters of flowers to the corners and a tiny flower on the sash.  I know the corner flowers covered the metal edges quite a bit, but I really like how they look. The whole panel was mounted on a black card.  

I hope you like this card as much as I liked creating it.  

Jess

Visit Jess on her social media:
Instagram
Two Mad Dahlias Blog

Thanks so much Jess!
We hope you are inspired to play along and come back to shared your hand stamped creations! Our challenge link is right there on the right side and it is open until March 5, 2020.

Copyright Text

Blank Page Muse 2018 Sin City Stamps 2013