Showing posts with label Vintage bird man. Show all posts

Friday, October 20, 2023

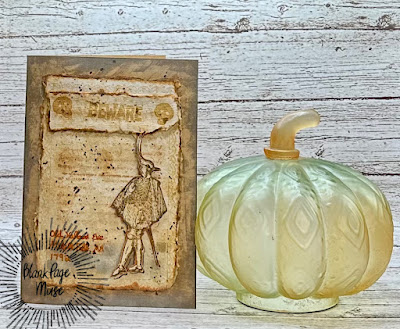
Beware the Bird Man

Hey there, friends!

It’s design team member Walter on the BPM blog today with a fun take on a Halloween card.  This card allowed me to combine my love for vintage looking cards with a stamp that was begging for a story to be told.  I had so much fun with this one!  Beware the Bird Man is a cautionary tale based on some imaginary local lore (or is it imaginary?)


I used the following BPM stamps in making it:

Each of these stamps combined to create a vintage looking book page and image.


Visit my blog for more details on the card and to read the story I wrote that was inspired by the Bird Man!

I hope that you all have a safe and happy All Hallow’s Eve.  Thanks for spending some time with me on the blog today.  See you next time!

Saturday, February 16, 2019

Steampunk Wings

Cathy N here with a steampunk card for you.
I like doing steampunk because you can add different elements together and they all work some how.


Stamps Used:
1887
Sketchy Doodle Bricks by Pam Bray
Concentric Circles by Cathy Frailey
Vintage Steampunk man

Other Supplies:
Kraft cardstock
Black cardstock
Brown cardstock
Purple cardstock
Clock key cutout
Steampunk gears die
Black paint
Colored wax rubs
Colored pencils
Black ink
Brown ink


Paint the clock key black, then cover with colored waxes.
Stamp Vintage Steampunk man on Kraft cardstock with black ink.  
 Randomly stamp Concentric Circles by Cathy Frailey with a brown ink in the background. Making sure you don't go over the Vintage Steampunk man .
 Also take Sketchy Doodle Bricks by Pam Bray and randomly stamp all over the background.
 Take your steampunk gears die and some black card stock and cut some gears out of it and add it to the Kraft cardstock.
 Take the same colored waxes you used on the clock key and rub them over the steampunk gears. Color the  Vintage Steampunk man with colored pencils.
Edge the whole Kraft panel with some black ink and stamp 1887 in spots. Mount the clock key to the middle of the Vintage Steampunk man. Layer on purple cardstock then on a dark brown card base.

Please come join the fun at these different spots.
The Blank Page Muse- https://blankpagemuse.com/

FB Fan Page-  https://www.facebook.com/groups/blankpagemuse/

Instagram Shop-  https://www.instagram.com/blankpagemuse/

Instagram Blog-  https://www.instagram.com/blankpagemuseblog/

Twitter-  https://twitter.com/BlankPageMuse

Pintrest- https://www.pinterest.com/blankpagemuse/boards/

Monday, November 26, 2018

Quiet, but not blind

Hi Everyone,
Jess here today. I was starting my project with a fall theme in mind and then I stumbled across my quote stamp.  The colors evoke fall, but the sentiment can work year round!


Blank Page Products used:
Oh darling stamp
I was quiet, but I was not blind
Floral Lace
Large Bird Man


Other Products Used:
Distress Inks
Distress Oxides
Distress Crayons
Distress Markers
Cardstock
Micro Glaze
Archival Ink
Clear Texture Paste
3d Embossing Folder
Ribbon
Adhesive
Stencil
Waterbrush

Using Distress Heavy stock blend together several shades of DIstress Ink.  Spritz with water and dry completely.  Take a tiny bit of Distress Micro Glaze cover most of the background.  Stamp the Floral Lace stamp using Distress Oxide Ink and spritz with water.  Using the micro glaze on most of the background keeps the top layer of ink from blending into the background.  It also keeps some of the intricate stamp pattern, but not all of it.  The look is wonderfully aged and tattered.
Take clear texture paste and a stencil to the background.  Don't worry about it looking perfect.  Imperfect looks better! ONce the paste is dry use Distress crayon to scribble over the paste.  Smudge the crayon using your finger and the pattern pops up adding another layer to your background.
Stamp the Large Bird Man on Watercolor cardstock.  Color him in using a waterbrush and Distress Markers.  Once he is dry fussy cut the image.

To finish the background stamp your two sentiments( Oh darling  and I was quiet, but I was not blind) using archival ink.  Back them with black cardstock and play with placement on your background.  Once you're happy with placement you can glue them down.
Run plain black cardstock through your die cutting machine using a 3d embossing folder.  Take a Distress Crayon and highlight the raised areas.  The slight gilded effect is so gorgeous.  Adhere this piece right under the focal background piece you created.
All that's left to do is layer up your background.  On this card the black is attached to a distressed piece of gold cardstock.  The gold is mounted to a sage green card.  A bit of burgundy ribbon was the finishing touch.
Happy Crafting,
Jess


Thanks for coming by!
Please visit the following for more inspiration!


Friday, October 12, 2018

A Elegant Gentleman

Hello all you Blank Page Muse stamp lovers, Cathy here .
How is your October going?  Fall is my favorite time of year. Enjoy this card I have made.

Stamps Used:

Other Supplies:
Watercolor paper
Distress Oxide ink
White cardstock
Black cardstock
Copic markers
Witch hat die
rub-ons
water
heat gun
craft mat
 Start out by making the background paper. Use different colors of Distress Oxide ink to make it look like old paper.  Use the smooching technique with the inks and the craft mat.                                                    
Next stamp Vintage bird man. Just the body so mask the head off. Color with Copic markers .Set aside for now.
 Stamp pumpkin on white cardstock and color with Copic markers and cut out. Glue on top of vintage bird man's body. Die cut out witches hat and glue to top of pumpkin.
 Then take Faded page text  and some brown ink and randomly stamp over the background with it.
Lastly add some rub-ons to finish the card. 

Don't for get to join all the fun at these different spots.

Copyright Text

Blank Page Muse 2018 Sin City Stamps 2013