Hello Again Blank Page Muse Stamps Fans!!

Are you all enjoying our Fall and Halloween themed month so far??
It's a bit weird for me here in Australia as it's Spring and not Autumn so it's strange to be working with the warmer autumnal tone colours - so guess what I did? I added a flower stamp to the red/yellow/green page so it's part Fall and part Spring LOL!

Hope you like this page - it's really quite quick and easy with minimal supplies needed and you can adapt it to a range of Blank Page Muse Stamps and any colour combo you like!

Supplies:
Blank Page Muse Stamp Set: Art Journaling Mixed Media by Pam Bray Designs
Blank Journal Page or plain white card
Coloured Ink Pads - any 3 co-ordinating colours, any distress or dye ink pads
Stencil - use your favourite!
Embossing Ink Pad and Black Embossing Powder
Fixative Spray - "optional" depending on types of ink pads used
Tools & Supplies: sponges, scissors, heat gun, sticky note pad & ink pad for making flower "mask"
Instructions:

First step is to sponge your coloured inks onto the blank journal page - randomly, doesn't have to be perfect - blend until you are happy with the effect and depth of colours.

Next step grab your stencil and using the same 3 coloured inks randomly sponge bits of the stencil over the page - alternate the colours. If you have used Distress Inks you may wish to add a fine mist of fixative spray to set the ink.

Using the large flower from the Journaling Set stamp with ink onto a sticky note pad and fussy cut to make a "mask" to use on the journal page.

Using the embossing ink pad start stamping the flower - add embossing powder and use heat gun to melt after you stamp each flower. Stamp them along the outside of the page or your piece of paper using the mask to cover the already embossed flowers as you work up (or down!!) the page!
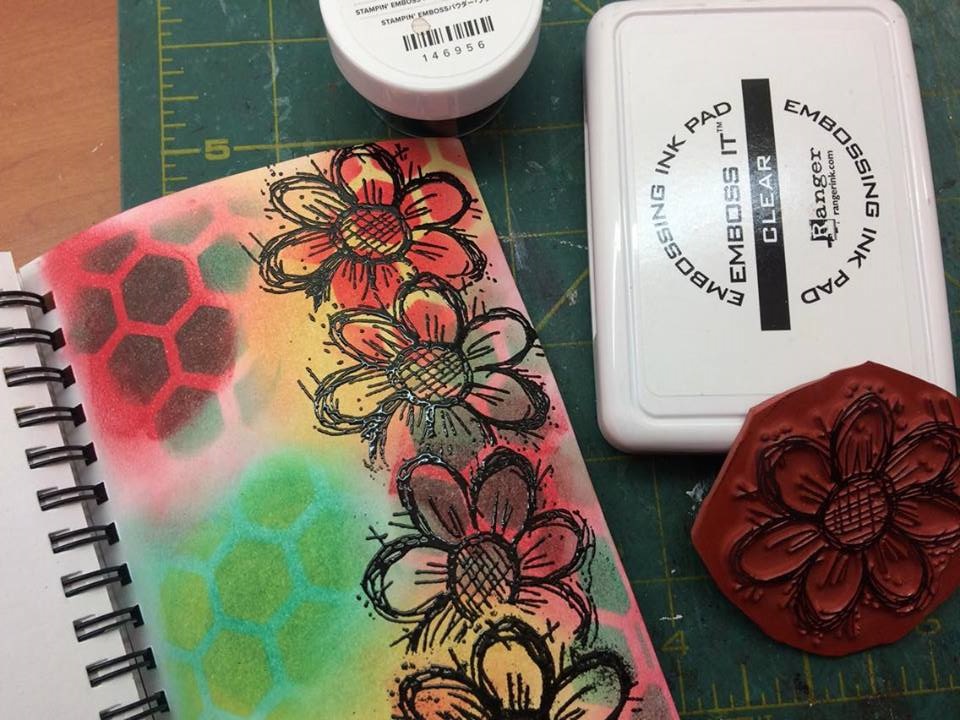
Use your scissors to fussy cut around the flowers as shown below to get the patterned look on the edge of the page! It will look even better when you complete the page behind and you have some colour behind the flower edge!

Finally stamp and emboss the "Journal" word stamp from the set at the bottom of the page. And your page is finished!

You can have lots of fun playing around with different Blank Page Muse Stamps to make fancy edges on your pages!

Hope you have enjoyed this little tutorial!
I'll be back soon with some more inspiration for you.
Don't forget to check us out at all of the following Social Media Sites:
The Blank Page Muse- https://blankpagemuse.com/
FB Fan Page- https://www.facebook.com/groups/blankpagemuse/
Instagram Shop- https://www.instagram.com/blankpagemuse/
Instagram Blog- https://www.instagram.com/blankpagemuseblog/
Twitter- https://twitter.com/BlankPageMuse
Happy Stamping!
Sharon
I love how you trimmed the edge of the page!
ReplyDelete