Monday, April 17, 2017

Circus Celebrations


Chris here and today I am excited to share this vintage looking Circus Celebration Birthday card!
When I created this I was inspired by the striped 7 gypsies paper - every time I looked at it and my Sin City Stamps Steampunk Circus Stamp Set all I could think of was a circus tent!!!!!!   So I decided to re-create a circus tent!
Enjoy!

Supplies needed
2 sided Striped Patterned paper
Cream/Ivory Card stock
Archival Brown Ink
Colored ink pads
Colored markers
Water Brush
Twine/Jute
Foam Dimensional Tape

1. Start by cutting your cream cardstock as your card base and distress with your ink pad.

2. Stamp image from Sin City Stamps Steampunk Circus  in bottom center of card.

3. Color image in muted colors using markers and a water brush.

4. Cut 2 sided striped patterned paper slightly smaller than card base.
5. Cut a slit in the center of the paper, stopping about 1 inch from the top.
6. Attach foam dimensional tape on the front of striped paper as below.
7. Fold ends back and attached striped paper over stamped image.
8. Add ground base with water brush and markers.

9. Stamps the 'Happy Birthday Greeting' and cut into a banner shape then attach to the card.

10. Add the Jute/twine bow accent to finish off your card.

Hope you are inspired to get stamping! Please visit our Fan Page for more inspiration!

Saturday, April 15, 2017

Day of the Dead Triptych


Hi all, today I show you how to make this Day of the Dead Triptych.


Supplies:

Sin City stamps Sugar Skull Floral Flourish and Praying kneeling skeleton
flower flourish from the Day of the dead sugar Skull sheet

Die Artfull Dwellings, but these shapes are also easy to handcut
Black ribbon
Paints in  blue, quinacridone gold , red, dark grey, yellow iron oxide.
Antiquing cream in white (or white paint)
Gesso
Matte Varnish
Chipboard (I used the back of a paperpad)
Black waterproof stamp ink
Arylic block
Unmounted rubber stamp  about the same size as the kneeling skeleton stamp
Glue


Instructions:

1)  Cut out house shapes of chipboard ; 4 smaller and 2 larger (or use the Artfull dwellings die) and gesso both sides  (size needs to match the stamps you will be using)


2)  Paint all 6 shapes with the grey paint.
3) Add a layer of antiquing cream over the grey, let it dry and wipe back using a baby wipe to give it a worn look. (This can be done with acrylic white paint too, it's just a bit harder. If you use paint  make sure it has not dried completely before you wipe it off)

Brush the edges with the ink pad to create a distressed look.
4)  Now we will do a technique that is called "Mirror stamping" As you can see on the picture of the Triptych the Praying kneeling skeleton are both facing the middel pannel, so we have to do a little trick to make one of  the skellies face the other way using the same stamp.

Take an unmounted rubber stamp , here the Sugar Skull Floral Flourish that 's on the middle pannel is used, lay it on the work surface face down.
Ink up the Praying kneeling skeleton and make an impression on the back side of the unmounted Skull stamp.
Take the left pannel of the triptych and press it (white side down) onto the impression you just made on the back of the skull stamp. See picture below


 Make sure to press firm and evenly to make a good impression, work fast so the ink will not dry before you can stamp.
 Here is the result, on the left the mirrored image and on the right the image as it is on the stamp.

 5) Make an impression of the Sugar Skull Floral Flourish on the middle panel, and add the flower flourish stamp on the top of each panel.
6)  Because the antiquing cream will keep reacting with water add a layer of matte varnish (be carefull the antiquing cream will react with the varnish too). If you used acrylic paint you will not have this problem so no need to varnish then.
When varnish is dry add  iron oxide yellow paint  thinned with water to the edges
 7) Next add some quinacridon gold, with every layer of paint you want the image and background to shine though. Therefor you need to thin all thepaints used with water.
 8) Use some red an blue to make the Triptych a bit more colorful but make sure you will be able to see the stamps shine through the paint layers. Adding paint over the stamped image will give a more aged look as stamping over the paint. and as you can see- the imperfections of the mirror stamped skeleton are not noticeable anymore.
9) Cut two pieces of ribbon to use as hinges.  Take the 3 panels, line them up with some space between the panels, add a layer of glue and attache the ribbons as shown in the picture above.


10 ) Next put the stamped pannels in their right place.


Thanks for visiting.

Here's our quick links to find even more inspiration and to grab your own Sin City Stamps:
Sin City Stamps Store
Sin City Stamps Facebook Group
And you are here at "The Blog" but make sure you keep checking back - even better "follow" us so you don't miss any of the Inspiration Team posts

Thursday, April 13, 2017

Be Your Own Kind of Beautiful...


Hi there!
Today I am going to show you how to make this lovely framed project using Sin City Stamps!
Enjoy!
Products Used:

  • Sin City Stamps - Angel Of Time 
  • Blank wooden 5X7 frame
  • Molded paper clay pieces
  • Flower Assortment
  • Microbeads
  • 3D Matte Gel
  • Glue Gun
  • Stencils
  • Acrylic waxes
  • Texture paste
  • Chipboard tree embellishment
  • Black Archival Ink
  • Clear Embossing Powder
  • Heavy patterned cardstock
  • Printed quote or photo
  • Tissue or washi tape
  • Black gesso
  • Metallic acrylic paint

Prep-work:
1. Stamp your image onto heavy cardstock and emboss with embossing powder and heat.
2.Choose a patterned paper and cut to fit in your frame.
3.Adhere your quote or picture to the patterned cardstock.

 4. Apply texture paste through a stencil on the sides.
5. Adhere your molded paper clay pieces.
6. I added some tissue tape to any blank spaces for a little extra fun, but this doesn't really show in the end so it is optional.
7. Cover the molded pieces and textured areas with black gesso.

8. Using a metallic paint , (I used green here) paint over the black areas. For the stenciled areas brush lightly.
9. Using another color in a metallic (turquoise was used here) lightly brush over the green areas.
I also added a molded clock here. (gesso in black)
10.Continue adding colors of your choice by lightly dry brushing onto the last until you achieve the color effect you like.

This was my result after adding a bit of black, purple,bronze, and more of the previous colors.

All that's left to do now is add your tree or other embellishment, florals, and the stamped image!
Place your quote of choice in the frame or you could even put a picture in if you prefer!
 I hope you are inspired by my project today and are ready to get creative!!
Thanks For visiting!!

Remember to head over to Sin City Stamps and get your own beautiful stamps to create with and please visit our Fan Page.
 There are endless possibilities awaiting you!


Tuesday, April 11, 2017

Time Is Running Out tag

Hello friends,

I am excited about today's project because I just love the Pocket Watch with Bat Wings stamp by Sin City Stamps.  I hope this project inspires you to create something meaningful to you as well.


Supplies:
Sin City Stamps:
  1.  Pocket Watch with Bat Wings 
  2.  Broken Wings Music Keys 
  3.  Knock on Wood 
  4.  Inks -in pumice stone/gray and shades of brown
  5. Gold and copper embossing powder
  6. Drip Drop die and Coffee Ring die
  7. Manila Tag
  8. Red cardstock
  9. Stencil
  10. Markers-shades of gray
  11. Foam Tape
  12. Crinkle Ribbon
    
Step 1:
Grey and brown inks onto tag.


Step 2: 
Place stencil over inked tag centering to your taste. Using a baby wipe cloth, wipe it back and forth, removing some ink- through the stencil to create a ghost effect.


Step 3: 
Emboss the music background stamp with gold.


Step 4: 
Emboss the wood grain background stamp with copper on red cardstock.


Step 5:
Die cut the Drip Drop from the embossed red cardstock.


Step 6: 
Die cut coffee rings in two sizes. Next ink blend the rings the same colors used on the tag background.


Step 7: 
Stamp the Pocket Watch with Bat Wings onto white cardstock.  Cut out the image.  Using the markers, color the image.  I used shades of gray.


Step 8:
Arrange the die cuts and stamped image onto the tag. Once happy with the placement adhere pieces to the tag.  I used foam tape under the Pocket Watch to give dimension. Lastly, add the crinkle ribbon to finish the tag.


I hope you enjoy making this project as much as I did.

Follow us on our Fan Page for more idea's!

Monday, April 10, 2017

Dream - Journal page

Hello Everyone, Shilpa here,
Today I am sharing a art journal page.
Enjoy!

Supplies:


Step by step Tutorial


1. Adhere Dictionary paper and few washi tapes on your blank journal page, then randomly apply the  gesso.


2. Stamp flower with  black archival ink onto the page.


3. Color the image with watercolors.


4. Finish off your page with a pretty piece of trim and a few buttons.

 
To shop Sin City stamps please visit:  http://sincitystamps.com/ 
and share your idea's on our Fan Group!

Thanks so much for stopping by!

Sunday, April 9, 2017

Get Book Marked......

Hi Everyone!


How did you all enjoy the "Sugar Skull" Blog Hop we had in March - lots of fun????? I loved creating with Michelle's Day of the Dead Sugar Skulls Stamp Set so I decided to play around with them some more and I made these colorful bookmarks to share with you today!!


Supplies List:
  • Sin City Stamp Set Day of the Dead Sugar Skulls
  • White paper or cardstock
  • Black Cardstock
  • Ink Sprays in colors of your choice
  • Black Archival ink & Black Stazon ink
  • Sticky Note Pad (big enough to stamp sugar Skulls) for masking
  • Colored string or raffia
  • Shrink Plastic
  • Colored Pencils
  • Heat gun & heatproof tray
  • General supplies: scissors, ruler, guillotine, double sided tape, glue, hole punch

Instructions:


1. Firstly you need to cut your white paper or card into strips for stamping on (you can leave as a whole sheet - ink spray and then cut to size - totally up to you!) You can cut any size you like - these are cut at 6cm width by 21cm in length which allows for 3 of the "skull" stamps overlapping. An alternative is to make your bookmarks shorter and just use 2 of the skulls!


2. Grab your ink sprays - any colors - remembering that lighter colors work best as they allow your stamped image to show clearly. You can mop up any excess spray with paper towel (the mop up paper towel makes for great backgrounds for other projects!!) Set these aside to dry while you work on the next step!


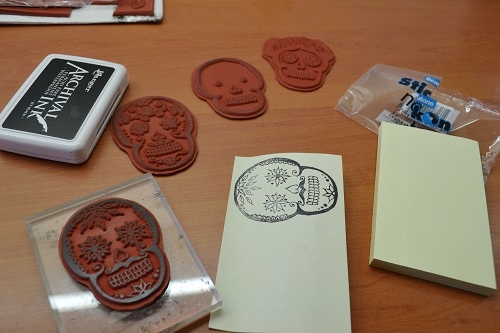
3. As you can see on the finished bookmarks the stamping of the skulls is overlapped so we need to make up some masks. Stamp skulls onto sticky note pad sheets and cut out - LOL remember to stamp part of your image onto the sticky part of the piece so it actually sticks to your project when masking!!!


4. When your ink sprayed pieces are dry you can start stamping!! Stamp one image in the middle of the strip and cover with the "mask" and then stamp skulls above and then below. I like things running off the page and at different angles for more interest!


5. Cut your black card slightly larger than your inked and stamped strips and adhere with double sided tape or a glue stick and punch a hole in the middle at the top of the book mark.


6. Now you can just add colored raffia or string to the tops of these bookmarks and call them finished but I still wanted to play with the stamps so I made some shrink plastic "additions" to add and what fun it was!!! Use black Stazon to stamp your shrink plastic (I had a small piece of clear plastic and also white - you can use whatever you have on hand - mine is years old but still shrinks perfectly!!)

Color images with colored pencils and cut out - remember to use your hole punch to punch a hole at the top so it can be threaded through after you have "shrunk" it!
Use your heat gun and a heat proof tray to shrink the plastic - shrinks to under half the original size.


7. Thread the colored raffia through the shrink plastic skulls and attached to the tops of the bookmarks, tie bows to finish them all off!
Now you have some bright and sweet sugar skull bookmarks!


Thanks for joining me today!!


And before I go here are some handy links for you!!
Sin City Stamps Store - where you can grab all your fav stamps!!!
Sin City Stamps Fan Group at Facebook - where we all can share our creations!!!
And of course here at The Blog where the DT share all their amazing creations!!!

Happy Stamping!

Sharon


Copyright Text

Blank Page Muse 2018 Sin City Stamps 2013